SweetFX: The enhancement that your ESO game is likely missing

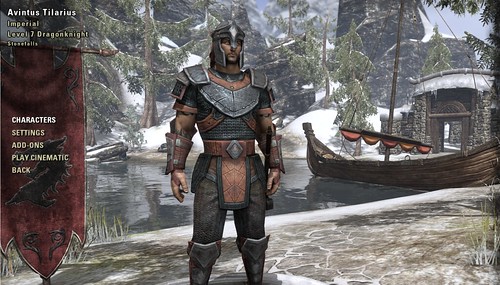
Some of you may be wondering what exactly SweetFX is and I am not really going to go into detail about it, other than to say that it is a third-party graphical enhancement software. It allows ESO to look more beautiful than you can imagine. I know, I know, it already looks fantastic on Ultra settings. Well, I agree, but after enabling SweetFX you will notice that vanilla ESO is faded. SweetFX will bring out the colors in the game.
The armor will be shinier, the water more translucent, and the sky and sun more radiant. In fact, once you have ESO with SweetFX working properly, you will never be able to play it without it again. I guarantee that.
Below is a step by step guide to get SweetFX set up properly on your PC. Follow every step exactly as it is described and you will be basking in the gorgeous world of Tamriel in a completely different light.
Note: This will require three downloads, all of which are perfectly safe. The first is RadeonPro, which is a utility for configuring ATI graphics cards (It will work with nVidia, as well). The second, of course, is SweetFX 1.4 (There is a 1.5, but it does not work in Windows 8.1. For this tutorial, we will stick to 1.4 to accommodate everyone.). Finally, we will need a SweetFX preset. The one that I use is called Perfection! A preset is a file that contains a particular configuration for SweetFX. There are many available, but for this tutorial, we will use the one that I do. In the future, you can follow the last few steps of this guide to add different SweetFX presets and determine which you like best.
NOTE: I added some screen shot comparisons. Please check them out.
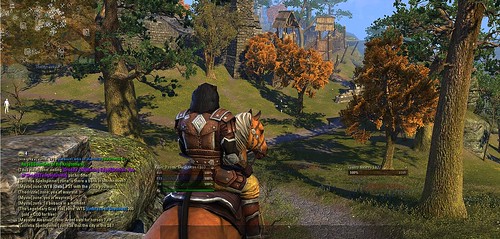
Comparison 1: Enabled
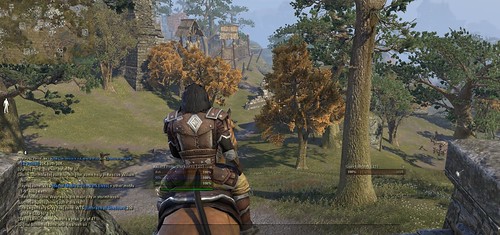
Comparison 1: Disabled
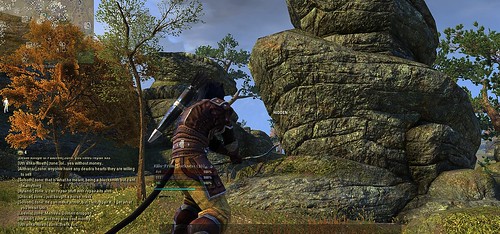
Comparison 2: Enabled
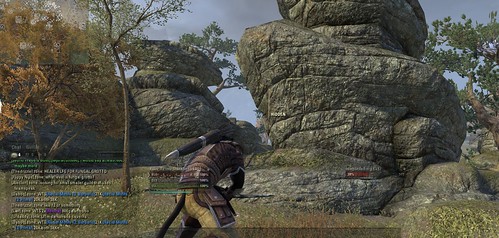
Comparison 2: Disabled
Comparison 3: Enabled

Comparison 3: Disabled
These screen shots cannot possibly show the extent to what SweetFX can do. To appreciate it entirely, one must see it in game.
Step 1: Download RadienPro
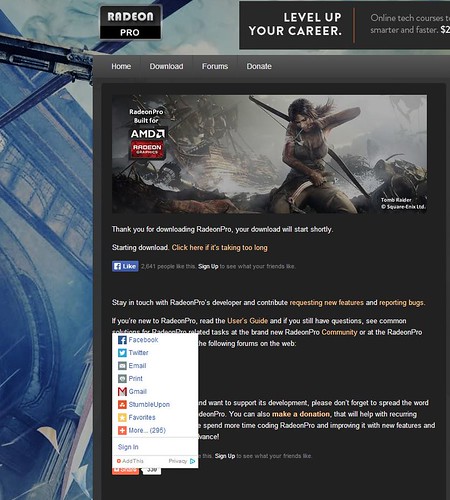
RadeonPro_Download_Screen
Step 2: Download SweetFX 1.5
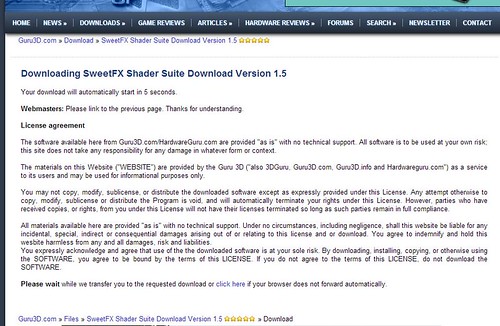
Click "I accept the agreement" and then click the Next button
Step 3: Create a new file to hold the preset data and call it "My_ESO_Preset.txt".
Step 4: Copy the text below into the empty file from Step 3. Save and close the file.
Step 5: Install RadeonPro. Step-by-step instructions below.
Screen 1
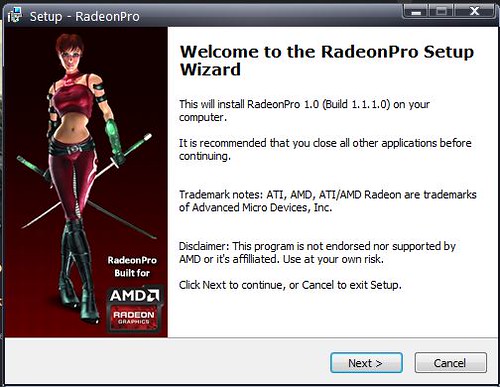
Click Next button
Screen 2

Check the I accept the agreement radio button and then click Next
Screen 3

Click Next button
Screen 4

Click Next button
Screen 5

Click Install button and wait for installation to complete.
Screen 6
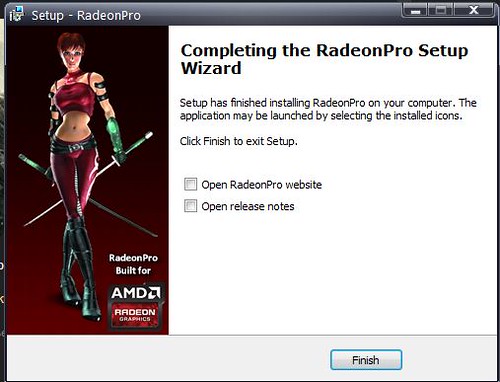
Uncheck "Open RadeonPro website" and click Finish button.
Step 6: Create a new folder on your desktop (or anywhere, as long as your remember where) and call it "SweetFX Files".
Step 7: Unzip the SweetFX archive (the file that ends in .7z) to the new directory.
Step 8: Open the new directory and view the files. It should like like the image below.
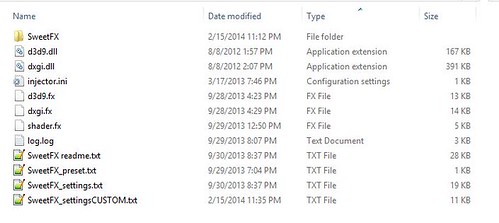
SweetFX_Folder
Step 9: Run RadeonPro as Administrator.
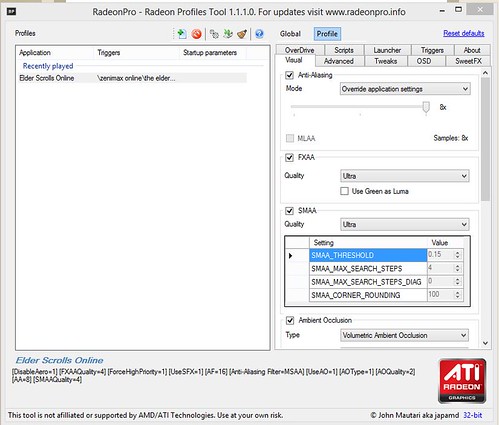
You'll notice that in the above image, the left column has "Elder Scrolls Online" under the Recently Played Section. Your copy will not have this just yet, so don't worry.
Step 10: Configure RadeonPro to enable SweetFX
Screen 1: Open configuration dialog
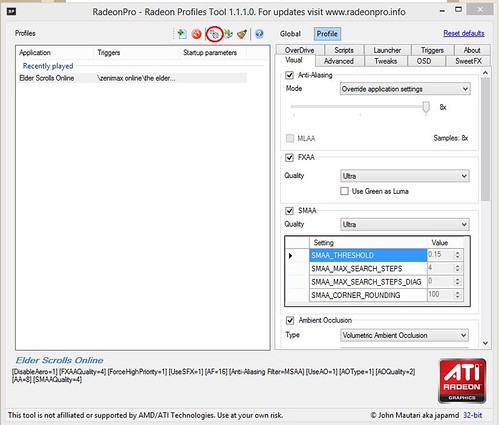
Click on the gears near the top of the screen. It is circled in the above image.
Screen 2: Tell RadeonPro where to find the SweetFX files
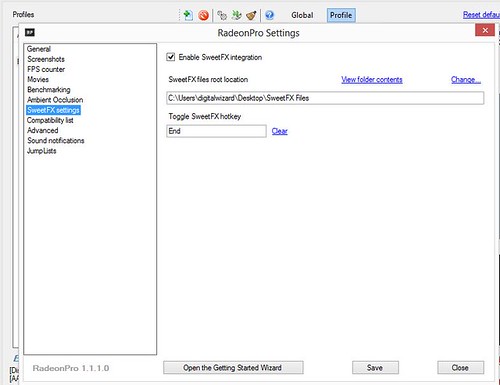
Click SweetFX Settings in the left-hand list. On the right-hand side, check Enable SweetFX integration and in the text box below enter in the path to the directory created in Step 5. See the image above for better understanding. Note: You can click "Change..." and search for the directory via the file explorer. Also, do not forget to set a key in the Toggle SweetFX hotkey box. Simply click in the box and press the key that you want to use in game to toggle SweetFX on or off. I use 'End'. Once you are done with all that click Save button.
Screen 3: Import the SweetFX Preset into RadeonPro
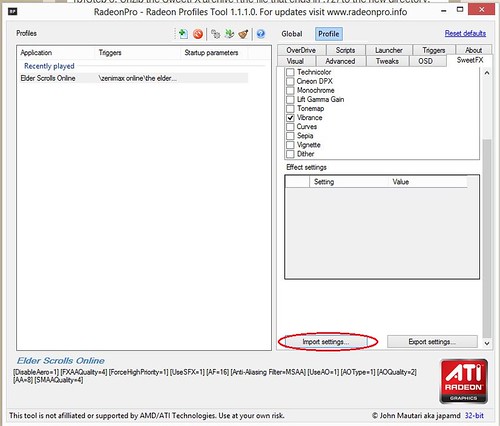
Click on the Sweet FX tab on the right-hand side. Check the Enable SweetFX box and scroll down to the bottom of this screen. Click the Import settings button. This will open a file explorer. Locate the preset that you created and saved in Steps 3 & 4 and click the Open button. If you scroll up, you should notice that there are several options checked in the "Effect to configure" section.
Screen 4: Configure the Visual tab

On this tab, make sure that FXAA is checked and Quality is not "Off". I set mine to Ultra, but you can select whichever your PC can handle. On this tab you can also check Anti-Aliasing, SMAA, Ambient Occlusion, Anti-Aliasing Filter, and Anisotropic Filtering. I don't claim to be a genius when it comes to these settings, so play around with them until they are what you are looking for.
Screen 5: Create an ESO game profile

Click the piece of paper icon with a plus sign on it located two icons to the left of the gears icon. (See above). Browse to the directory where your eso.exe file is and double click the game's executable. On my PC, this is "D:\Programs\Zenimax Online\The Elder Scrolls Online\game\client\eso.exe".
Screen 6: Apply the changes
Right click the profile under Recently played and select "Apply Now".
Step 10: Play the game!
Finally, we can play the game with the new graphical enhancements. The first time that you run the game, I recommend that you right click the profile and select "Play". However, as long as RadeonPro is running in the background (or minimized), you can safely run it from the Launcher (in order to get updates).
Enjoy.
Edited by digitalwizard on April 28, 2014 9:35PM The armor will be shinier, the water more translucent, and the sky and sun more radiant. In fact, once you have ESO with SweetFX working properly, you will never be able to play it without it again. I guarantee that.
Below is a step by step guide to get SweetFX set up properly on your PC. Follow every step exactly as it is described and you will be basking in the gorgeous world of Tamriel in a completely different light.
Note: This will require three downloads, all of which are perfectly safe. The first is RadeonPro, which is a utility for configuring ATI graphics cards (It will work with nVidia, as well). The second, of course, is SweetFX 1.4 (There is a 1.5, but it does not work in Windows 8.1. For this tutorial, we will stick to 1.4 to accommodate everyone.). Finally, we will need a SweetFX preset. The one that I use is called Perfection! A preset is a file that contains a particular configuration for SweetFX. There are many available, but for this tutorial, we will use the one that I do. In the future, you can follow the last few steps of this guide to add different SweetFX presets and determine which you like best.
NOTE: I added some screen shot comparisons. Please check them out.
Comparison 1: Enabled
Comparison 1: Disabled
Comparison 2: Enabled
Comparison 2: Disabled
Comparison 3: Enabled
Comparison 3: Disabled
These screen shots cannot possibly show the extent to what SweetFX can do. To appreciate it entirely, one must see it in game.
Step 1: Download RadienPro
RadeonPro_Download_Screen
Step 2: Download SweetFX 1.5
Click "I accept the agreement" and then click the Next button
Step 3: Create a new file to hold the preset data and call it "My_ESO_Preset.txt".
Step 4: Copy the text below into the empty file from Step 3. Save and close the file.
/*******************************************
*
* This file has been generated by RadeonPro
* from a user defined profile
*
* http://www.radeonpro.info
*
*******************************************/

#define USE_SMAA_ANTIALIASING 1
#define USE_LUMASHARPEN	1
#define USE_BLOOM	1
#define USE_HDR	1
#define USE_TECHNICOLOR	0
#define USE_DPX	0
#define USE_LIFTGAMMAGAIN	0
#define USE_TONEMAP	1
#define USE_VIBRANCE	1
#define USE_CURVES	1
#define USE_CARTOON	0
#define USE_ADVANCED_CRT	0
#define USE_MONOCHROME	0
#define USE_SEPIA	0
#define USE_VIGNETTE	0
#define USE_DITHER	0
#define USE_BORDER	0
#define USE_SPLITSCREEN	0

/*
 LumaSharpen settings
*/

#define sharp_strength	1.55 // [0.10 to 3.00] Strength of the sharpening
#define sharp_clamp	0.250 // [0.000 to 1.000] Limits maximum amount of sharpening a pixel recieves - Default is 0.035
#define pattern	2 // [1|2|3|4] Choose a sample pattern. 1 = Fast, 2 = Normal, 3 = Wider, 4 = Pyramid shaped.
#define offset_bias	1.0 // [0.0 to 6.0] Offset bias adjusts the radius of the sampling pattern.
#define show_sharpen	0 // [0 or 1] Visualize the strength of the sharpen (multiplied by 4 to see it better)

/*
 Bloom settings
*/

#define BloomThreshold	30.00 // [0.00 to 50.00] Threshold for what is a bright light (that causes bloom) and what isn't.
#define BloomPower	1.150 // [0.000 to 8.000] Strength of the bloom
#define BloomWidth	0.0150 // [0.0000 to 1.0000] Width of the bloom

/*
 HDR settings
*/

#define HDRPower	1.15 // [0.00 to 8.00] Strangely lowering this makes the image brighter
#define radius2	0.95 // [0.00 to 8.00] Raising this seems to make the effect stronger and also brighter

/*
 Technicolor settings
*/

#define TechniAmount	0.11 // [0.00 to 1.00]
#define TechniPower	2.8 // [0.00 to 8.00]
#define redNegativeAmount	0.88 // [0.00 to 1.00]
#define greenNegativeAmount	0.88 // [0.00 to 1.00]
#define blueNegativeAmount	0.88 // [0.00 to 1.00]

/*
 Cineon DPX settings
*/

#define Red	8.0 // [1.0 to 15.0]
#define Green	8.0 // [1.0 to 15.0]
#define Blue	8.0 // [1.0 to 15.0]
#define ColorGamma	2.5 // [0.1 to 2.5] Adjusts the colorfulness of the effect in a manner similar to Vibrance. 1.0 is neutral.
#define DPXSaturation	3.0 // [0.0 to 8.0] Adjust saturation of the effect. 1.0 is neutral.
#define RedC	0.20 // [0.60 to 0.20]
#define GreenC	0.20 // [0.60 to 0.20]
#define BlueC	0.20 // [0.60 to 0.20]
#define Blend	0.2 // [0.00 to 1.00] How strong the effect should be.

/*
 Lift Gamma Gain settings
*/

#define RGB_Lift	float3(1.000,1.000,1.000) // [0.000 to 2.000] Adjust shadows for Red, Green and Blue.
#define RGB_Gamma	float3(1.000,1.000,1.000) // [0.000 to 2.000] Adjust midtones for Red, Green and Blue
#define RGB_Gain	float3(1.000,1.000,1.000) // [0.000 to 2.000] Adjust highlights for Red, Green and Blue

/*
 Tonemap settings
*/

#define Gamma	1.0 // [0.000 to 2.000] Adjust midtones. 1.000 is neutral. This setting does exactly the same as the one in Lift Gamma Gain, only with less control.
#define Exposure	0.00 // [-1.000 to 1.000] Adjust exposure
#define Saturation	0.00 // [-1.000 to 1.000] Adjust saturation
#define Bleach	0.00 // [0.000 to 1.000] Brightens the shadows and fades the colors
#define Defog	0.000 // [0.000 to 1.000] How much of the color tint to remove
#define FogColor	float3(0.00,0.00,2.55) // [0.00 to 2.55, 0.00 to 2.55, 0.00 to 2.55] What color to remove - default is blue

/*
 Vibrance settings
*/

#define Vibrance	0.40 // [-1.00 to 1.00] Intelligently saturates (or desaturates if you use negative values) the pixels depending on their original saturation.

/*
 Curves settings
*/

#define Curves_contrast	0.25 // [-1.00 to 1.00] The amount of contrast you want
#define Curves_formula	7 // [1|2|3|4|5|6|7|8|9|10] The contrast s-curve you want to use.

/*
 Cartoon settings
*/

#define CartoonPower	1.0 // [0.1 to 10.0] Amount of effect you want.

/*
 Advanced CRT settings
*/

#define CRTAmount	1.00 // [0.00 to 1.00]  Amount of CRT effect you want
#define CRTResolution	1.2 // [1.0 to 8.0]    Input size coefficent (low values gives the "low-res retro look"). Default is 1.2
#define CRTgamma	2.4 // [0.0 to 4.0]    Gamma of simulated CRT (default 2.2)
#define CRTmonitorgamma	2.2 // [0.0 to 4.0]    Gamma of display monitor (typically 2.2 is correct)
#define CRTBrightness	1.0 // [1.0 to 3.0]    Used to boost brightness a little. Default is 1.0
#define CRTScanlineIntensity	2.0 // [2.0 to 4.0]    Scanlines intensity (use integer values preferably). Default is 2.0
#define CRTScanlineGaussian	1 // [0 or 1]        Use the "new nongaussian scanlines bloom effect". Default is on
#define CRTCurvature	1 // [[0 or 1]          "Barrel effect" enabled (1) or off (0)
#define CRTCurvatureRadius	1.5 // [0.0 to 2.0]       Curvature Radius (only effective when Curvature is enabled). Default is 1.5
#define CRTCornerSize	0.0010 // [0.0000 to 0.0020] Higher values, more rounded corner. Default is 0.001
#define CRTDistance	2.00 // [0.00 to 4.00]     Simulated distance from viewer to monitor. Default is 2.00
#define CRTAngleX	0.00 // [-0.20 to 0.20]    Tilt angle in radians (X coordinates)
#define CRTAngleY	-0.10 // [-0.20 to 0.20]    Tilt angle in radians (Y coordinates). (Value of -0.15 gives the 'arcade tilt' look)
#define CRTOverScan	1.01 // [1.00 to 1.10]     Overscan (e.g. 1.02 for 2% overscan). Default is 1.01
#define CRTOversample	0 // [0 or 1]           Enable 3x oversampling of the beam profile (warning : performance hit)

/*
 Monochrome settings
*/

#define Monochrome_conversion_values	float3(0.18,0.41,0.41) // [0.00 to 1.00] Percentage of RGB to include (should sum up to 1.00)

/*
 Sepia settings
*/

#define ColorTone	float3(1.40,1.10,0.90) // [0.00 to 2.55, 0.00 to 2.55, 0.00 to 2.55] What color to tint the image
#define GreyPower	0.11 // [0.00 to 1.00] How much desaturate the image before tinting it
#define SepiaPower	0.58 // [0.00 to 1.00] How much to tint the image

/*
 Vignette settings
*/

#define VignetteRatio	1.00 // [0.15 to 6.00]  Sets a width to height ratio. 1.00 (1/1) is perfectly round, while 1.60 (16/10) is 60 % wider than it's high.
#define VignetteRadius	1.00 // [-1.00 to 3.00] lower values = stronger radial effect from center
#define VignetteAmount	-1.00 // [-2.00 to 1.00] Strength of black. -2.00 = Max Black, 1.00 = Max White.
#define VignetteSlope	8 // [2 to 16] How far away from the center the change should start to really grow strong (odd numbers cause a larger fps drop than even numbers)
#define VignetteCenter	float2(0.500,0.500) // [0.000 to 1.000, 0.000 to 1.000] Center of effect for VignetteType 1. 2 and 3 do not obey this setting.

/*
 Dither settings
*/

#define dither_method	1 // [1 or 2] 1 = Ordered dithering (very good and very fast), 2 = Random dithering (different but slightly slower dithering)

/*
 Border settings
*/

/*
 Splitscreen settings
*/

#define splitscreen_mode	1 // [1|2|3|4|5|6]  1 = Vertical 50/50 split, 2 = Vertical 25/50/25 split, 3 = Vertical 50/50 angled split, 4 = Horizontal 50/50 split, 5 = Horizontal 25/50/25 split, 6 = Curvy vertical 50/50 split
Step 5: Install RadeonPro. Step-by-step instructions below.
Screen 1
Click Next button
Screen 2
Check the I accept the agreement radio button and then click Next
Screen 3
Click Next button
Screen 4
Click Next button
Screen 5
Click Install button and wait for installation to complete.
Screen 6
Uncheck "Open RadeonPro website" and click Finish button.
Step 6: Create a new folder on your desktop (or anywhere, as long as your remember where) and call it "SweetFX Files".
Step 7: Unzip the SweetFX archive (the file that ends in .7z) to the new directory.
Step 8: Open the new directory and view the files. It should like like the image below.
SweetFX_Folder
Step 9: Run RadeonPro as Administrator.
You'll notice that in the above image, the left column has "Elder Scrolls Online" under the Recently Played Section. Your copy will not have this just yet, so don't worry.
Step 10: Configure RadeonPro to enable SweetFX
Screen 1: Open configuration dialog
Click on the gears near the top of the screen. It is circled in the above image.
Screen 2: Tell RadeonPro where to find the SweetFX files
Click SweetFX Settings in the left-hand list. On the right-hand side, check Enable SweetFX integration and in the text box below enter in the path to the directory created in Step 5. See the image above for better understanding. Note: You can click "Change..." and search for the directory via the file explorer. Also, do not forget to set a key in the Toggle SweetFX hotkey box. Simply click in the box and press the key that you want to use in game to toggle SweetFX on or off. I use 'End'. Once you are done with all that click Save button.
Screen 3: Import the SweetFX Preset into RadeonPro
Click on the Sweet FX tab on the right-hand side. Check the Enable SweetFX box and scroll down to the bottom of this screen. Click the Import settings button. This will open a file explorer. Locate the preset that you created and saved in Steps 3 & 4 and click the Open button. If you scroll up, you should notice that there are several options checked in the "Effect to configure" section.
Screen 4: Configure the Visual tab
On this tab, make sure that FXAA is checked and Quality is not "Off". I set mine to Ultra, but you can select whichever your PC can handle. On this tab you can also check Anti-Aliasing, SMAA, Ambient Occlusion, Anti-Aliasing Filter, and Anisotropic Filtering. I don't claim to be a genius when it comes to these settings, so play around with them until they are what you are looking for.
Screen 5: Create an ESO game profile
Click the piece of paper icon with a plus sign on it located two icons to the left of the gears icon. (See above). Browse to the directory where your eso.exe file is and double click the game's executable. On my PC, this is "D:\Programs\Zenimax Online\The Elder Scrolls Online\game\client\eso.exe".
Screen 6: Apply the changes
Right click the profile under Recently played and select "Apply Now".
Step 10: Play the game!
Finally, we can play the game with the new graphical enhancements. The first time that you run the game, I recommend that you right click the profile and select "Play". However, as long as RadeonPro is running in the background (or minimized), you can safely run it from the Launcher (in order to get updates).
Enjoy.
"My name is digitalwizard and I am an ESO addict!"
11
-
 Marovec✭✭✭While I am sure this is every bit as fantastic as you suggest, can we get some comparison shots?0
 -
My apologies. I was trying to get it up and forgot all about comparisons. I added some comparisons to the OP.Edited by digitalwizard on April 28, 2014 9:35PM"My name is digitalwizard and I am an ESO addict!"1
-
Is it safe? Can anyone from ESO staff post here his opinion about using mods like this?
This is mmorpg and this kind of mod is a 3th party program which some multiplayer games are banning for so would be nice if we can proper confirmation from Dev's if we can sue it without harm for our accounts.0 -
It is 100% safe and allowed. Of course, you do not have to take my word for it. Perhaps an ESO elder can post affirming this, but here is also a post from reddit of a conversation between another user and an ESO elder.
http://www.reddit.com/r/elderscrollsonline/comments/1zsxmk/my_sweetfx_preset/"My name is digitalwizard and I am an ESO addict!"1 -
catabuca✭Glad to see people making SFX presets, good job OP.
I just wanted to add that RadeonPro is no longer needed to run SweetFX. The author of ESO Launcher produced a version of SFX 1.5 that works just like SFX usually does - you throw the files in the same folder as your eso.exe and off you go.
I've made my own preset if anyone is at all interested. It isn't as vibrant as the OP's, and it uses the fixed 1.5, and therefore doesn't need RadeonPro. As the OP notes though, 1.5 may not work in Win8 for everyone. If you want to use my preset with RadeonPro you can follow the OP's steps and just transfer over my settings instead. Options!!
There's a link to it here, and a bunch of comparison screenshots: http://www.reddit.com/r/elderscrollsonline/comments/247tak/sweetfx_the_enhancement_that_your_eso_game_is/ch4iuhbEdited by catabuca on April 28, 2014 10:43PM1 -
catabuca✭LukeFRAGWARS wrote: »Where i can download version which works without radeonpro?
There's a link to my preset with that version in the post directly above yours. You can use my settings or make your own.
1 -
Well it did crash for me ;/ Should all file be droped into folder where eso.exe is?Edited by LukeFRAGWARS on April 29, 2014 12:20AM0
-
catabuca✭LukeFRAGWARS wrote: »Well it did crash for me ;/ Should all file be droped into folder where eso.exe is?
Yes. Everything inside the main folder (so the .dll, the settings, the injector, the SweetFX folder, etc.) should all be pasted inside the folder that contains your eso.exe.
Some users report this version doesn't work with Win8, in which case you'll have to stick with RadeonPro.
Edit: here's a picture of my installation directory so you can see what it should look like with the files in there: https://db.tt/hxJtWjUIEdited by catabuca on April 29, 2014 12:30AM0 -
 Theron75✭✭Looks like an amateurish Photoshop filter that just over-sharpens and saturates color.Edited by Theron75 on April 29, 2014 12:57AM5
 -
catabuca✭Looks like an amateurish Photoshop filter than just over-sharpens and saturates color.
Settings can be whatever you want them to be. Some people go for really saturated stuff, others go for more subtle things. The issue isn't SweetFX, it's all about taste and the settings you choose for yourself.
0 -
LukeFRAGWARS wrote: »Well it did crash for me ;/ Should all file be droped into folder where eso.exe is?
Yes. Everything inside the main folder (so the .dll, the settings, the injector, the SweetFX folder, etc.) should all be pasted inside the folder that contains your eso.exe.
Some users report this version doesn't work with Win8, in which case you'll have to stick with RadeonPro.
Edit: here's a picture of my installation directory so you can see what it should look like with the files in there: https://db.tt/hxJtWjUI
Ok it works somehow now, btw... do i need to stop and start game after each change in ini files or there is a way to implement changes on the fly while game is running?Edited by LukeFRAGWARS on April 29, 2014 2:16AM0 -
LukeFRAGWARS wrote: »LukeFRAGWARS wrote: »Well it did crash for me ;/ Should all file be droped into folder where eso.exe is?
Yes. Everything inside the main folder (so the .dll, the settings, the injector, the SweetFX folder, etc.) should all be pasted inside the folder that contains your eso.exe.
Some users report this version doesn't work with Win8, in which case you'll have to stick with RadeonPro.
Edit: here's a picture of my installation directory so you can see what it should look like with the files in there: https://db.tt/hxJtWjUI
Ok it works somehow now, btw... do i need to stop and start game after each change in ini files or there is a way to implement changes on the fly while game is running?
I believe that you have to restart the game. If you find an alternative, I'd appreciate it if you'd share. However, I have not found a way to apply the changes while the game runs."My name is digitalwizard and I am an ESO addict!"0 -
 AreoHotah✭✭✭✭Sorry but i have type this in caps. I ABSOLUTELY LOVE IT.
also OP you made it look very hard and complicated to instal. it took me 2 minutes and it will probably take me 3 minutes and 4 lines to explain how to.
that wall of text is unecessaryEdited by AreoHotah on April 29, 2014 7:46AMHota'h, Dual-wield/bow full medium armor NB Khajiit from day 1.
https://imageshack.com/i/p2rF313Qj/b]0 -
Dxtory doesn't work with this mod for some reasons while Fraps does. Shame because i am recording videos with Dxtory ;/0
-
crai7er_boy_4lif3b16_ESO wrote: »Sorry but i have type this in caps. I ABSOLUTELY LOVE IT.
also OP you made it look very hard and complicated to instal. it took me 2 minutes and it will probably take me 3 minutes and 4 lines to explain how to.
that wall of text is unecessary
I am a professional developer and I deal with people who don't know how to click a button, let alone configure something like this. I'm used to having to hold peoples' hands. I was not intending to make anyone feel dumb or insignificant.
Glad you love it, though!"My name is digitalwizard and I am an ESO addict!"3 -
0
-
Is it possible to implement in game UI similar to the one in skyrim where we could change everything on the fly while game is running?
Btw... is there a way to boost only green color without bumping while pallet with saturation?Edited by LukeFRAGWARS on April 29, 2014 2:19PM0 -
Hello, I am one of those hand holders. Can you tell me where I am suppose to
"Step 3: Create a new file to hold the preset data and call it "My_ESO_Preset.txt".
Is on my desktop ok? I have win7 also.
Thank you in advance.
Yes. On your desktop is fine. It can be anywhere that you like. You just need to know where it is. I personally put it into the SweetFX\presets directory in the SweetFX Files directory. For instance, if I have the SweetFX files in "C:\SweetFX Files" then I would put my preset in C:\SweetFX Files\SweetFX\presets\. Hope that helps."My name is digitalwizard and I am an ESO addict!"0 -
LukeFRAGWARS wrote: »Is it possible to implement in game UI similar to the one in skyrim where we could change everything on the fly while game is running?
Btw... is there a way to boost only green color without bumping while pallet with saturation?
I personally do not know. I am just trying to pass along something that I feel personally made my ESO much better. As far as configurations and all that, you will need to experiment or perhaps a viewer of the forums will be able to help you. I am sorry.
In my case, I just kept tweaking settings until I found the one that I wanted. It is of very important not also to make sure that your GAMA is set properly in game. Go to video settings and click "Calibrate". Make sure the middle image is barely visible. My screen was extremely dark and I couldn't figure out what was going on until I fixed the GAMA. Hope you figure out your answer."My name is digitalwizard and I am an ESO addict!"0 -
LukeFRAGWARS wrote: »Dxtory doesn't work with this mod for some reasons while Fraps does. Shame because i am recording videos with Dxtory ;/
As far as compatibility, I have had no issues with anything. The only issue that I ever run into is when I click "Quit" in Elder Scrolls Online. It usually crashes, but it doesn't matter as it always starts up again just fine. Perhaps someone can come up with a hack or tweak that will allow you to use it with Dxtory."My name is digitalwizard and I am an ESO addict!"0 -
catabuca✭Q: Do I need to restart the game for changes to take effect?
A: I don't know about the RadeonPro version, but certainly if you're using 1.5 without RadeonPro (and in fact any 'normal' version of SweetFX in any other game) you do NOT need to restart the game. You can simply press the key that has been assigned for reloading the shaders (it is usually Pause by default - in my preset linked above it is Scroll Lock). You can see these keybinds and change them if you want in the injector.ini file. The screenshot key is there as well, and the button to toggle the effect on and off while in game.
Q: Can we get a UI window to edit in game like ENB has?
A: That would be something that would have to be coded into the SFX program itself by CeeJay (the original author of SFX) or someone else who knows what they're doing. It's not currently possible, and I don't know if it ever would be possible.0 -
- I've noticed that if you Alt-TAB and run Fraps when game is running with SFX changes it will all reverse to old look.
- When i take in game screenshots (PrtScn) they are normal without changes and yet my game is colorfull and so on lol
- So far i couldn't make Dxtory to work with SFX enabled (btw. it 2.0.122 ver.).
Ps. I do enjoy more greenish environment so it'a semi-wina at least.0 -
catabuca✭Screenshots: In order to make screenshots show up with the SFX effects present you need to use SFX's own screenshot key. I think Fraps should capture it as well, but I'm not sure. ESO's in-game screenshot function will NOT capture the SFX effects. Edit: SFX screenshots will be saved to your game folder (the folder with eso.exe), and NOT to your in-game screenshots folder in MyDocs.
Alt+Tab: Does using the reload shaders key and/or the toggle key make it come back on again?
DXtory: I'm afraid I don't use that so I can't offer any advice. I know ENBs generally can have problems with some overlay programs, and since ENBs use d3d9.dll just like SFX does, perhaps that's the root of the problem?
Green: Are you using my preset or the one in the OP? If you're using mine and you want to bring back more green, find LIFTGAMMAGAIN in sweetfx_settings.txt, and gradually increase the middle value for each line until you get what you want. You can decrease the value for the first and last numbers as well to lower the red/blue in the scene. You might end up losing some of the overall depth and clarity though.
To clarify:
under LIFTGAMMAGAIN, the bold numbers directly control the level of green.
#define RGB_Lift float3(0.990, 0.975, 1.010)
#define RGB_Gamma float3(0.990, 0.990, 1.000)
#define RGB_Gain float3(0.990, 0.990, 0.990)Edited by catabuca on April 29, 2014 5:21PM0 -
catabuca✭For those who are interested, some more screenshots of my preset:
http://pictureamoebae.tumblr.com/post/84236577659/locations-in-tamriel-you-can-download-my-sweetfx
There is a download link to the preset in that post, along with links to multiple screenshot comparisons.1 -
 Brutalis✭✭I know the OP stated it works with Nvidia and I have yet to try this, but has there been any issues with Nvidia cards?
Im running a 4GB GTX770A Roman walks into a bar and hold up two fingers and says, "I'll have five beers please."0 -
Green: Are you using my preset or the one in the OP? If you're using mine and you want to bring back more green, find LIFTGAMMAGAIN in sweetfx_settings.txt, and gradually increase the middle value for each line until you get what you want. You can decrease the value for the first and last numbers as well to lower the red/blue in the scene. You might end up losing some of the overall depth and clarity though.
To clarify:
under LIFTGAMMAGAIN, the bold numbers directly control the level of green.
#define RGB_Lift float3(0.990, 0.975, 1.010)
#define RGB_Gamma float3(0.990, 0.990, 1.000)
#define RGB_Gain float3(0.990, 0.990, 0.990)
Actually using LIFTGAMMAGAIN is bad for what i want to do.
What i did to make environment more colorful (not just whole screen like LiftGamma is doing it) it was using VIBRANCE settings:
#define Vibrance 0.4
#define Vibrance_RGB_balance float3(-0.10, 3.00, 1.00)
+
LumaSharpen:
#define sharp_strength 0.90
#define sharp_clamp 0.035
*** everything else is turned off (SMAA ofc. ON)
Slideshow with two comparisons (there is no LumaSharpen incl. in these screens):
s1174.photobucket.com/user/lukefragwars/slideshow/
Edited by LukeFRAGWARS on April 29, 2014 8:08PM1 -
meyers2479ub17_ESOSoul ShrivenStep 10 - I can't check the enable SweetFX box in the SweetFX tab to do the import. Any ideas?0
