Maintenance for the week of August 10:
• [COMPLETE] NA megaservers for patch maintenance – August 10, 4:00AM EDT (8:00 UTC) - 12:00PM EDT (16:00 UTC)
• [COMPLETE] EU megaservers for patch maintenance – August 10, 8:00 UTC (4:00AM EDT) - 16:00 UTC (12:00PM EDT)
• [COMPLETE] NA megaservers for patch maintenance – August 10, 4:00AM EDT (8:00 UTC) - 12:00PM EDT (16:00 UTC)
• [COMPLETE] EU megaservers for patch maintenance – August 10, 8:00 UTC (4:00AM EDT) - 16:00 UTC (12:00PM EDT)
Need Festering Timelines tips

This achievement is crazy hard. There's a massive discrepancy between this and the other two dungeon achievements. The furthest we got was like 40%. The issue is the first dragon just dies after the third one spawns. It's hard to kill scarabs and archers while not damaging the dragon. We tried 2 tanks 2 dds, flame and lightning aura. It worked great actually, but then the first dragon died. It's always super low hp after the third spawns.
0
-
 Soarora✭✭✭✭✭
✭✭✭✭✭I did this 1T, 2D, 1H. We got the buff from a sorrow’s friend faceted, the oddity in skittering, the race in parch, and parch faceted. I (tank) stood far from the boss, so my flame aura wasn’t really hitting the dragons. If you’re using fatecarver, aim down or sideways, not through and into the dragon.[PC/NA] Dungeoneer (Tank/DPS), Semi-retired Trialist, and amateur Battlegrounder (DPS) with a passion for The Elder Scrolls lore.
Current GM of Hard Dungeoneers
Tanks: Sorcerer - Necromancer - Templar
DPS: Frost Warden - Stamarc - StamDK - Hybrid NB Healer
Ex-Healer: Warden - Arcanist
Dungeons: 34/34 HMs - 28/28 Tris0 -
But how did you do it? Where were you standing while tanking both the dragons and the boss? We had two tanks, one held boss one held dragons, is it better for one to hold boss and 1 dragon?0
-
Soarora✭✭✭✭✭
✭✭✭✭✭seventhirtyseven_ wrote: »But how did you do it? Where were you standing while tanking both the dragons and the boss? We had two tanks, one held boss one held dragons, is it better for one to hold boss and 1 dragon?
I ran around the middle of the arena in a circle while the DPS and healer stood by the wall. I have tried two tanks one time and iirc they took boss and the last dragon and I took the other two. Didn’t clear it that way so take with some salt.[PC/NA] Dungeoneer (Tank/DPS), Semi-retired Trialist, and amateur Battlegrounder (DPS) with a passion for The Elder Scrolls lore.
Current GM of Hard Dungeoneers
Tanks: Sorcerer - Necromancer - Templar
DPS: Frost Warden - Stamarc - StamDK - Hybrid NB Healer
Ex-Healer: Warden - Arcanist
Dungeons: 34/34 HMs - 28/28 Tris0 -
 emilyhyoyeon✭✭✭✭✭
✭✭✭✭My group and I managed this without any NM buffs. We tried 1T 1H 2DD for an hour, then 2T 2DD, and finished with that comp.
We tried 1T holding all three dragons for awhile, but 1T holding two dragons and 1T holding the final dragon and the main boss worked in the end.
I was the tank who did the boss + last dragon for many attempts, but I swapped to doing the first 2 dragons and we got it first try (much easier). I'm mentioning this because I think tank class (passives) and skills mattered a lot. This was before Class Mastery passives, FTR.
I was pure sorcerer tank, other tank was arc+warden+(IIRC) dragonknight. The other tank naturally had better group support passives and skills on that alone (evasion, toughness, etc) consistently applied by always being close to the group without needing to worry about also kiting the scarabs. + he was also spamming polar wind which hits more consistently designwise on others compared to vibrant shroud I was using.
The general gameplay strategy: after all 3 dragons came up, non-group tank (me) would regularly run into the group when hit by scarabs so 1-they died to the DD aoes and 2-get buffs and heals from the other tank.
I'd also make sure to get off my own support skills/buffs at this time before running back away a bit before more scarabs spawn (so that I'd be away and could kite them back in). Applying minor vitality + burst heal on group and major maim on main boss with vibrant shroud, for ex.IGN @ emilypumpkin
Tullanisse Starborne altmer spellsword battlemage & scholar of the ayleids
Qa'Rirra khajiit assassin & dancer
Seliwequen Narilata altmer necromancer & debaucher1 -
 heaven13✭✭✭✭✭
✭✭✭✭My group did 3 DDs, 1 T. We tried 1|1|2 and discussed 2|2 but the first ended up working the best. We had multiple NM buffs (fire aura, tempest, swift gale, and transfusion). One of the DDs and I, as tank, both had Healthy Bargain as well because we happened to be near the skirmish while we were waiting on the other 2 to log in for the evening. My tank is mostly sorc, with some necro skills. I also was using Leeching. I stayed mostly in the middle of the arena, kiting the scarabs around (who died pretty quickly most of the time to the AoE damage).
I will say we ALMOST failed. Fake Z'maja died just before one of the dragons was about to keel over. Leeching probably didn't help, particularly with all the other buffs but we did it.PC/NAMountain God | Leave No Bone Unbroken | Apex Predator | Pure Lunacy | Depths Defier | No Rest for the Wicked | In Defiance of DeathMeet my characters :
Defanged the Devourer | Nature's Wrath | Relentless Raider | True Genius | Bane of Thorns | Subterranean Smasher | Ardent Bibliophile
vAA HM | vHRC HM | vSO HM | vDSA | vMoL HM | vHoF HM | vAS+2 | vCR+2 | vBRP | vSS HM | vKA | vRGIT DOESN'T MATTER BECAUSE THEY'RE ALL THE SAME NOW, THANKS ZOS0 -
 Gabriel_H✭✭✭✭✭
✭✭✭✭One Tank. Max survival spec. Flame circle. Range taunt dragons. Boss only needs taunting once at the start then keep away from them. A DD needs to slot Ele Sus for use on the boss. Healer or 3rd DD. If healer they ignore the tank. If DD they slot some self heals. Tank cannot use damage skills other than flame aura to kill the adds away from the dragons, and only use low damage range taunt with no penetration at all.
When I say max survival, I mean MAX: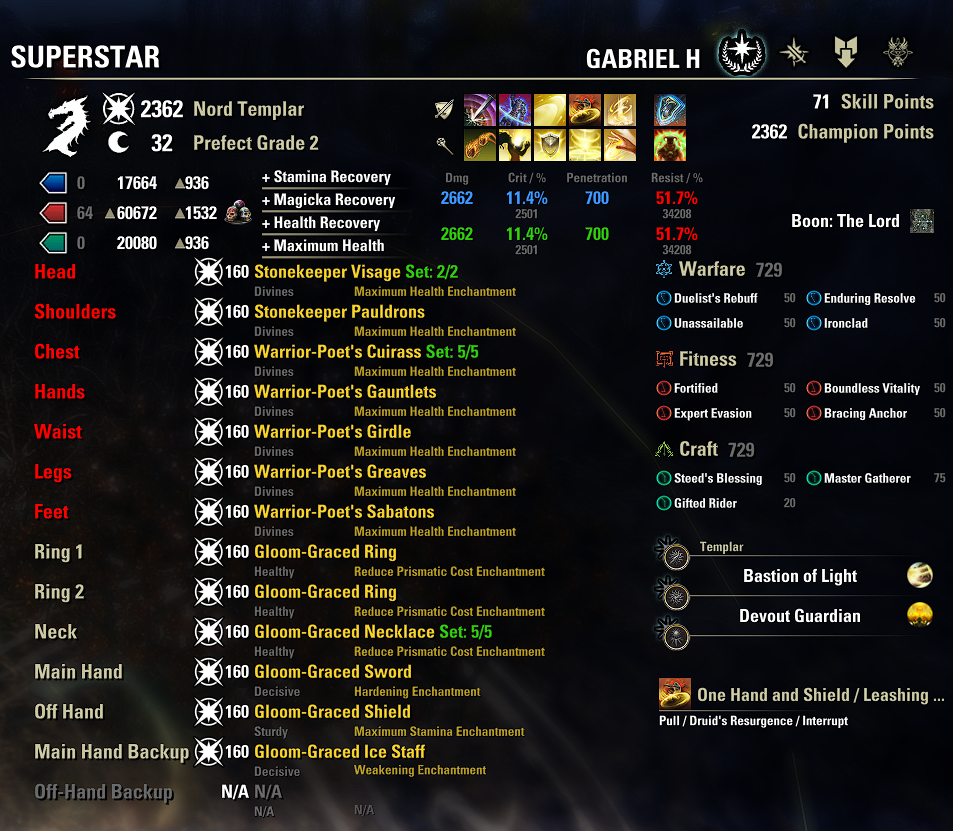
0 -
Lekjih✭✭✭✭We did 1 tank, 1 healer and 2 dd with skittering oddity and parch race buffs, faceteds were bugged at the time, and one banged it, pretty sure healer had a taunt so tank could focus on managing adds around them. Have helped others get it since and faceted from Sorrow also helps.698d played, 267 days on the Warden.
ZOS won't give us Bard class so I'm scribbling songs for Nirn irl.0 -
 frogthroat✭✭✭✭✭
✭I've done it a few times ranging from 2t 2dd with flame aura to 1t 1h 2dd no buffs and I can say that the toughest, most difficult part in this fight is the evil overlord Constant de Sync. You can't fight lord de Sync. Lord de Sync will get you no matter what you do.1 -
 Lokiator✭✭✭I did it with the one tank, one healer, and two DD. We used the buffs from Skittering oddity and the Parch race.
The tank held the dragons and used the flame aura buff to kill the scarabs. The healer mostly focused on keeping the tank alive, but helped the DDs during the curse phase, and dropped Tempest near the boss when possible. The DDs used both buffs while damaging the boss.
The important part was managing the damage, especially the Sapping Mark curse. The curse is applied when boss hits 45% It sets your health to 50% and damages you every 1.5s. The first tick of damage is 2.5% max health, the next 5.0%, the next 7.5%, and so on. Ignore the curse and you're dead in seconds.
To get rid of the curse, you NEED to heal back to 100%. DDs had to mitigate other damage (block the necrotic swarms, kite the aoe damage from the boss, avoid the aoe from the dragons) while trying to get to 100% to shake the curse. Damage shields helped a lot for that. We used Reviving Barrier. Pop the shield, use your self heal (Vigor), use a potion, get some assistance from the healer and shake that curse.
Every time we tried to just burn the boss, the DDs were dead by the time the boss hit 35% because we weren't dealing with Sapping Mark properly. Get rid of that curse, mitigate the other incoming damage (block, kite, avoid) and damage the boss slow and steady.1 -
 SolarRune✭✭✭✭2T (one hold slug has resto back bar for heals, made sure to use warden shield and absorb missile to be able to eat all slug attacks apart from kiteable). One tank holds dragons, othe holds slug.
2DDs focus slug and clear little adds.
The fire circle from the spider mini game helps alot on small trash and the beetles on the dragon tank.0 -
 code65536✭✭✭✭✭
✭✭✭✭✭(I had originally posted this in another thread.)
I've done this achievement on 5 different accounts, with 5 different groups (I have a number of alt accounts lol), each time as a tank, and here is what worked most consistently for me...- Useful skills to have:
- Shimmering Shield (Winter's Embrace), for dragon light attacks and for the main boss's heavy attack in execute; I basically try to keep this up 100% in execute
- Polar Wind (Winter's Embrace), for a bursty self-heal
- Siphoning Attacks (Siphoning), for sustain
- Hearth and Home (Ardent Flame), for a 70% snare AoE for the scarabs
- Soul of Flame (Ardent Flame), for an AoE interrupt for taking aim
- Shield Discipline (One Hand and Shield), for 6-8s worth of breathing room (its cheap cost paired with Shimmering's ultigen means I get to use this multiple times)
- Useful buffs:
- Flame Aura, to help thin out the army of skeletons
- Boulder Bash, to help thin out (and CC/interrupt) the army of skeletons
- Tempest, because why not, it's right there next to the boulder thing
- We get the Flame Aura in Skittering, then go to Parch and do the Boulder and Unstable Creatia that are in the southeast before heading to the dungeon. The southeast boulder is super-easy, just need to keep green and yellow paddles up at all times and ignore red and blue.
My groups were 1T 1H 2DD; the DDs ignored the adds and just focused the boss, while the healer kept an eye on everyone (and threw me burst heals when Sapping Mark is applied in execute). The only adds that the DDs kill are the melee adds that aggro onto them. The ranged adds, the scarabs, and any melee adds that aggro to me are the reasons why I have flame aura (to kill them), tempest (to kill them), boulder (to CC them and to kill them), and soul of flame (to interrupt taking aim, if a boulder is not available). Since the DDs are focusing boss and ignoring adds, the only damage that the dragons take are from my buffs, and that's not enough damage to kill a dragon.
No, I don't taunt the adds, only the dragons. The boss seems to keep aggro even when taunt expires, which is good because while I do try to maintain taunt on the boss, in execute when there's a bunch of things in the way, it's a little hard to reliably target the boss for a retaunt. [The dragons do change target when taunt drops, so prioritize those over the boss.] The only taunt I have slotted is the ranged Undaunted taunt since I'm not going to be in melee to pierce the boss, so why waste a bar slot. Healer should be maintaining breach on the boss since the tank is not in a good position to do so, esp. in execute.
Edit: I should note that the hard part of the fight is execute, when the boss turns into her shade form. She takes less damage in that form, so execute is slow. She starts doing her undodgeable heavy attack on the tank. And then there's the Sapping Mark heal check. Our DDs used ultis at the start and then saved them for the start of execute to try to make that phase just a little bit shorter.
Edit 2: When I first read the description of this achievement, my initial instinct was, "this sounds like a job for two tanks". And my first attempt at this achievement was with a 2T 2DD group. I've also tried this with a 1T 3DD comp. And I will say that, from experience, 1T 1H 2DD is the easiest, and more importantly, DO NOT USE TWO TANKS. It's definitely doable with two tanks (and I know people who have done it this way), but I think it's actually harder than 1T 1H 2DD or even 1T 3DD.
Why don't I like 2T? Well, ask yourself what the second tank is supposed to help with. If you divide up the work by 1 tank holds dragons and 1 tank holds boss, the only think that gets diverted away from the dragon tank is the boss's heavy attack. (Also, keep in mind that the boss retains aggro and doesn't require regular retaunting.) Both Sapping Mark and the head beams are multi-target and will hit both tanks. Okay, maybe if the boss tank also takes a dragon, that might be a little more useful, but only a little. I think a healer is really, really nice to have because of Sapping Mark in execute. If I had to choose between a tank diverting away the boss's heavy or a healer to help me get out of Sapping Mark, I'd take the healer any day because one cast of Shimmering takes care of each heavy attack, but self-healing myself out of Sapping requires multiple casts of my self-heal and is very resource-intensive. Similarly, if given a choice between a second tank or a third DD to help shorten that critically dangerous execute phase, I'd take the third DD.Edited by code65536 on 16 June 2026 10:31Nightfighters ― PC/NA and PC/EU
Dungeons and Trials:Personal best scores:- Dragonstar Arena: 46817 (NA)
- Maelstrom Arena: 600526 (NA)
- Blackrose Prison: 99274 (EU) (Unchained)
- Maw of Lorkhaj: 165227 (EU)
- Halls of Fabrication: 220708 (NA) (Tick-Tock Tormentor #1, #2, #3, #4, #5, #6, #7, #8, #9, #10, #11, #12)
- Asylum Sanctorium: 114957 (NA) (Immortal Redeemer #1, #2, #3, #4, #5, #6, #7, #8, #9, #10)
- Cloudrest: 131256 (NA) (Gryphon Heart #1, #2, #3, #4, #5, #6, #7)
- Sunspire: 250866 (EU) (Godslayer #1, #2, #3, #4, #5, #6, #7)
- Kyne's Aegis: 235841 (EU) (Dawnbringer #1, #2, #3, #4, #5, #6, #7, #8)
Dungeon trifectas:- Mountain God and Leave No Bone Unbroken
- Apex Predator and Pure Lunacy
- Depths Defier and Relentless Raider
- Defanged the Devourer and Nature's Wrath
- In Defiance of Death and No Rest for the Wicked
- Bane of Thorns and True Genius
- Ardent Bibliophile and Subterranean Smasher
- Battlespire's Best and Bastion Breaker
- Zero Regrets and Land, Air, and Sea Supremacy
- Fist of Tava and Invader's Bane
- Curator's Champion (Valinna) and Temporal Tempest
- Unshakeable Fervor and Lighting the Embers
Extended Journal Add-Ons: Item Set Browser ― Loot Log ― Character Knowledge ― Collectibles Tracker ― RaidificatorPC/Console Add-Ons: Combat Alerts ― Group Buff PanelsOther Add-Ons: Deconstruction Junk Marker ― Purge Tracker ― Asylum Status Panel ― Smart Looter ― Improved Companion Rapport Information1 - Useful skills to have:
-
 aetherix8✭✭✭✭✭Our PUG was 1T 1H 2DD. I listed 2T 2DD, but the 2nd tank switched to a healer very fast. The tank should have either great survivability or a great healer. My tank is decent but not that great, so we managed to get it done because of our amazing healer and good dps with beams. The tank and the healer did not get the flame aura or tempest buffs; DDs were beaming the tank to clear scarabs. DDs had flame aura and tempest buffs.
Our healer insisted we follow this strategy:
1. The tank always stands between the boss and the dragon, in front of the boss; taunt each dragon once, it is enough.
2. DDs should each pick their side of the boss and kite on their side only; never go to the other side, and never stand behind.
3. When the 3rd dragon spawns, all adds must be killed before the execute. This is obligatory and also the most difficult moment for the tank, as DDs and the healer stay in the center to clear all adds, so the tank must survive on their own. Until the 3rd dragon spawns, adds can be pretty much ignored.
It took three weeks of failure before it finally worked. And even on that day, one DD was not following the instructions. At first, I didn't notice, so we wasted more than one hour, but when I finally understood that this DD was not doing what they were supposed to, we replaced them with another DD and from there it went really fast. The first try was to show the new DD our approach. On the second try, one dragon died a few seconds before the boss (skittering race buff from the new DD), so we had to go and refarm the keys. Then it took just two minutes to get it done.PC EU - V4hn1
If you care about the future of ESO PvP, then help the devs test their ideas on how to improve it.0 -
frogthroat✭✭✭✭✭
✭Edit 2: When I first read the description of this achievement, my initial instinct was, "this sounds like a job for two tanks". And my first attempt at this achievement was with a 2T 2DD group. I've also tried this with a 1T 3DD comp. And I will say that, from experience, 1T 1H 2DD is the easiest, and more importantly, DO NOT USE TWO TANKS. It's definitely doable with two tanks (and I know people who have done it this way), but I think it's actually harder than 1T 1H 2DD or even 1T 3DD.
Or do use 2 tanks if you like. The tank keeping the dragons has plenty to do with the shalks anyway. And if you build the boss tank for night market, it's pretty good and is equivalent of a 3rd DD, especially with Signet and flame aura. I have been testing a few cool tank ideas (some of which included front barring Pearl and back barring Crimson) and the most fun NM tank I have come up with is Archdruid+Shattered Path+Glacial Guardian front bar+Crimson back bar and using Flame Aura. (Or other buffs if you come across with them, but Flame Aura is great, and quick and easy to obtain. Especially on DK.) Doing easily 60k ST dps on Flesh Abo argent. That works fantastically on Festering Timelines, too. And I'm speaking from experience.
However, once NM is gone, you don't really need that tank build any more since it doesn't really work in any other content.
But yeah, from my times doing that achievement with different groups, the easiest time we've had has been the classic 1t 1h 2dd and 2t 2dd compositions. In the latter the boss tank just has to be built for NM.
Also, without desync the achievement would be so much easier.0 -
code65536✭✭✭✭✭
✭✭✭✭✭frogthroat wrote: »The tank keeping the dragons has plenty to do with the shalks anyway.
The scarabs are pretty easy to manage, though, with the right setup. Just like in Fang Lair, the scarabs are self-expiring in that they are constantly losing health. My strategy for the Fang Lair trifecta has always been to just CC, immobilize, and/or snare the scarabs and get away from them, and by the time they catch up to you, they would've expired all on their own, even with no DDs hitting them.
Here, you get up to three pairs of scarabs, so it's a bit trickier, but your flame aura significantly speeds up their expiration, and the AoE snare from Ardent Flame is very large, so it's easier to catch multiple scarabs. I plop down my snare AoE and just watch them die as they slowly crawl through it to try to get to me (well, ok, I'm not actually watching them die because there are other things that I'm paying attention to, but if there weren't, I'd totally get out the popcorn and watch).Edited by code65536 on 16 June 2026 11:28Nightfighters ― PC/NA and PC/EU
Dungeons and Trials:Personal best scores:- Dragonstar Arena: 46817 (NA)
- Maelstrom Arena: 600526 (NA)
- Blackrose Prison: 99274 (EU) (Unchained)
- Maw of Lorkhaj: 165227 (EU)
- Halls of Fabrication: 220708 (NA) (Tick-Tock Tormentor #1, #2, #3, #4, #5, #6, #7, #8, #9, #10, #11, #12)
- Asylum Sanctorium: 114957 (NA) (Immortal Redeemer #1, #2, #3, #4, #5, #6, #7, #8, #9, #10)
- Cloudrest: 131256 (NA) (Gryphon Heart #1, #2, #3, #4, #5, #6, #7)
- Sunspire: 250866 (EU) (Godslayer #1, #2, #3, #4, #5, #6, #7)
- Kyne's Aegis: 235841 (EU) (Dawnbringer #1, #2, #3, #4, #5, #6, #7, #8)
Dungeon trifectas:- Mountain God and Leave No Bone Unbroken
- Apex Predator and Pure Lunacy
- Depths Defier and Relentless Raider
- Defanged the Devourer and Nature's Wrath
- In Defiance of Death and No Rest for the Wicked
- Bane of Thorns and True Genius
- Ardent Bibliophile and Subterranean Smasher
- Battlespire's Best and Bastion Breaker
- Zero Regrets and Land, Air, and Sea Supremacy
- Fist of Tava and Invader's Bane
- Curator's Champion (Valinna) and Temporal Tempest
- Unshakeable Fervor and Lighting the Embers
Extended Journal Add-Ons: Item Set Browser ― Loot Log ― Character Knowledge ― Collectibles Tracker ― RaidificatorPC/Console Add-Ons: Combat Alerts ― Group Buff PanelsOther Add-Ons: Deconstruction Junk Marker ― Purge Tracker ― Asylum Status Panel ― Smart Looter ― Improved Companion Rapport Information1 -
frogthroat✭✭✭✭✭
✭frogthroat wrote: »The tank keeping the dragons has plenty to do with the shalks anyway.
The scarabs are pretty easy to manage, though, with the right setup. Just like in Fang Lair, the scarabs are self-expiring in that they are constantly losing health. My strategy for the Fang Lair trifecta has always been to just CC, immobilize, and/or snare the scarabs and get away from them, and by the time they catch up to you, they would've expired all on their own, even with no DDs hitting them.
Here, you get up to three pairs of scarabs, so it's a bit trickier, but your flame aura significantly speeds up their expiration, and the AoE snare from Ardent Flame is very large, so it's easier to catch multiple scarabs. I plop down my snare AoE and just watch them die as they slowly crawl through it to try to get to me (well, ok, I'm not actually watching them die because there are other things that I'm paying attention to, but if there weren't, I'd totally get out the popcorn and watch).
Oh for sure, and caltrops if you're not DK. The flame aura really helps with the shalks but is not mandatory. And if a dragon is too close to the boss, you can walk it farther by going just out of melee range -> the dragon wants to melee you and walks closer -> move a bit farther -> dragon follows.
I think the hardest part of the fight is the desync, though. Where's the shalks? They should be here? I guess they died. Hey, wait, why is my mag and stam gone? Oooooh... the invisible shalks got to me and I'm dead, that's why. ...and then a few seconds later you character remembers to die. Or when a dragon does the frost breath multi-cone attack. In FL you can go between the pizza slices and you're good. Here, good luck. If you stand between the slices, you might get hit or you might not, who knows--not the game at least.0 -
Bah, looks like I'll have to miss this one, I probably could do it If I had more time but I underestimated how hard this was lol. Thanks everyone for the tips though! Hopefuly I'll be able to unlock it next time this event is up!1
-
Soarora✭✭✭✭✭
✭✭✭✭✭frogthroat wrote: »The tank keeping the dragons has plenty to do with the shalks anyway.
The scarabs are pretty easy to manage, though, with the right setup. Just like in Fang Lair, the scarabs are self-expiring in that they are constantly losing health. My strategy for the Fang Lair trifecta has always been to just CC, immobilize, and/or snare the scarabs and get away from them, and by the time they catch up to you, they would've expired all on their own, even with no DDs hitting them.
I feel validated; I saw mentions that the scarabs don't die on their own like they do in Fang Lair but I've been too busy during Festering Timelines to look and see if that's true. I just felt like it wasn't lol.
[PC/NA] Dungeoneer (Tank/DPS), Semi-retired Trialist, and amateur Battlegrounder (DPS) with a passion for The Elder Scrolls lore.
Current GM of Hard Dungeoneers
Tanks: Sorcerer - Necromancer - Templar
DPS: Frost Warden - Stamarc - StamDK - Hybrid NB Healer
Ex-Healer: Warden - Arcanist
Dungeons: 34/34 HMs - 28/28 Tris0 -
Soarora✭✭✭✭✭
✭✭✭✭✭I know OP said they gave up on this but for posterity, this is what I used:
Ignore the vateshran destro I didn't know what to put as backbar. Vateshran destro was not the play LOL.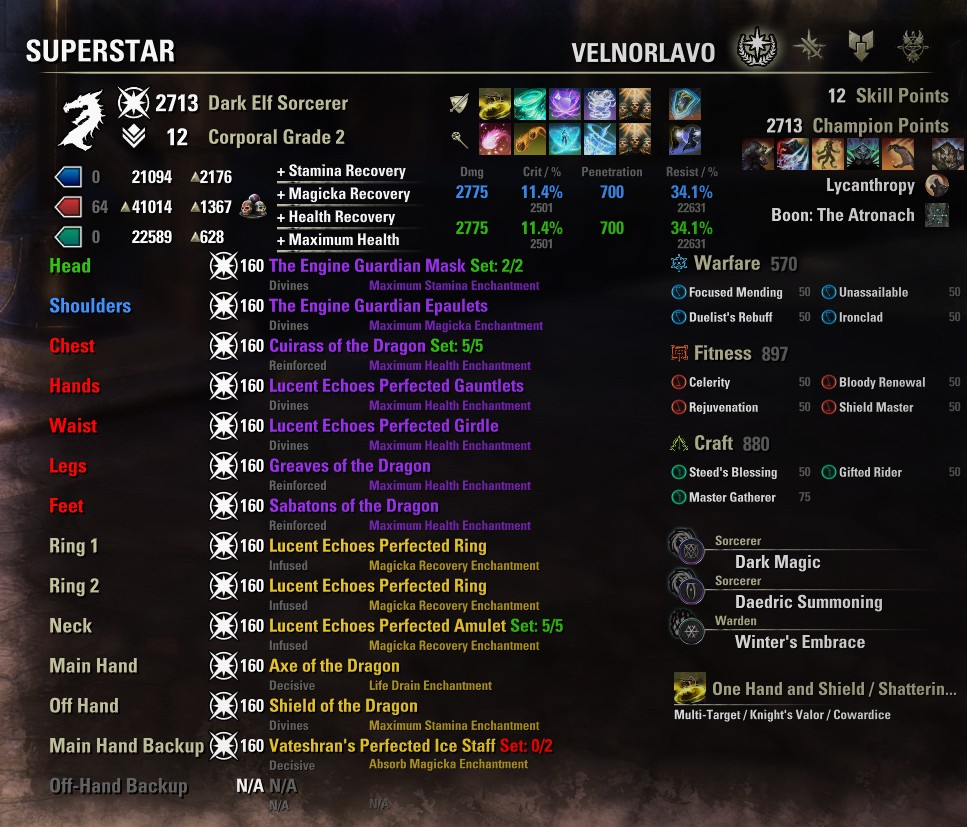
[PC/NA] Dungeoneer (Tank/DPS), Semi-retired Trialist, and amateur Battlegrounder (DPS) with a passion for The Elder Scrolls lore.
Current GM of Hard Dungeoneers
Tanks: Sorcerer - Necromancer - Templar
DPS: Frost Warden - Stamarc - StamDK - Hybrid NB Healer
Ex-Healer: Warden - Arcanist
Dungeons: 34/34 HMs - 28/28 Tris0