Maintenance for the week of June 29:
· [COMPLETE] NA megaservers for patch maintenance – June 29, 4:00AM EDT (8:00 UTC) - 12:00PM EDT (16:00 UTC)
· [COMPLETE] EU megaservers for patch maintenance – June 29, 8:00 UTC (4:00AM EDT) - 16:00 UTC (12:00PM EDT)
· [COMPLETE] NA megaservers for patch maintenance – June 29, 4:00AM EDT (8:00 UTC) - 12:00PM EDT (16:00 UTC)
· [COMPLETE] EU megaservers for patch maintenance – June 29, 8:00 UTC (4:00AM EDT) - 16:00 UTC (12:00PM EDT)
Kyne's Aegis Mechanics Guide

code65536
✭✭✭✭✭
✭✭✭✭✭
✭✭✭✭✭
Introduction – What this guide is—and isn't.
The goal here is to lay out the key mechanics found in Kyne's Aegis. While I may touch a little on strategies and tactics and offer some recommendations, that is not the goal of this guide. This is not a "What should I do?" guide, but rather a "What is going on?" guide.
Base Population – Non-boss enemies (a.k.a., "Trash")
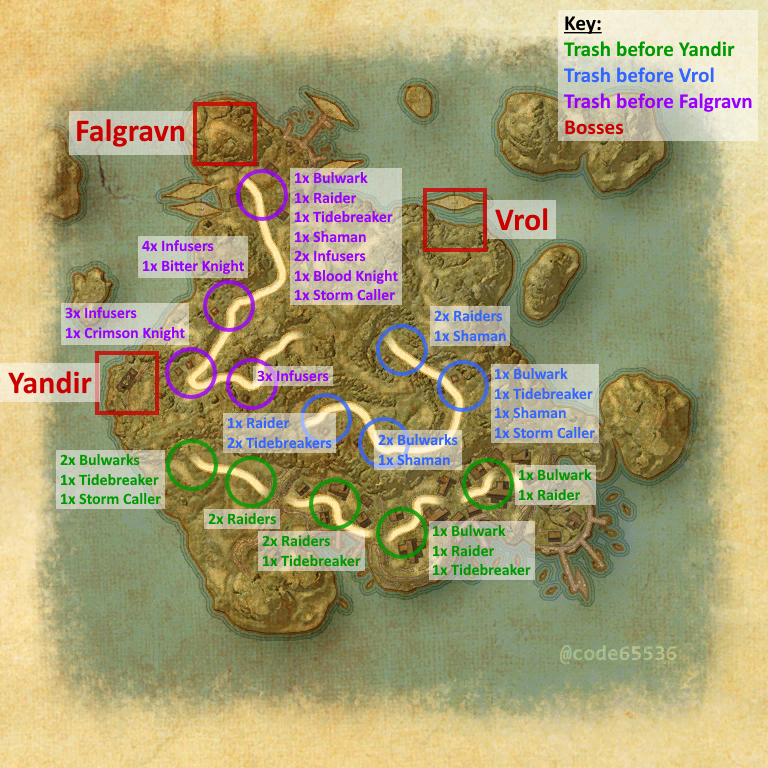
Half-Giant Bulwark
Half-Giant Raider
Half-Giant Tidebreaker
Half-Giant Storm Caller
Half-Giant Shaman
Vampire Infuser
Crimson Knight
Bitter Knight
Blood Knight
Edited by code65536 on June 4, 2020 3:12AM The goal here is to lay out the key mechanics found in Kyne's Aegis. While I may touch a little on strategies and tactics and offer some recommendations, that is not the goal of this guide. This is not a "What should I do?" guide, but rather a "What is going on?" guide.
Base Population – Non-boss enemies (a.k.a., "Trash")
Half-Giant Bulwark
- Shield Bash: The Bulwark's heavy attack has a conal cleave. Bulwarks should be turned away from the group.
- Cleave Range: 8 meters
- Armor Guard: The Bulwark will surround itself with an effect which appears as a yellow circle. This effect protects all other enemies inside from damage, and it reduces the movement speed of players inside. Bulwarks cannot be protected by their own Armor Guard (though they can be protected by the Armor Guard of other Bulwarks).
- Effect Radius: 8 meters
- Reel In: The Bulwark will target a player at random and chain them to the Bulwark.
- Every time a Bulwark casts this ability, it will interrupt every other enemy unit within a 20m radius of the Bulwark. This can cause unexpected and "strange" behavior; for example, this could cause a Tidebreaker to suddenly cancel its Crashing Wave mid-animation and start casting a Wrath of Tides conal instead.
Half-Giant Raider
- Exploding Spear: The raider will throw a spear at a random player.
- The animation of the throw is very fast and lasts only 0.5 seconds. Once thrown, the spear will land after 2 seconds at the location of the targeted player at the moment the spear was launched. (Because the spear does not track its target for the 2 seconds that it is hovering in the air, it is possible for players to sidestep the spear before it lands.)
- Upon landing, the spear creates a damaging ground AoE that resembles a Templar's Spear Shards, except orange instead of yellow. Because of its similarity to friendly Spear Shards and its lack of a hostile ground telegraph, it is relatively easy to unknowingly step into it.
- If a player is within the AoE of the Exploding Spear at the moment of its landing, they will be stunned if they are not blocking.
- Ground AoE Radius: 4 meters
Half-Giant Tidebreaker
- Wrath of Tides: The Tidebreaker has a conal attack, where it swings its sword in an animation resembling a player's 2-handed Cleave ability. This attack lacks a hostile telegraph, and tanks should turn Tidebreakers away from group.
- Cleave Range: 6 meters
- Crashing Wave: The Tidebreaker's will plunge its sword into the ground, and when it pulls it out, it will unleash a wave that expands outward in a circle, similar to the Sea Lurchers' Tidal Wave ability in March of Sacrifices. However, unlike the ability in March of Sacrifices, which is accompanied by a clear hostile telegraph, no such telegraph exists here.
- This ability can be blocked or dodged.
- Effect Radius: 25 meters
Half-Giant Storm Caller
- These enemies are stationary and are generally not particularly threatening.
- Storm Call: Storm Callers will constantly call down lightning strikes on players.
- Unstable Energy: Storm Callers are surrounded by an effect that damages players who come too close to it. The damage is inconsequential at first, but will steadily increase the longer a player remains close to a Storm Caller.
- Effect Radius: 8 meters
Half-Giant Shaman
- Focused Healing: This interruptible ability will heal other enemy units.
- Conjure Totem: Shamans found outside boss encounters can conjure totems, similar to Yandir's totem conjuration.
Vampire Infuser
- Infuse: Similar to the Infusers found in Blackrose Prison, the Infuse ability, if it is not interrupted, will empower all other enemies in the area.
- Cast Time: 2 seconds
Crimson Knight
- Bloodlust: The Crimson Knight will cast this ability on itself, which causes it to enlarge and empower. When empowered, its heavy attack (Cross Swipe) can kill a tank through block.
Bitter Knight
- Sanguine Prison: The Bitter Knight will target a player at random with this ability. The player will be stunned and imprisoned within a bubble. Other players can attack and destroy this prison to free the victim. While imprisoned, a player is immune to damage. If a player is not freed from their prison before the prison expires, they will die to Exsanguination.
- Sanguine Prison duration: 8 seconds
Blood Knight
- Blood Fountains: The Blood Knight will twist and wave its arms for 3 seconds, after which it will unleash four "lines" of blood along the ground, along the Blood Knight's front, back, and sides.
- These lines persist for 1.5 seconds.
- Players standing in the lines will take damage every 0.25 seconds (a player standing in the line for its full duration will take 7 ticks of damage).
- Every time a player takes a tick of Blood Fountain damage, they will gain a stack of a debuff that causes them to take additional damage from subsequent ticks.
- The damage is blockable and shieldable, but it is not roll-dodgeable. Because of the rapid damage ramp, players must react to quickly step out of a line. Preemptively shielding can give players a little more time to react if they find themselves in a line. While blocking can mitigate the damage as well, the reduced movement speed from block may result in a player staying inside a line for too long.
Nightfighters ― PC/NA and PC/EU
Dungeons and Trials:
Personal best scores:
Dungeon trifectas:
- Dragonstar Arena: 46817 (NA)
- Maelstrom Arena: 600526 (NA)
- Blackrose Prison: 99274 (EU) (Unchained)
- Maw of Lorkhaj: 165227 (EU)
- Halls of Fabrication: 220708 (NA) (Tick-Tock Tormentor #1, #2, #3, #4, #5, #6, #7, #8, #9, #10, #11, #12)
- Asylum Sanctorium: 114957 (NA) (Immortal Redeemer #1, #2, #3, #4, #5, #6, #7, #8, #9, #10)
- Cloudrest: 131256 (NA) (Gryphon Heart #1, #2, #3, #4, #5, #6, #7)
- Sunspire: 250866 (EU) (Godslayer #1, #2, #3, #4, #5, #6, #7)
- Kyne's Aegis: 235841 (EU) (Dawnbringer #1, #2, #3, #4, #5, #6, #7, #8)
Dungeon trifectas:
- Mountain God and Leave No Bone Unbroken
- Apex Predator and Pure Lunacy
- Depths Defier and Relentless Raider
- Defanged the Devourer and Nature's Wrath
- In Defiance of Death and No Rest for the Wicked
- Bane of Thorns and True Genius
- Ardent Bibliophile and Subterranean Smasher
- Battlespire's Best and Bastion Breaker
- Zero Regrets and Land, Air, and Sea Supremacy
- Fist of Tava and Invader's Bane
- Curator's Champion (Valinna) and Temporal Tempest
- Unshakeable Fervor and Lighting the Embers
Extended Journal Add-Ons: Item Set Browser ― Loot Log ― Character Knowledge ― Collectibles Tracker ― Raidificator
PC/Console Add-Ons: Combat Alerts ― Group Buff Panels
Other Add-Ons: Deconstruction Junk Marker ― Purge Tracker ― Asylum Status Panel ― Smart Looter ― Improved Companion Rapport Information
20
-
code65536✭✭✭✭✭
✭✭✭✭✭Yandir the Butcher
General Boss Abilities- Toxic Tide: Yandir has a conal attack, where it swings its sword in an animation resembling a player's 2-handed Cleave ability. This attack lacks a hostile telegraph, and tanks should turn Yandir away from group.
- This ability is dodgeable. If it is not dodged, Toxic Tide will apply a purgeable DoT.
- Cleave Range: 10 meters
- Fiery Grip: If Yandir's target gets too far from Yandir, he will use this ability to try to pull his target back. Blocking this ability will prevent the target from being pulled.
- Sundering Strike: After dropping below 50% health, Yandir will start to use this ability on the tank, which causes the tank to take increased damage for a period of time, similar to the Mark from Nahviintaas in Sunspire.
- Thunderous Leap: After dropping below 50% health, Yandir will periodically leap into the air and land on the player with aggro. The impact of the landing does blockable AoE damage.
- Damage Radius: 5.75 meters
- Lightning Strike: After dropping below 50% health, lightning strikes will target players at random. These strikes are AoE damage and will hit the targeted player (who cannot avoid the strike) as well as any other player within range of the targeted player.
- Damage Radius: 2 meters
Conjure Totem- Yandir will place his hand next to his head, with a glowing light in his hand. The color of this light corresponds to the type of totem that he is conjuring.
- Dragon Totem: Two totems will spawn, each one spouting fire along a line in two opposite directions. The direction of the fire for each totem is random, but it does not change once the fire has started.
- Conjuration Color: Orange
- Harpy Totem: A totem will spawn from which Wind Shear ground AoEs will radiate out.
- Conjuration Color: Light Blue
- Gargoyle Totem: A totem will spawn that will launch Gargoyle's Curse at random players, which are stones that can petrify players.
- Conjuration Color: Beige
- Chaurus Totem: A totem will spawn that will launch Chaurus Bile at random players. This surrounds the player with a damaging effect that can be spread to other players within its radius. If players are close together, the effect will quickly spread to multiple players, which will cause players to take multiple damage ticks from overlapped AoEs.
- Conjuration Color: Green
- Effect Radius: 3 meters
Pets- Yandir will start the fight with one pet (Sea Adder), and he will summon additional pets every 60 seconds until he reaches 50% health.
- The pet spawns will always alternate between Sea Adder and Gryphon.
- If a pet is alive when the next pet spawns, the existing pet will enrage.
- Pets can also enrage if they remain in the vicinity of Yandir. This proximity enrage grows over time as they remain in Yandir's vicinity.
- Yandir will periodically heal pets within his vicinity.
- Range of Heal: 10 meters
- Yandir will periodically cast Hailstone Shield.
- Yandir and all of his pets will gain a damage shield.
- All of the Hailstone Shields must be destroyed within 16 seconds. Failure to do so will cause any intact Hailstone Shield to explode with Hailstone Burst damage.
- Bile Spray (Sea Adder): The Sea Adder has a conal attack. This attack lacks a hostile telegraph, and tanks should turn The Sea Adder away from group.
- This ability is dodgeable. If it is not dodged, Bile Spray will apply a DoT.
- Slam (Sea Adder): The Sea Adder's jump ability does AoE damage. This damage is blockable.
- Damage Radius: 9 meters
Shamans (Hard Mode)- If the Challenge Banner is planted, Yandir will start the fight with one Shaman, and additional Shamans will spawn every 40 seconds.
- The Shamans will call down meteors on 3 players at random.
- When calling meteors, Shamans will channel for 3 seconds, then select their targets, and finally meteors will hit their targets another 2.25 seconds later, for a total of 5.25 seconds between the start of the meteor animation and the meteors' impacts.
- Meteors will track and follow their targets as they are moving, so it is impossible for a player directly targeted by a meteor to avoid it.
- Any player within the impact radius of a meteor will be stunned if they are not blocking.
- Player spacing and/or blocking are recommended mitigations for meteor damage.
- Meteor Damage Radius: 5 meters
Edited by code65536 on May 26, 2020 9:48AMNightfighters ― PC/NA and PC/EU
Dungeons and Trials:Personal best scores:- Dragonstar Arena: 46817 (NA)
- Maelstrom Arena: 600526 (NA)
- Blackrose Prison: 99274 (EU) (Unchained)
- Maw of Lorkhaj: 165227 (EU)
- Halls of Fabrication: 220708 (NA) (Tick-Tock Tormentor #1, #2, #3, #4, #5, #6, #7, #8, #9, #10, #11, #12)
- Asylum Sanctorium: 114957 (NA) (Immortal Redeemer #1, #2, #3, #4, #5, #6, #7, #8, #9, #10)
- Cloudrest: 131256 (NA) (Gryphon Heart #1, #2, #3, #4, #5, #6, #7)
- Sunspire: 250866 (EU) (Godslayer #1, #2, #3, #4, #5, #6, #7)
- Kyne's Aegis: 235841 (EU) (Dawnbringer #1, #2, #3, #4, #5, #6, #7, #8)
Dungeon trifectas:- Mountain God and Leave No Bone Unbroken
- Apex Predator and Pure Lunacy
- Depths Defier and Relentless Raider
- Defanged the Devourer and Nature's Wrath
- In Defiance of Death and No Rest for the Wicked
- Bane of Thorns and True Genius
- Ardent Bibliophile and Subterranean Smasher
- Battlespire's Best and Bastion Breaker
- Zero Regrets and Land, Air, and Sea Supremacy
- Fist of Tava and Invader's Bane
- Curator's Champion (Valinna) and Temporal Tempest
- Unshakeable Fervor and Lighting the Embers
Extended Journal Add-Ons: Item Set Browser ― Loot Log ― Character Knowledge ― Collectibles Tracker ― RaidificatorPC/Console Add-Ons: Combat Alerts ― Group Buff PanelsOther Add-Ons: Deconstruction Junk Marker ― Purge Tracker ― Asylum Status Panel ― Smart Looter ― Improved Companion Rapport Information11 - Toxic Tide: Yandir has a conal attack, where it swings its sword in an animation resembling a player's 2-handed Cleave ability. This attack lacks a hostile telegraph, and tanks should turn Yandir away from group.
-
code65536✭✭✭✭✭
✭✭✭✭✭Captain Vrol
General Boss Abilities- Frigid Fog: Vrol will point his weapon straight at his target and summon a ground AoE centered around the target.
- This animation happens fairly quickly, in just 1 second.
- Anyone located within the AoE at the moment it spawns will be frozen and stunned and need to break free.
- Frigid Fog will persist on the ground for a brief period of time, damaging anyone who steps inside.
- Vrol gains an indestructible damage shield and is thus immune to damage as long as he is standing within his Frigid Fog.
- Frigid Fog is Vrol's only cleave ability.
- Effect Radius: 5 meters
- Shocking Harpoon: Vrol will toss a harpoon at the player farthest from him.
- This ability happens approximately every 45 seconds, but it can be delayed if there are other abilities in the queue (in particular, the first summoning of a Storm Twin can delay the Shocking Harpoon substantially).
- When the harpoon lands, it creates a Sharpened Conduit.
- The conduit will start to tether players, causing the tethered players to take damage.
- After a period of time, if the conduit is not destroyed, it will explode and kill every tethered player.
- Lightning Strike: Throughout the fight, lightning strikes will target players at random. These strikes are AoE damage and will hit the targeted player (who cannot avoid the strike) as well as any other player within range of the targeted player.
- Damage Radius: 2 meters
Storm Twins- Once the boss has fallen below 50% health, he will periodically summon Storm Twins.
- Storm Twins are untauntable and will tether and aggro to whoever had Vrol's aggro at the moment that Storm Twin was summoned. The Storm Twin will remain tethered and aggroed onto that person, even if that person no longer has Vrol's aggro.
- The Storm twin will periodically cast Tempest, which sends a traveling AoE out in front of the Storm Twin. This ability can and should be interrupted.
Ballistas- There are two ballistas that can be repaired using the parts found in the barrels. After being repaired, a ballista can fire one shot before requiring another repair.
- The ballistas can only damage enemies on the longship off the coast. While it is possible to position the enemies on land in a way that allows them to be shot at by the ballistas, they will not take any damage from the ballista shots.
- Conjurers on the longship require 3 ballista shots to kill, on all difficulty levels. (This number can be lower if a player uses the portal to attack Conjurers directly.)
- Shamans on the longship require 2 ballista shots to kill, on all difficulty levels.
Conjurers- From 100% to 50% health, Vrol will summon a Conjurer on his longship every 45 seconds.
- This Conjurer, in turn, will conjure a portal that will bring reinforcements that will join the fight. These waves of reinforcements will continue indefinitely until the Conjurer is defeated.
- Harpooner: These enemies will target players with their Javelin ability. While the Javelin is interruptible, it is difficult to interrupt because the Harpooner will dodge roll away right before it casts its Javelin. Similar to Taking Aim, if the Javelin is not interrupted, it can be roll dodged.
- Apothecary: These enemies can lay fiery ground AoEs, and they can also heal the boss. Their healing ability is interruptible and must be quickly interrupted.
- Bulwark: These enemies, which appear only in Hard Mode, behave identically to the Bulwarks seen elsewhere in Kyne's Aegis.
- The portal created by the Conjurer can be used by a single player to transport that player to the longship, where they can battle the Conjurer.
- The Conjurer can also be damaged by the ballistas.
Shamans- From 50% to 0% health, Vrol will summon pairs of shamans on his longship every 45 seconds.
- These shamans can only be killed by the ballistas.
- These shamans behave identically to the shamans on Yandir Hard Mode and will call meteors down on players. Please see the Yandir section above for details on the meteors that shamans call down.
Edited by code65536 on May 27, 2020 12:14PMNightfighters ― PC/NA and PC/EU
Dungeons and Trials:Personal best scores:- Dragonstar Arena: 46817 (NA)
- Maelstrom Arena: 600526 (NA)
- Blackrose Prison: 99274 (EU) (Unchained)
- Maw of Lorkhaj: 165227 (EU)
- Halls of Fabrication: 220708 (NA) (Tick-Tock Tormentor #1, #2, #3, #4, #5, #6, #7, #8, #9, #10, #11, #12)
- Asylum Sanctorium: 114957 (NA) (Immortal Redeemer #1, #2, #3, #4, #5, #6, #7, #8, #9, #10)
- Cloudrest: 131256 (NA) (Gryphon Heart #1, #2, #3, #4, #5, #6, #7)
- Sunspire: 250866 (EU) (Godslayer #1, #2, #3, #4, #5, #6, #7)
- Kyne's Aegis: 235841 (EU) (Dawnbringer #1, #2, #3, #4, #5, #6, #7, #8)
Dungeon trifectas:- Mountain God and Leave No Bone Unbroken
- Apex Predator and Pure Lunacy
- Depths Defier and Relentless Raider
- Defanged the Devourer and Nature's Wrath
- In Defiance of Death and No Rest for the Wicked
- Bane of Thorns and True Genius
- Ardent Bibliophile and Subterranean Smasher
- Battlespire's Best and Bastion Breaker
- Zero Regrets and Land, Air, and Sea Supremacy
- Fist of Tava and Invader's Bane
- Curator's Champion (Valinna) and Temporal Tempest
- Unshakeable Fervor and Lighting the Embers
Extended Journal Add-Ons: Item Set Browser ― Loot Log ― Character Knowledge ― Collectibles Tracker ― RaidificatorPC/Console Add-Ons: Combat Alerts ― Group Buff PanelsOther Add-Ons: Deconstruction Junk Marker ― Purge Tracker ― Asylum Status Panel ― Smart Looter ― Improved Companion Rapport Information10 - Frigid Fog: Vrol will point his weapon straight at his target and summon a ground AoE centered around the target.
-
code65536✭✭✭✭✭
✭✭✭✭✭Lord Falgravn: Ruins of Kyne's Aegis (Phase 1)
General Boss Abilities- Cross Swipe: This is the boss's heavy attack.
- Claw: This is the boss's light attack.
- Getting hit by Claw applies a 20-second Poisoned DoT on the player.
- The damage from this DoT ramps up with each tick. It is inconsequential at first, but the final ticks are fairly dangerous.
- The damage ramp of this DoT is reset each time the player is hit by the Claw ability.
- For a tank that is constantly holding Lord Falgravn, it is likely that they will not notice the DoT because it will not have an opportunity to ramp up. This DoT can cause problems if, for some reason, a tank stops holding the boss.
- Instability: A number of players (6 in Hard Mode, 3 otherwise) will receive a lightning AoE that will explode after 4 seconds, damaging all players within the AoE's radius.
- It is possible for a player to take multiple hits of Instability if they are standing within an overlapped area.
- Instability damage can be shielded, but it cannot be blocked.
- The player with Lord Falgravn's aggro will never be targeted by Instability.
- Damage Radius: 5 meters
Lieutenant Njordal- Shortly after the start of the fight, Lieutenant Njordal will spawn.
- Blood Cleave: Njordal has a conal attack, where he swings his sword in an animation resembling a player's 2-handed Cleave ability. This attack lacks a hostile telegraph, and tanks should turn Njordal away from group.
- This ability is dodgeable. If it is not dodged, Blood Cleave will apply an unpurgeable DoT.
- This DoT lasts for 20 seconds.
- The damage from this DoT ramps up with each tick. It is inconsequential at first, but the final ticks are fairly dangerous and can easily kill tanks on Veteran and Veteran Hard Mode.
- Cleave Range: 15 meters
- This ability is dodgeable. If it is not dodged, Blood Cleave will apply an unpurgeable DoT.
- Vampiric Grip: If Njordal's target gets too far from Njordal, he will use this ability to try to pull his target back. This ability cannot be blocked or dodged, and it will place the player in an unbreakable stun.
- Sanguine Grasp: Njordal will plunge his sword into the ground to start the Sanguine Grasp ability, which targets a number of players (6 in Hard Mode, 3 otherwise) with fists that shoot out of the ground.
- This ability is effectively the same as the Call Lightning ability seen in other content, except with different visual effects.
- Taking damage from Sanguine Grasp will cause a player to take increased damage from subsequent Sanguine Grasp hits.
- Frenzied Cleave: Njordal will raise his sword into the air and teleport to a random selection of players and swipe each one. This ability is identical to the Blood Frenzy ability from the final boss of Spindleclutch II.
- This ability generally comes after Sanguine Grasp.
- The damage from this ability can be blocked.
Grievous Pulse and Proximity Lightning- At 90% and 80% health, Lord Falgravn will perform his Grievous Pulse and Proximity Lightning mechanic.
- Everyone will continuously take Grievous Pulse damage, which increases in intensity over time.
- One random sconce of the four sconces around the room will light up with electricity.
- Players will need to conduct that electrical energy to Lord Falgravn by forming a "daisy chain" of players.
- Once that electrical energy reaches Falgravn, he will be briefly stunned, and another sconce will light up.
- After all four sconces have had their energy conducted to Falgravn, the Grievous Pulse damage will stop.
- Each time this mechanic happens, each of the four sconces will light up just once (i.e., every sconce will be used, and no sconce will be used twice).
- The order in which the sconces light up is random.
- Each sconce is 30 meters from the center of the room.
- The maximum distance that two players can be apart and still conduct lightning is 7.5 meters. (However, the maximum distance between the sconce and the "first" player in the chain is much, much less, and generally, that first player has be right up against the sconce.)
- If Falgravn is held in the exact center of the room, it is theoretically possible to cover the 30-meter distance with a chain of 4 players. However, this would require exceptionally precise positioning and is impractical in reality. With a chain of 5 players, each player will need to be 6 meters apart. And with a chain of 6 players, each player will need to be 5 meters apart.
- Falgravn takes reduced damage during this mechanic.
Hard Mode: Resurrections and Death Seekers- If the Challenge Banner has been planted, then when a player resurrects another player using a soul gem, the player that performed the resurrection will be pulled down into the Ritual Vault, where they must make their way to a portal (which will periodically despawn and respawn at random locations) to return to the group.
- As players attempt to make their way to a portal after a resurrection, there will be Death Seekers that will spawn at random locations and smash the ground, instantly killing anyone within the radius of the smash.
- This smash can be roll-dodged.
- Damage Radius: 4.5 meters
- This mechanic is present during the first two phases of the Falgravn fight. It is not present in the final phase because the final phase takes place in the Ritual Vault.
Edited by code65536 on May 27, 2020 12:30PMNightfighters ― PC/NA and PC/EU
Dungeons and Trials:Personal best scores:- Dragonstar Arena: 46817 (NA)
- Maelstrom Arena: 600526 (NA)
- Blackrose Prison: 99274 (EU) (Unchained)
- Maw of Lorkhaj: 165227 (EU)
- Halls of Fabrication: 220708 (NA) (Tick-Tock Tormentor #1, #2, #3, #4, #5, #6, #7, #8, #9, #10, #11, #12)
- Asylum Sanctorium: 114957 (NA) (Immortal Redeemer #1, #2, #3, #4, #5, #6, #7, #8, #9, #10)
- Cloudrest: 131256 (NA) (Gryphon Heart #1, #2, #3, #4, #5, #6, #7)
- Sunspire: 250866 (EU) (Godslayer #1, #2, #3, #4, #5, #6, #7)
- Kyne's Aegis: 235841 (EU) (Dawnbringer #1, #2, #3, #4, #5, #6, #7, #8)
Dungeon trifectas:- Mountain God and Leave No Bone Unbroken
- Apex Predator and Pure Lunacy
- Depths Defier and Relentless Raider
- Defanged the Devourer and Nature's Wrath
- In Defiance of Death and No Rest for the Wicked
- Bane of Thorns and True Genius
- Ardent Bibliophile and Subterranean Smasher
- Battlespire's Best and Bastion Breaker
- Zero Regrets and Land, Air, and Sea Supremacy
- Fist of Tava and Invader's Bane
- Curator's Champion (Valinna) and Temporal Tempest
- Unshakeable Fervor and Lighting the Embers
Extended Journal Add-Ons: Item Set Browser ― Loot Log ― Character Knowledge ― Collectibles Tracker ― RaidificatorPC/Console Add-Ons: Combat Alerts ― Group Buff PanelsOther Add-Ons: Deconstruction Junk Marker ― Purge Tracker ― Asylum Status Panel ― Smart Looter ― Improved Companion Rapport Information10 -
code65536✭✭✭✭✭
✭✭✭✭✭Lord Falgravn: Hidden Barrow (Phase 2)
At 70% boss health, the floor will break and players will enter the second phase of the fight. The entire "General Boss Abilities" section from the first phase is applicable here (except that Falgravn will use Venomous Claw as his light attack, which, unlike his regular Claw attack, counter-intuitively does not apply a Poisoned DoT). Furthermore, if Lieutenant Njordal was not killed in the first phase, he will continue to be a presence in the second phase.
Three Knights- Corporeal Form
- Lord Falgravn will leave the area, and there will be a Crimson, Bitter, and Blood Knight at the start of the second phase. Please refer to "Base Population" section above for a summary of their mechanics.
- During this initial part of the second phase, all three knights are corporeal, and when one of them dies, the remaining knights will absorb the dead knight's ability.
- For example: If the Bitter Knight dies, then the Crimson and Blood Knight will both gain the ability to cast Sanguine Prison, and it is now possible to get two Sanguine Prisons at the same time, and the prison cast by the Crimson Knight, if it is currently under the effect of Bloodlust, will be an "enraged" prison that has more health than a regular prison.
- It is thus disadvantageous to kill any knight "first"; instead, it is recommended that all three knights die at approximately the same time.
- Note: The Bitter Knight has substantially less health than the Crimson and Blood Knights.
- There are no anti-stacking mechanics during this first portion of the second phase, as Lord Falgravn is not around to cast Instability.
- Incorporeal Form
- Lord Falgravn will return after the corporeal forms of all three knights have been defeated.
- Throughout the remainder of the second phase, these three knights will periodically reappear as ghostly incorporeal shades.
- These shades, which are not targetable, will spawn in, cast their mechanic, and then despawn.
- Incorporeal Crimson Knight, which appears as a reddish ghost (slightly brighter than Blood Knight's), will cast Bloodlust on Falgravn, causing him to empower for a period of time
- Incorporeal Bitter Knight, which appears as a purple ghost, will cast Sanguine Prison on a random player
- Incorporeal Blood Knight, which appears as a reddish ghost (slightly darker than Crimson Knight's), will cast Blood Fountains, centered on the position of the ghostly incorporeal shade
Hemorrhage and Ichor Sphere- After the three knights' corporeal forms have been defeated, Lord Falgravn will rejoin the fight and will periodically cast Hemorrhage.
- The Hemorrhage mechanic lasts for 30 seconds.
- During the Hemorrhage mechanic, players are covered by a visual effect resembling bloody barbed wire. Any movement made by the player will cause them to take Hemorrhage damage.
- During the Hemorrhage mechanic, an Ichor Sphere will appear in the middle of the room.
- Standing underneath this sphere, which occupies a circular area 4 meters in radius, will cause players to take Ichor Pool damage. This damage is blockable, which may cause stamina drain problems for tanks that stand within the pool.
- A number of Coagulants will spawn around the room and slowly make their way towards the Ichor Sphere in the middle. Each one that reaches the Ichor Sphere will empower it.
- The smaller Coagulants only have 1/10th the health of the larger ones
- At the end of the 30-second Hemorrhage mechanic...
- The "barbed wire" will disappear from players and players will no longer take Hemorrhage damage if they move.
- The Ichor Sphere will explode, dealing Ichor Eruption damage to everyone. The amount of damage dealt by Ichor Eruption is determined by the number of Coagulants that reach the Sphere.
- A large Coagulant will be formed from the explosion.
- This final Coagulant has a dangerous AoE cleave ability (Colony Collapse) and should be taunted.
Edited by code65536 on May 26, 2020 4:52PMNightfighters ― PC/NA and PC/EU
Dungeons and Trials:Personal best scores:- Dragonstar Arena: 46817 (NA)
- Maelstrom Arena: 600526 (NA)
- Blackrose Prison: 99274 (EU) (Unchained)
- Maw of Lorkhaj: 165227 (EU)
- Halls of Fabrication: 220708 (NA) (Tick-Tock Tormentor #1, #2, #3, #4, #5, #6, #7, #8, #9, #10, #11, #12)
- Asylum Sanctorium: 114957 (NA) (Immortal Redeemer #1, #2, #3, #4, #5, #6, #7, #8, #9, #10)
- Cloudrest: 131256 (NA) (Gryphon Heart #1, #2, #3, #4, #5, #6, #7)
- Sunspire: 250866 (EU) (Godslayer #1, #2, #3, #4, #5, #6, #7)
- Kyne's Aegis: 235841 (EU) (Dawnbringer #1, #2, #3, #4, #5, #6, #7, #8)
Dungeon trifectas:- Mountain God and Leave No Bone Unbroken
- Apex Predator and Pure Lunacy
- Depths Defier and Relentless Raider
- Defanged the Devourer and Nature's Wrath
- In Defiance of Death and No Rest for the Wicked
- Bane of Thorns and True Genius
- Ardent Bibliophile and Subterranean Smasher
- Battlespire's Best and Bastion Breaker
- Zero Regrets and Land, Air, and Sea Supremacy
- Fist of Tava and Invader's Bane
- Curator's Champion (Valinna) and Temporal Tempest
- Unshakeable Fervor and Lighting the Embers
Extended Journal Add-Ons: Item Set Browser ― Loot Log ― Character Knowledge ― Collectibles Tracker ― RaidificatorPC/Console Add-Ons: Combat Alerts ― Group Buff PanelsOther Add-Ons: Deconstruction Junk Marker ― Purge Tracker ― Asylum Status Panel ― Smart Looter ― Improved Companion Rapport Information10 - Corporeal Form
-
code65536✭✭✭✭✭
✭✭✭✭✭Lord Falgravn: Ritual Vault (Phase 3)
At 35% boss health, the floor will break again and players will enter the third and final phase of the fight. If Lieutenant Njordal has not yet been defeated, he will continue to be a presence here.
General Boss Abilities- There is no Instability in phase 3. There are no anti-stacking mechanics in this final phase.
- Claw: Same as Phase 1.
- Cross Swipe: This is the boss's heavy attack. In Hard Mode, each time the boss casts this, it will leave behind a pool of Corrupted Ichor.
- The damage is blockable, which substantially reduces the threat these pools pose to the tank. But hitting the tank's block can also be a stamina drain.
- These pools are persistent and will remain until the boss is defeated.
- Effect Radius: 2 meters
- Apotheosis: Shortly after entering the third phase, the boss will permanently empower. This will also heal him back up to 40%.
- This empowerment will gradually increase over time until it plateaus and stabilizes.
- This empowerment also increases in strength with the number of players dead
- In Hard Mode, this empowerment means that every Cross Swipe must be dodged, and an unblocked light attack instantly will kill a tank.
- Unstable Energy: Within the pit of the Ritual Vault, every player is subject to continuous Unstable Energy damage.
- Since Unstable Energy is technically an AoE, Evasion can be used to mitigate it.
- Smash: If Falgravn steps onto the staircases, he will cast Smash, which will instantly wipe the group (i.e., he must be kept within the pit).
Prison Cells- There are 8 prison cells along the upper level of the Ritual Vault.
- The upper level is cut off by the Blood Dome; venturing outside the Blood Dome into the upper level will kill a player.
- Every 50 seconds, Lord Falgravn will briefly disperse the Blood Dome and summon two torturers to feast on the victims in two random prison cells.
-
Falgravn will send out two "balls" that players can visually follow to the cells that will be activated.
- Players may opt to go to these cells to kill the torturer and save the victim before the Blood Dome reappears.
- If players succeed in killing a torturer and saving a victim, that victim will help the group.
- If players fail to kill a torturer, that torturer will join Falgravn in the pit and will cast Uppercut and Frenzied Cleave similar to Lieutenant Njordal.
Edited by code65536 on June 4, 2020 12:41AMNightfighters ― PC/NA and PC/EU
Dungeons and Trials:Personal best scores:- Dragonstar Arena: 46817 (NA)
- Maelstrom Arena: 600526 (NA)
- Blackrose Prison: 99274 (EU) (Unchained)
- Maw of Lorkhaj: 165227 (EU)
- Halls of Fabrication: 220708 (NA) (Tick-Tock Tormentor #1, #2, #3, #4, #5, #6, #7, #8, #9, #10, #11, #12)
- Asylum Sanctorium: 114957 (NA) (Immortal Redeemer #1, #2, #3, #4, #5, #6, #7, #8, #9, #10)
- Cloudrest: 131256 (NA) (Gryphon Heart #1, #2, #3, #4, #5, #6, #7)
- Sunspire: 250866 (EU) (Godslayer #1, #2, #3, #4, #5, #6, #7)
- Kyne's Aegis: 235841 (EU) (Dawnbringer #1, #2, #3, #4, #5, #6, #7, #8)
Dungeon trifectas:- Mountain God and Leave No Bone Unbroken
- Apex Predator and Pure Lunacy
- Depths Defier and Relentless Raider
- Defanged the Devourer and Nature's Wrath
- In Defiance of Death and No Rest for the Wicked
- Bane of Thorns and True Genius
- Ardent Bibliophile and Subterranean Smasher
- Battlespire's Best and Bastion Breaker
- Zero Regrets and Land, Air, and Sea Supremacy
- Fist of Tava and Invader's Bane
- Curator's Champion (Valinna) and Temporal Tempest
- Unshakeable Fervor and Lighting the Embers
Extended Journal Add-Ons: Item Set Browser ― Loot Log ― Character Knowledge ― Collectibles Tracker ― RaidificatorPC/Console Add-Ons: Combat Alerts ― Group Buff PanelsOther Add-Ons: Deconstruction Junk Marker ― Purge Tracker ― Asylum Status Panel ― Smart Looter ― Improved Companion Rapport Information10 -
code65536✭✭✭✭✭
✭✭✭✭✭General tips
For players on PC, the Combat Alerts addon will assist with and alert many of the mechanics discussed here.
There are a number of anti-stacking mechanics throughout the trial. Chaurus Totems, Lightning Strikes, Meteors, and Instability. The first portion of the second Falgravn phase and the third Falgravn phase are the only times when players are free of anti-stacking mechanics during boss fights. As a result, groups may want to consider setting up "loose stack" formations.
For example: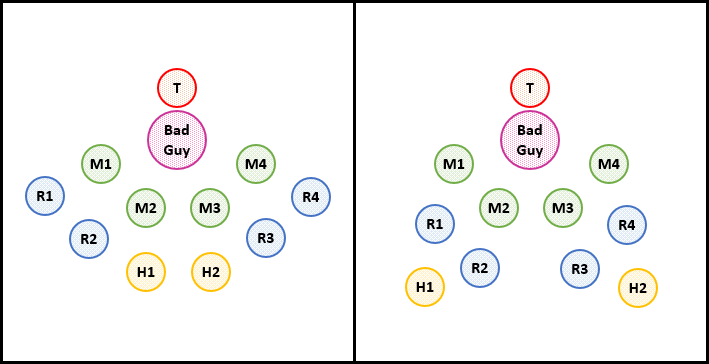
Tips for Vrol's Frigid Fog
Frigid Fog is the only ability from Captain Vrol that can be considered to be a "cleave", and there is a fairly long cooldown between each cast of Frigid Fog. This means that, after Fog has been cast, it is safe to turn Vrol towards the group. This allows the tank to dodge through to pull Vrol out of the Frigid Fog, thus keeping the boss's movement to a minimum and reducing the amount of repositioning.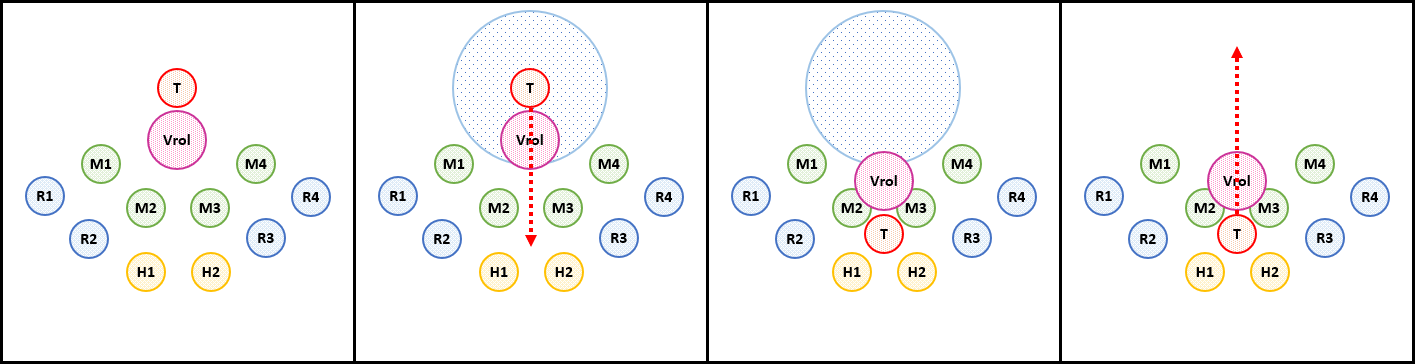
Tips for Falgravn's chain lightning mechanic
During the PTS, my groups have tried doing the chain lightning mechanic with two chains groups and with one chain group. And we felt that one chain group, while it is a little slower than two chain groups, was much easier to do. It required a lot less coordination and had better resiliency.
Furthermore, this approach allowed us to keep the healers out of the chain groups and let them focus their attention on healing the chain groups without worrying about participating in the chains themselves.
We opted for 6 people in the chain, which left us with a reasonably comfortable amount of wiggle room, and we assigned chain positions by distance, using this diagram: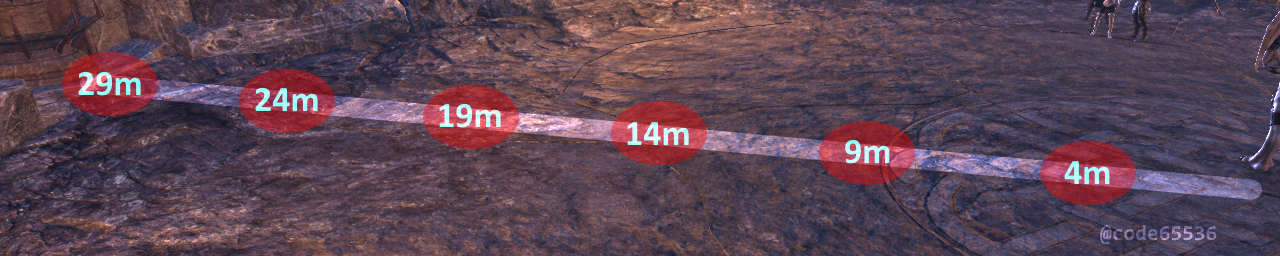
Tips for Falgravn's second phase
There is an interesting confluence of mechanics in the second phase of the Falgravn fight. Specifically,- There will be periods where players are limited in their ability to move.
- Players need to be at least 5 meters apart when Instability is active.
- Players need to be close enough to be able to kill Sanguine Prisons effectively.
- Players must not stand underneath the Ichor Sphere.
To achieve these goals, I had come up with a positioning guide, with positions anchored to the markings of the decorative floor pattern, that will maintain a reasonably compact formation to help with Prisons, while ensuring that everyone is at least 5m apart and that there would be no need for movement if Instability is cast.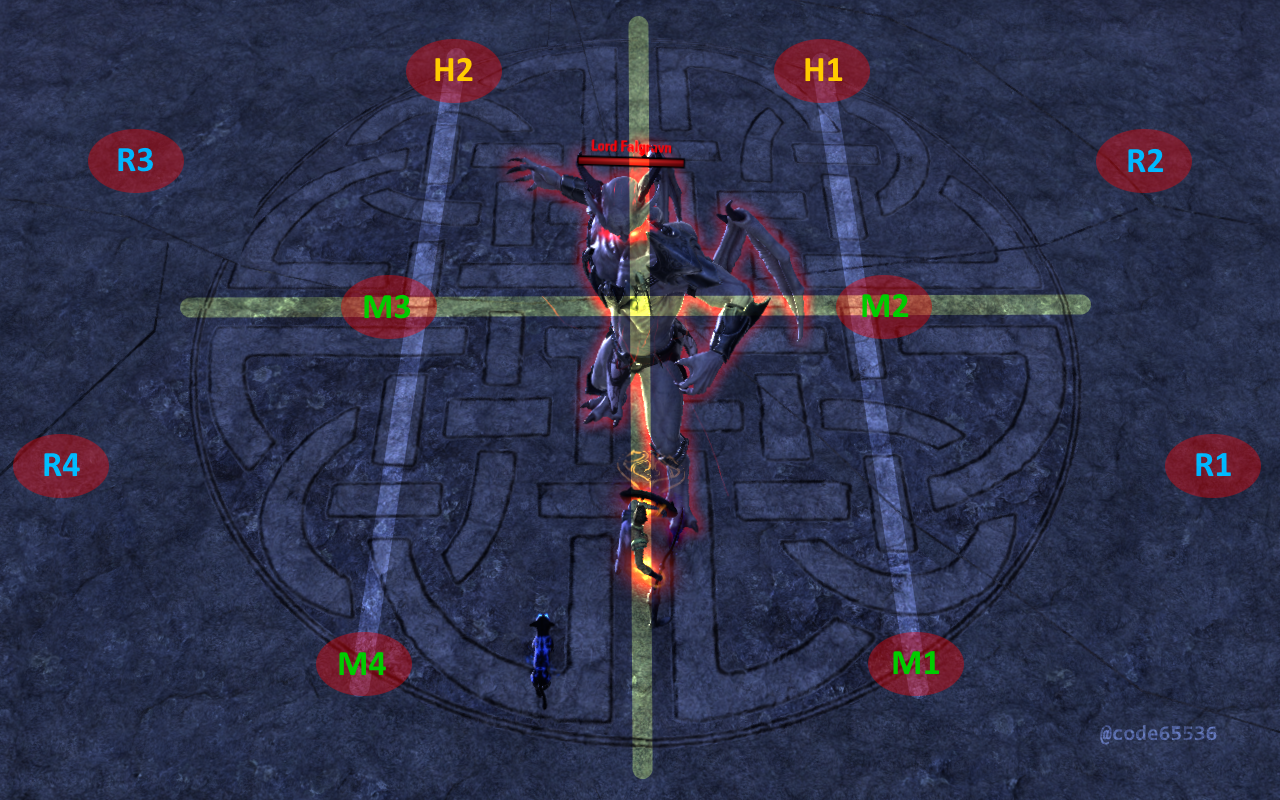
If a tank dodges Falgravn's heavy attack during the second phase, then dodging forward through Falgravn and walking back into position (which is safe for a tank to do even during a Hemorrhage phase) should keep Falgravn stationary.
Videos
Main Tank's perspective: https://youtu.be/cX9-KFDdKd8 Edited by code65536 on June 24, 2020 12:25PMNightfighters ― PC/NA and PC/EU
Dungeons and Trials:Personal best scores:- Dragonstar Arena: 46817 (NA)
- Maelstrom Arena: 600526 (NA)
- Blackrose Prison: 99274 (EU) (Unchained)
- Maw of Lorkhaj: 165227 (EU)
- Halls of Fabrication: 220708 (NA) (Tick-Tock Tormentor #1, #2, #3, #4, #5, #6, #7, #8, #9, #10, #11, #12)
- Asylum Sanctorium: 114957 (NA) (Immortal Redeemer #1, #2, #3, #4, #5, #6, #7, #8, #9, #10)
- Cloudrest: 131256 (NA) (Gryphon Heart #1, #2, #3, #4, #5, #6, #7)
- Sunspire: 250866 (EU) (Godslayer #1, #2, #3, #4, #5, #6, #7)
- Kyne's Aegis: 235841 (EU) (Dawnbringer #1, #2, #3, #4, #5, #6, #7, #8)
Dungeon trifectas:- Mountain God and Leave No Bone Unbroken
- Apex Predator and Pure Lunacy
- Depths Defier and Relentless Raider
- Defanged the Devourer and Nature's Wrath
- In Defiance of Death and No Rest for the Wicked
- Bane of Thorns and True Genius
- Ardent Bibliophile and Subterranean Smasher
- Battlespire's Best and Bastion Breaker
- Zero Regrets and Land, Air, and Sea Supremacy
- Fist of Tava and Invader's Bane
- Curator's Champion (Valinna) and Temporal Tempest
- Unshakeable Fervor and Lighting the Embers
Extended Journal Add-Ons: Item Set Browser ― Loot Log ― Character Knowledge ― Collectibles Tracker ― RaidificatorPC/Console Add-Ons: Combat Alerts ― Group Buff PanelsOther Add-Ons: Deconstruction Junk Marker ― Purge Tracker ― Asylum Status Panel ― Smart Looter ― Improved Companion Rapport Information12 -
 Olibeau✭✭✭Awesome, fantastic writeup, thank you!ESO Stream Team - Twitch.tv/Olibeau - YouTube.com/Olibeau
QuakeCon 2022 ESO Speedrun Champion | QuakeCon 2021 ESO Speedrun Champion | World's Sweatiest PvE'er
Olibeau | Breton | Magicka Dragonknight | EU 1st Dawnbringer | EU 1st Magicka Godslayer | 52,710+ Achievement Points (100% Completion) | 3600cp | 7x Grand Overlord
<Pathfinders> | <Late Night Dungeoneers>1 -
 MaselClass RepresentativeWell-written, as always. Hopefully, this trial will get more combat cues on live, because the lack of telegraphs is actually quite annoying in this trial.PC EU
All Trial Trifecta Titles Done!
Youtube:
https://www.youtube.com/channel/UChVEG6ckuAgGs5OyA6VeisA1 -
 Zymcio✭✭✭Hey there is one ability i cannot find here.
On last phase Lord Falgravn can do damage from ability called "cowardice"
Can someone explain what it is ?0 -
code65536✭✭✭✭✭
✭✭✭✭✭Hey there is one ability i cannot find here.
On last phase Lord Falgravn can do damage from ability called "cowardice"
Can someone explain what it is ?
That's the name of the damage associated with standing outside the Blood Dome.Nightfighters ― PC/NA and PC/EU
Dungeons and Trials:Personal best scores:- Dragonstar Arena: 46817 (NA)
- Maelstrom Arena: 600526 (NA)
- Blackrose Prison: 99274 (EU) (Unchained)
- Maw of Lorkhaj: 165227 (EU)
- Halls of Fabrication: 220708 (NA) (Tick-Tock Tormentor #1, #2, #3, #4, #5, #6, #7, #8, #9, #10, #11, #12)
- Asylum Sanctorium: 114957 (NA) (Immortal Redeemer #1, #2, #3, #4, #5, #6, #7, #8, #9, #10)
- Cloudrest: 131256 (NA) (Gryphon Heart #1, #2, #3, #4, #5, #6, #7)
- Sunspire: 250866 (EU) (Godslayer #1, #2, #3, #4, #5, #6, #7)
- Kyne's Aegis: 235841 (EU) (Dawnbringer #1, #2, #3, #4, #5, #6, #7, #8)
Dungeon trifectas:- Mountain God and Leave No Bone Unbroken
- Apex Predator and Pure Lunacy
- Depths Defier and Relentless Raider
- Defanged the Devourer and Nature's Wrath
- In Defiance of Death and No Rest for the Wicked
- Bane of Thorns and True Genius
- Ardent Bibliophile and Subterranean Smasher
- Battlespire's Best and Bastion Breaker
- Zero Regrets and Land, Air, and Sea Supremacy
- Fist of Tava and Invader's Bane
- Curator's Champion (Valinna) and Temporal Tempest
- Unshakeable Fervor and Lighting the Embers
Extended Journal Add-Ons: Item Set Browser ― Loot Log ― Character Knowledge ― Collectibles Tracker ― RaidificatorPC/Console Add-Ons: Combat Alerts ― Group Buff PanelsOther Add-Ons: Deconstruction Junk Marker ― Purge Tracker ― Asylum Status Panel ― Smart Looter ― Improved Companion Rapport Information1 -
 Mandragorane✭✭This is so cool, how do I find any other guides you might have posted? Kind of new to Forum...0
 -
 Waffennacht✭✭✭✭✭
✭✭✭✭✭@Mandragorane click on their name and look up their comments or discussions
Fan-fing-tastic job there @code65536 !!!!0 -
 0
0

