Maintenance for the week of June 15:
• PC/Mac: No maintenance – June 15
• PC/Mac: No maintenance – June 15
Joy's Path to Flawless Conqueror

Joy_Division
✭✭✭✭✭
✭✭✭✭✭
✭✭✭✭✭
This guide was written before ZoS swung a huge indiscriminate nerfbat at the entire game. I still completed vMA on the PTS with this build and much of the advice still holds. It requires a lot of mindless heavy attack spam when there is one mob left. If I get the motivation I might update this and make it more specific
I stopped running vMA when I got my sharpened staffs back in Spring 2016. A few weeks ago, I got the urge to get the Flawless achievement so decided to head back in vMA. It took me 3 tries on my templar. I basically brought my PvP build into vMA – without even changing CPs – and just used generic blue magicka pots. Maelstrom was legit hard when it came out; anything but a skilled DPS build had little shot. The game has changed; a build based on versatility and survival does just fine in vMA and has a huge advantage over DPS builds if your goal is survival. If I I can do it, then so can you! When vMA first came out I wrote a guide after my first complete to help others achieve the same. So this will be a follow up sorts on my advice to get Flawless Conqueror.
I think there are pathways to Flawless:
The strategies suggested by this guide are just that: suggestions. All of them seek to minimize the possibility of death, to eliminate the one or two supposed “RNG deaths” that torpedo Flawless runs. It was the path I took and that path was very safe and conservative. One could certainly adopt parts of it to suit their DPS glass cannon and play a bit more aggressively and do just fine. Whatever helps you and makes vMA fun for you I say go for it!

Its stats are not very inspiring. However, I have found the best builds and most power in ESO do not lie in the raw stats, rather on the core mechanics of the game. It is a very versatile build. I have used it to tank even the DLC dungeons with no problem, without changing CP. And I have been beat on by enough AD and DC players to know that it can take the best the chump bosses in vMA can throw at it. All this while most of my CP specs are oriented toward trials healing since that’s my “role.”
I will explain the reasoning behind my choices so you can adapt a similar build/philosophy if you do not run a magicka templar.
Heavy armor rocks. Wear it. I have never worn heavy armor in any RPG I have ever played because quite frankly I don’t like it. About a year ago, the designers made mechanical changes to it such that it was not pigeonholed into being “tank” gear. If you’re looking for a hybrid DPS build that can take some punishment, this is precisely what the developers intended for you to use. This is exactly what you are looking for! There is no reason not to use it unless you are in a specialized raid build. While it’s true I can’t get elite DPSing wearing heavy, I still can get good DPS and enjoy all the goodies of heavy: the resistance, the health boost, the healing bonus, the Constitution resource return. I can get light armor’s crit and spell penetration back from other mechanics. It is a HUGE difference running vMA with 23K health and 23Kish (buffed) resistance than 17K health on a glass cannon.
Sword and Shield is very strong. It allows you to hold block and not die even on a non-tank build (I have very little invested in block cost reduction). And…dat ultimate! You know those times you are dying hoping your ultimate bar fills up? That’s no longer a problem because this only costs 100. Finally, it allows for an additional 5-piece set bonus, which after the One Tamriel update are very strong. Put down the resto staff and two swords.
Lightning Staff. I PvP and thus use Eye of the Storm which is at best a meh PvE ultimate. That’s not why I use destro. Read the Elemental Drain skill real carefully (and after you do, stop hoping nerfing CP will somehow eliminate the “ultimate sustain” builds that have recently become the latest complaint of the month by the ESO community). With this single skill, I get my Light armor’s spell penetration back and have enough resource intake to run the Thief Mundas stone so I get Light armor’s crit back as well. Using this setup makes my build much stronger than the unbuffed stats would otherwise indicate. I use lightning because it ticks magickasteal much more often than inferno, plus the AoE is a nice bonus.
The sets I chose to use and what I think is an efficient and versatile setup that can do pretty much everything is Rattlecage and Lich.

The beauty of the Rattlecage-Lich-Grothdar combination is that I can have three complete armor set bonuses while still using a destro staff as my primary weapon. It is very efficient setup that requires zero micromanagement or restrictive conditions.
On my rings, I use two regen glyphs and a spell damage glyph. If you have a magicka oriented race and are committed to heavy attacks, you can get away with adding an extra spell damage glyph. For Flawless attempts, I’d prefer to lean on the side of resources than damage since if this build has resources, it can pretty much survive whatever vMA throws at it.
But Joy, I hate farming stuff. Can you offer alternatives?
Why I like this build:
In short, it strives for efficiency and versatility as opposed to pure power. Instead of relying on luck, it relies on ESO’s mechanics. If you are like me, a somewhat lazy person who hates to respec or switch CPs, who is a good player but makes mistakes, then this is going to be the most efficient path and least frustrating path to getting Flawless.


Note: Purifying Light is a fantastic skill. An argument can be made for its use over Total Dark or Extended Ritual. I used it on my first vMA run and only had 2 deaths. But I noticed I was not using it all that much (mostly because stuff dies so fast) and felt ranged adds were still enough of a threat that neutralizing them with Eclipse made the stages easier.
Joy, I don’t play a magicka templar. What should I do?
The same. I just provided a template. The heavy armor / versatile approach works for every archetype except perhaps magicka sorcerer. In fact, it probably works better on stamina builds. There are stam damage oriented heavy sets like Seventh Legion. The infamous Blackrose-Viper-Velidreth combination would wreak havoc in Maelstrom as it did in Cyrodiil. You could use the standard Bow back bar and consider Sword and Shield. Sure, it’s not a trial DPS build – neither is mine - but it still does good damage (especially with a bash animation cancel), skills like Low Slash are very good, and the extra tankiness is exactly what Flawless aspirants need. Even magicka NBs, you don’t have to play a burst high damage build.
The point is if you are reading this, your trial DPS setup has not gotten Flawless. I ran the standard Burning Spellweave DK build and while I can complete vMA faster using that, it’s sooooooo much squishier and there always seems to be 3 or 4 or 5 places that I die. As we can get good DPS and enjoy legit tanking ability wearing heavy … why wouldn’t we use that if our entire goal, the raison d’etre, is an hour’s worth of difficult content without dying?
If you are reading this guide, that means you are going to use these. Period. End of story. They are available every single round. They turn dying into winning. They are that strong. Objectively analyze what is killing you, grab the appropriate power sigal for the situation, and then proceed onto to the next arena. They are not for "noobs" or are "crutches." Pride goeth before a fall.
Stage 1: Vale of the Surreal . You don’t need help here! Just be cognizant that the boss is a DPS race and you’re not doing as much on a heavy armor build. Do not be discouraged if you feel he survives uncomfortably long. You could have used the power sigil (and the defensive sigil rendering you invincible to his attacks for good measure) to make the fight a lot shorter but you didn’t.
Stage 2: Seht’s Balcony . The blades are mere nuisances now, but still the only thing that can kill you so just keep up the HoTs/shields/heals. Even with your mediocre DPS, you will spend more time waiting for the bosses to come out of their protective hibernation than actually fighting them. Biggest challenge here is watching your magicka pool because while you are standing around the blades are forcing you to consume resources without actually damaging the bosses. So don’t be afraid to heavy attack once in a while (or grab the speed sigil).
Stage 3: Drome of Toxic Shock . The only real threat is the water and the accompanying high lightning damage that comes from standing in it. Like the previous stage, the extra health and mitigation from heavy is welcome. The only real advice I think is needed here is that it is very convenient to start the final boss at full resources so just heavy attack the hag mini-boss if you aren’t full yet.
As for the Lamina Boss, I don’t think moving from island to island trying to kill the annoying plants is necessary. Even as a light armor templar I typically just stayed put and burned her and with heavy, that’s much easier. The biggest nuisance is the ranged mage. If you feel it threatening, you could simply take the fight to where it spawns or use reflect (eclipse, DK wings, defensive posture, or defensive sigil) to neutralize it.
Stage 4: Seht’s Flywheel This is the first stage that has spawns dangerous enough to kill you. Specially the third round will have two dwemer spheres. If you do not have your ultimate up, use the defensive sigil. They probably won’t kill you because you got more health and more mitigation than you are used to and they usually didn’t kill you before, but you are playing it safe, following my advice of not taking unnecessary risks. Is 750 points worth even a 10% chance of dying? Not when my goal is Flawless!
For the Dwemer Spider boss, if you feel you need the extra DPS, use the power sigil. I didn’t burn the boss during its first explosion phase which you may be accustomed to doing on your glass cannon build. So I made sure to destroy the two dwemer adds that spawned (be careful of the sphere, it likes to stay at range and can be hard to find, which can be an issue as it’s a high damaging opponent). I was able to burn the boss during the second green / safe phase and thus so should you. If you aren’t, then use the power sigil and be more disciplined maintain your DoTs on the boss when it’s exploding.
Stage 5: Rink of Frozen Blood (Ice Flows) This is going to be your first big test. The 2nd wave is no picnic and the 3rd and 4th rounds are legit tough: the 3rd may be the most difficult non-boss spawn in the entire arena because of the large number of high damaging ranged adds.
I think the trolls are more of a nuisance than a priority. They do no damage and the Neried that spawns is easily neutralized with a reflect ability. I know killing them is convenient, but it’s just that, convenient rather than strictly necessary.
What you have to worried about are the ranged adds. If you are a melee oriented build, read everything except a mag sorc and maybe mag NB, you really want a reflect ability, even if that means slotting sword and shield. Dying to them in this stage is your fault, not the developers for making it too hard. Nuking them when they spawn is ideal. Failing that, move toward the edge on an ice flow to entice them to move toward you and out of the water to make targeting them easier. You also have the sword and shield ultimate: I know you want to desto ultimate them, but if you’re in trouble, play conservatively and pop Spellwall, you’ll still kill them and survive. If all else fails you have the Defensive Sigil: fight on the third round on that platform so it’s there just in case.
This is my advice for the 3rd round:
There are three spawns.
The easiest way to do this is to build your ultimate on the boss before this wave (it’s the Ice Ogre, a pushover) and begin on the Starter platform. When the Nereid and archer die, make you way to the double Sigil platform. The mage will be in ice water and annoy you; reflect or ranged it down. When the next wave spawn, grab the defensive sigil (it’s on your island). It will not only make short work of this wave, but the next highly dangerous one…which happens to spawn right where you are for convenience
For the 4th round, you just have to avoid giants’ cleaves.
Giant Boss: The only boss in vMA where too much DPS actually makes the fight harder. Spawns and platform breaks are based on health percentage. You control the pace of the fight, not the developers! The safest way to avoid death is to use your ultimate on either the first set of adds or the second and make sure the last platform up is the one with the Defensive Sigil. After the boss breaks the second platform, grab the Defensive sigil and then you can ignore everything and just burn her down.
Stage 6: Spiral Shadow
You first priority is killing the webspinners that cover up the glowing pillars. It’s not a RNG death if the swarm catches you, it’s a failure of prioritization on your part. Hugely important: If there are not at least 2 glowing safe zone when a swarms arrives, you are dead if a webspinner spawns. Always always make sure there are multiple safe zones; nothing else is more important. Sometime light armor builds run into stamina issues here because sprinting and CC breaking are necessary: you will not have that issue.
The three most dangerous parts of this stage are:
Spider Boss: I know there is a burn strategy, but my build isn’t a raid DPS so I instead played it safe, which means not counting on that super-stun ultimate combination. Rather, every action I did was governed by how to not die. This meant:
There really is only one danger: If she is alive after you super-stun her, and she probably will be, do NOT think you can finish her off rather than destroying the first horvor and webspinner that spawn. Because that webspinner quickly spawns after the super-stun and so does a spider spawn; if there is only the one glowing safe-zone, you’re dead.
Stage 7: Vault of Umbrage (Poison Plants!) This is the real challenge, right? Where Flawless runs go to die because of the infamous poison plant spawns. Have you ever thought of why ZoS never changed the round despite its infamy and overwhelming calls from the community? Because the perspective that well over 90% of all poison plant deaths are preventable is a perfectly valid one. If we are being honest here, and I’m a big fan of honesty instead of self-exculpating excuses, many of us are lazy players who take the easy route because it works the vast majority of the time or we are greedy players who expect to have our cake and eat it. These are the three times that account for just about all my poison deaths:
These are preventable. And that’s my strategy for this entire stage.. Obviate the RNG death by never allowing the confluence of circumstances that allow for their possibility. This stage is *not* hard. It is much easier than the previous two. The adds are pretty pathetic actually. Nuke the Argonian poison spanner. What really are the only non-poison plant threats?
When the Shield argonians spawn, look before you attack. Make sure the one you leave alone is not near a poison plant. Their attacks are high damaging: you should have harness magicka slotted for this stage to begin with (I’d replace Extended Ritual) and a reflect so you can take the time to examine the environment.
All these precautions being taken, there still is one danger that is a bug and I’m not sure there is anything you can do about: If the boss stomps after one argonian shielder is dead and before it does its scream attack, it hits you as if it was enraged. This one shots any glass cannon that isn’t a warded sorcerer. I don’t know if it would one-shot me and I wasn’t about to find out. My advice is to take this super cautiously. Cast harness magicka before the final attack that kills a shielded argonian. You could even go as far as to wait until the boss stomps and then coup d’grace the first shielded argonian.
This bug is why you want to get this fight over with as quickly as possible and why I would recommend using the power sigil and not kiting.
Stage 8: Igneous Cistern
This stage isn’t difficult. But you’ve come this close, so caution and power sigils are still the way to go.
In the entire stage, there are only four circumstances that pose a danger:
I think the fire-spinner spawns on a timer, but sometimes I burn the three totems and DPS the boss and never see him. And sometimes he spawns just as I am at the third totem. So I don’t know. And uncertainly is not something you want here. So what I did was burn the two totems, left the third at 10% and then waited for the spawn and killed him. Then (with the power sigil) nuked the boss, grabbed the defensive sigil so the fire atros wouldn’t annoy me, and repeated the process: leave one totem at 10%, kill the spinner, then finish off the boss. I even grabbed the speed sigil at one point because the boss was getting too close to me and my resources were kind running low. This is extremely conservative, but how pissed off would I have been had I burned the three totems, was DPSing the boss, only to see the fire-spinner on the other side of the map channeling Inferno when I have no ranged interrupt? Extremely. I believe the best solution is to simply make such a scenario impossible to unfold.
Stage 9: Theater of Despair
You made it this far, don’t #%$& it up. Get every gold ghost. Use sigils at the slightest inkling of doubt or danger. Do not be cheap with your spectral explosions. Be very cognizant of the archers because they have a taking aim one-shot mechanic. My thoughts round by round:
ONE: This is easy. Don’t complicate it by trying to kill the Crematorium Guard that spawns at the end without using a spectral explosion. You get three ghosts in the round. Use them.
TWO: A pretty steep difficulty spike. The third wave has a Crematorium Guard and two adds (one is an archer). The fourth wave has an Ogrim, a super-snaring DK, and a NB with a very high damaging stun attack. You can’t use an ultimate for both. Whichever one you aren’t using a spectral explosion for, use the defensive sigil.
THREE: Arguably the most difficult round in the entire arena. There are three difficult pulls and you might only have one spectral explosion. GET THE GOLD GHOSTS to ensure you at least get one! The round starts off with a healer and Crematorium Guard. You do not want to use an ultimate if you don’t have to. If these things give you problems, the mage spawns right next to the power sigil. Use the power sigil to help burn them down. The second pull is just three annoying daedra. Not too hard. Consider heavy attacking to build up your ultimate/resources if that’s needed. Then comes the hard part: a two-handed mini-boss spawns, when it’s low on health an Ogrim an super-snaring DK spawns, and then a Crematorium guard + stunning NB + healer. I personally think it’s best to use the spectral explosion against the Ogrim. You do NOT want the Ogrim healing itself and be alive while the Crematorium guard is up – and it will be if you do not use something special; that’s a lot of incoming damage, even against my build. Do *NOT* hesitate to use the healing sigil and the defensive sigil, especially if you don’t have ultimate or missed a Gold Ghost. Even against a glass cannon build, the combination of these two will pretty much carry you through your mistakes.
FOUR: This isn’t hard. Even so, that Bone Colossus gets summoned real quickly so don’t get sloppy. The wave with the Ogrim + two summoners on opposite sides of the arena can be annoying; a spectral explosion there makes it a lot easier (note: this round just by a little stalling you can get a lot of gold ghosts: I typically stun both the Crematorium Guard and the Ogrim).
FIVE: You probably have a strategy to burn the Ash Titan, but remember, if you followed my advice on a build for survival, your DPS might have trouble pulling that off. The Crematorium Guard spawns by the power sigil, which is convenient because that’s what we are going to use against the Ash Titan. Like round three, you got to kill the Crematorium guard + an add (a stunning NB) and you don’t want to use an ultimate or spectral explosion. This is exactly why I really like my build; it’s not even a concern.
When the Ash Titan spawns, grab the power sigil, drop an ultimate, and DPS the crap out of it … while standing next to the defensive sigil. You are going to grab that sigil at some point before it does its fire wave. For whatever reason, an unsettling amount of times I just don’t make it to the safe spot in-between the fire waves; normally an insta-death, not on my build. The defensive sigil allows you to ignore all the archer spawns and finish off the Ash Titan at your leisure.
The most dangerous enemy in this round is not the Ash Titan, but the soul teathering stunning NB that spawns in the wave after. How many times when first doing the arena did you kill the Ash Titan only to get stunned and killed by the NB? Do *not* underestimate it. Once you are left with the Ogrim, use it to build up your ultimate and change you quickslot from trash magicka pots to tri-stat potions that refill all your resources. Do this before the round ends! The final boss fight is stamina intensive and if you run out of it, you’re dead. If you are the safe-type, your chances of survival are higher with purple tri-stat food than with blue dual-stat food. Consider that as well.
FINAL BOSS:
You are going to use all four sigils. I don’t care how easy your strategy has made this fight, you are using all four and taking zero chances.
If you have a ranged interrupt, I highly recommend you slot it. I trade Eclipse for Toppling Charge. This fight is stamina intensive and if you are relying on bash, then you are relying on luck for Flawless because it is no guarantee and you know it. A DK, NB, and Sorcerer who uses their respective disorient ability completely and pretty much permanently neutralizes any healer/summoner, which makes burning the boss easier. Harness Magicka is a strong skill on this stage. Console users are kind of screwed because they can’t just press a key to change their setups. *Do NOT be in your character menu when the boss spawns.* With tri-stat potions you already slotted the round before, my default build is good enough to clear this.
At this point in doing vMA, this fight is not really that much harder than the others; it is first timers that struggle mightily on it. You undoubtedly have a strategy that involves burning it, just keep in mind that if you followed my route, your DPS is not going to be as high and adjustment is probably necessary. Also, everyone’s approach is going to be different because some people bring a spectral explosion into the arena and doing so dramatically changes the course of the fight.
Burning the boss to 70% before it teleports and spawns a Crematorium Guard is *not* a guarantee. Because a Crematorium Guard will spawn anyway (instead of the healer) and if it breathes on you before you kill the clanfear on the correct portal, you are screwed if you go up top with that DOT. I’ve done the burn on my DPS build but do not know if I can on my PvP build. So I offer zero guarantees or assurances and the 70% burn strategy is not something I’d recommend testing if Flawless is on the line. If you pop your destro ultimate and the boss teleports out of it … now you have a Crematorium Guard and the mage add to deal with and you have no ultimate.
What I did (super-safe mode!):
Didn’t try 70% burn. I just played it normally because I’d rather know what I am dealing with…especially since I know the “normal” way won’t kill me. What I recommend to newer players is that they should grab the healing sigil after they block the boss’s first skull attack (and before he teleports) to deal with the Crematorium Guard, and that’s exactly what I did. Overkill for sure since I handle this just fine on my DPS build, but I’m not taking any chances and I’m using all four of these sigils.
Ignore the healer while killing the Crematorium Guard. Between the sigil and the heavy armor 23K health build, you can be sloppy and still survive. An AoE ultimate placed at the boss and the CG brings the boss down to 70% and kills the CG. Simply kill the healer before you go up to the crystals.
Note about the Walls. Do *not* chase them. Instead anticipate where they will explode and DPS that crystal, usually it’s faster to turn around and intercept the wall. The first wall will travel about 1 Crystal. The second one about 2. The Third one will make about a complete circuit. If there is a fourth wall, then you are hemorrhaging health and resources and doing it wrong.
I was able to burn the 3 totems on my build thus so should you, but there was not much margin for error. If you even sense the potential for running out of resources or dying, THEN JUMP DOWN. Yes. jumping down (as opposed to getting throw off) is a more conservative and safer strategy when burning the Crystals become a dicey proposition. OK, so you have a cleanfear and a Creamtorium Guard to kill. Big deal. Yeah, this was tough when first learning the arena, but:
When you destroy the Crystals and (ideally jumped) back down to finish off the boss, you have two dangers: running out of stamina and tunnel vision. Stamina is no joke; you were sprinting and dodge/blocking the skull attacks up top and now you need to sprint more & bash if that’s for some reason what you are relying on as an interrupt. If you are using blue food and spell power pots and run out of stamina, that’s your own fault for dying. If you just focus on the boss and ignore a Crematorium Guard or even the dumb summoner, you run a risk: you might miss a skull attack, the Bone Colossus might spawn faster than your DPS, the CG you ignored is breathing on you and you are using Radiant Oppression rather than Glory, etc. Lots of things can go wrong.
Whatever sigils you haven’t used yet, you are going to grab. You are also going to get the three gold ghosts and use your spectral explosion. If there is even a chance of the boss being alive after the spectral explosion stun wears off, you are going to kill the Crematorium Guard rather than ignore it (you have an AOE ultimate, it’s not asking much). Do NOT just ignore the summoner. The Bone Colossus spawns fast. In short, you are removing the potential threats before they arise and DPSing the boss in-between. If you have stamina, if you neutralize/kill the first summer, if you get the three gold ghosts and kill the CG before it can attack, you aren’t going to die.
The only potential RNG issue here is that sometimes a ghost spawns next to the boss and you won’t be able to get it. There is a technique to defend against this. Wait a bit to grab the defensive sigil, perhaps after the second gold ghost spawns (this is why I use the healing sigil against the first CG spawn). Let’s say the third gold ghost spawns next to the boss so you can spectral explosion the CG spawns. Big deal. Another gold ghost spans immediately after the CG, you are going to get it. Normally this is dangerous because of the boss’s channeled attack. Not in this instance because the sigil reflects it. So you will get that gold ghost! If you already used the defensive sigil, that means you have had some rotten luck so far, which is why you are happy to have a heavy armor build with 23K health because it can survive things such as this. You have to be able to kill the CG and interrupt the boss so be sure to follow the boss wherever he teleports to.
The guide is not how to get the best score or even necessarily the easiest way to clear these stages. Its sole intent is identifying those pulls/circumstances in the area you already are clearing at an 80-90% clip and lessen that possibility of a death. Because the laws of mathematics dictate even when faced with a 10-15% chance of failure, if there are enough of them – and in vMA there are – by accepting them you are more than tempting fate, you are enabling failure if your goal is Flawless. In fact, I would say the only time my guide is valid is if Flawless is your goal: I would most certainly not follow the many conservative strategies I outline if my goal was simply farming for a particular sharpened weapon (and even then, I’m not sure the laws of mathematics make that a worthwhile, let alone enjoyable, goal to pursue). So, understand that while this guide maximizes your odds for Flawless, it also will lengthen your run and lower your score (though I still got like 487,000 on a my templar, which isn’t bad for templars. Actually, it’s good for a templar with mediocre DPS that used power sigils!)
This is just a guide to how I did it. Use and tailor them as you see fit! They are meant for those folks who want Flawless and found it frustrating so far. I think the approach will work! It’s been a year since I have run this arena regularly. I have the “wrong” race. I use disposable potions that many people just vendor. I did not adjust a single champion point from my normal build. Nor did I change any morph. Did not change any gear. And my previous best score was like 370,000 or something. It took me three tries to get something I was quite frankly was not close to before. This arena has a reputation of being an RNGfest. I don’t think it is. I think most of the people who say that are lazy players who willfully accept at 10% chance for failure and comfort themselves by claiming that 10% is somehow not their fault, rather due to circumstances beyond their control. All this guide seeks to accomplish is to lower that 10% such that the laws of mathematics are now in favor of Flawless rather than against it.
My final observation would be this: it was sort of fun again to run vMA on a heavy armor build. There was a reason I stopped doing this content: I didn’t enjoy it. With my PvP build, I felt powerful and strong, felt like I was bullying the NPCs, felt like they couldn’t hurt me. It was … gratifying … in contrast to my previous experiences on a glass cannon build. Maybe variety is the spice of life and changing builds and approaches is the way to go rather than copying some perceived “best-in-slot” build or chasing some weapon you’re only hope to get is via RNG. I’ve done neither and Tamriel calls me “The Flawless Conqueror” Give it a shot!
Good luck!
Edited by Joy_Division on June 2, 2017 3:33PM I stopped running vMA when I got my sharpened staffs back in Spring 2016. A few weeks ago, I got the urge to get the Flawless achievement so decided to head back in vMA. It took me 3 tries on my templar. I basically brought my PvP build into vMA – without even changing CPs – and just used generic blue magicka pots. Maelstrom was legit hard when it came out; anything but a skilled DPS build had little shot. The game has changed; a build based on versatility and survival does just fine in vMA and has a huge advantage over DPS builds if your goal is survival. If I I can do it, then so can you! When vMA first came out I wrote a guide after my first complete to help others achieve the same. So this will be a follow up sorts on my advice to get Flawless Conqueror.
I think there are pathways to Flawless:
- The Alcast, AndyS, Gilliam, Streak, et. al, Youtubers/Streamers who complete their runs in <40 minutes. This method is the most reliable. By far. However, it requires top notched DPS, suburb skillplay, memorizing every single spawn, and not making mistakes. It maximizes DPS to destroy threats before they materialize. If you are reading this guide, you will not be able to follow their route until you run vMA like hundred times or even more and your skill is amongst the top 10% of all ESO players. They make it look easy because they are very good!
- Hoping for luck. Players who take over an hour, typically die 7-8 times, find their score plateauing in the 430,000 range, know the mechanics but do not have all spawns memorized, etc. This is the least reliable method. These players might think RNG is preventing them from that title, but it’s not. Their DPS is not enough to burn through some threats, they aren’t as efficient with their resources / ultimates because they don’t have everything learned by heart, they make occasional mistakes, etc.
- The path I took. I prioritized survival, wasn’t worried about my score, and did not pretend I was as good at vMA as Alcast & company. I brought my PvP build into the arena and despite not having run vMA in many months, completed it with only two deaths (one due to poison plant spawn!). I was no longer hoping for luck. It was only a matter of time before I got Flawless because I was relying on a solid foundation: using the mechanics of the game and eliminating the potentially lethal situations by not allowing them to materialize in the first place.
The strategies suggested by this guide are just that: suggestions. All of them seek to minimize the possibility of death, to eliminate the one or two supposed “RNG deaths” that torpedo Flawless runs. It was the path I took and that path was very safe and conservative. One could certainly adopt parts of it to suit their DPS glass cannon and play a bit more aggressively and do just fine. Whatever helps you and makes vMA fun for you I say go for it!
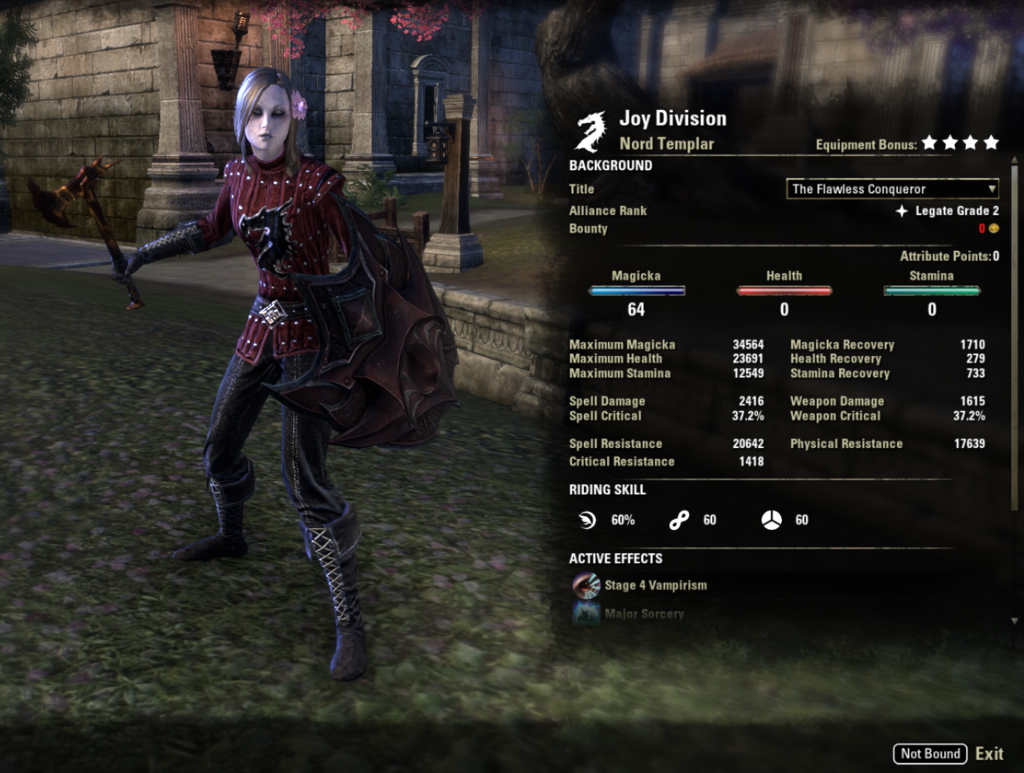
This is the build I run. No buffs except food.
Its stats are not very inspiring. However, I have found the best builds and most power in ESO do not lie in the raw stats, rather on the core mechanics of the game. It is a very versatile build. I have used it to tank even the DLC dungeons with no problem, without changing CP. And I have been beat on by enough AD and DC players to know that it can take the best the chump bosses in vMA can throw at it. All this while most of my CP specs are oriented toward trials healing since that’s my “role.”
I will explain the reasoning behind my choices so you can adapt a similar build/philosophy if you do not run a magicka templar.
Heavy armor rocks. Wear it. I have never worn heavy armor in any RPG I have ever played because quite frankly I don’t like it. About a year ago, the designers made mechanical changes to it such that it was not pigeonholed into being “tank” gear. If you’re looking for a hybrid DPS build that can take some punishment, this is precisely what the developers intended for you to use. This is exactly what you are looking for! There is no reason not to use it unless you are in a specialized raid build. While it’s true I can’t get elite DPSing wearing heavy, I still can get good DPS and enjoy all the goodies of heavy: the resistance, the health boost, the healing bonus, the Constitution resource return. I can get light armor’s crit and spell penetration back from other mechanics. It is a HUGE difference running vMA with 23K health and 23Kish (buffed) resistance than 17K health on a glass cannon.
Sword and Shield is very strong. It allows you to hold block and not die even on a non-tank build (I have very little invested in block cost reduction). And…dat ultimate! You know those times you are dying hoping your ultimate bar fills up? That’s no longer a problem because this only costs 100. Finally, it allows for an additional 5-piece set bonus, which after the One Tamriel update are very strong. Put down the resto staff and two swords.
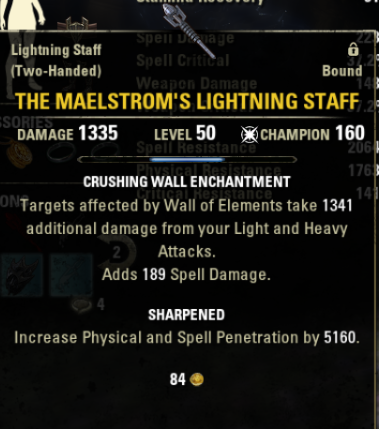
Lightning Staff. I PvP and thus use Eye of the Storm which is at best a meh PvE ultimate. That’s not why I use destro. Read the Elemental Drain skill real carefully (and after you do, stop hoping nerfing CP will somehow eliminate the “ultimate sustain” builds that have recently become the latest complaint of the month by the ESO community). With this single skill, I get my Light armor’s spell penetration back and have enough resource intake to run the Thief Mundas stone so I get Light armor’s crit back as well. Using this setup makes my build much stronger than the unbuffed stats would otherwise indicate. I use lightning because it ticks magickasteal much more often than inferno, plus the AoE is a nice bonus.
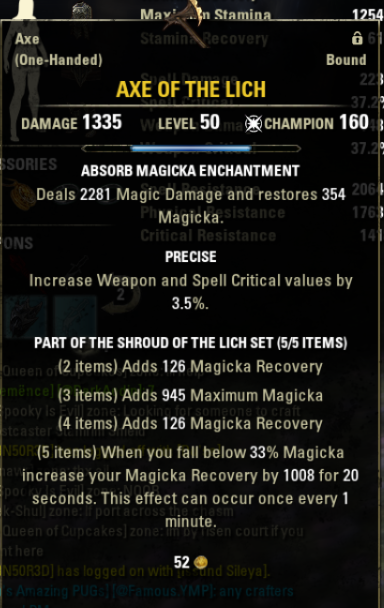
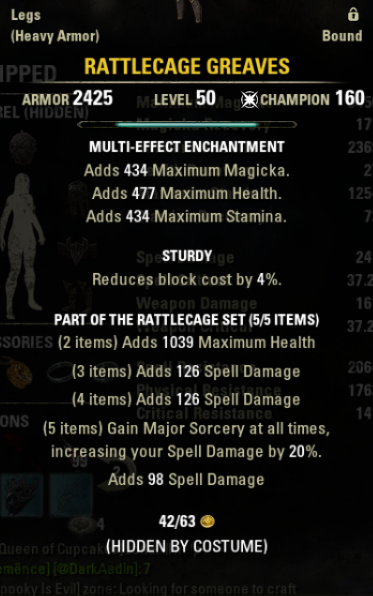
The sets I chose to use and what I think is an efficient and versatile setup that can do pretty much everything is Rattlecage and Lich.
- It is hard to argue a set out there is more efficient than Rattlecage. Soulshine does nothing for Breath of Life or what will be your most damaging skills (Wall of Elements, Blazing Spear, Reflective Light) and forces you to either to use costly potions or slot a meh skill in Degeneration for the major sorcery bonus. I am cheap and I value an extra skill slot.
- I think Lich is the best magicka sustain set in the game and it’s not even close. Even if you are a vampire, which I am, that uses Elusive Mist. I like Lich because it *always* works without having a specific trigger to proc it (e.g., hit by melee attack) and I don’t actually have to be wearing the 5-piece bonus to enjoy the benefit, which is one of the strengths of this build that does not show up on the stat sheet
- Grothdar is hands down the best Monster DPS set for PvE. (Note: I use Valkyn Skoria in PvP and I use Bloodspawn if asked to tank for a daily).
The beauty of the Rattlecage-Lich-Grothdar combination is that I can have three complete armor set bonuses while still using a destro staff as my primary weapon. It is very efficient setup that requires zero micromanagement or restrictive conditions.
On my rings, I use two regen glyphs and a spell damage glyph. If you have a magicka oriented race and are committed to heavy attacks, you can get away with adding an extra spell damage glyph. For Flawless attempts, I’d prefer to lean on the side of resources than damage since if this build has resources, it can pretty much survive whatever vMA throws at it.
But Joy, I hate farming stuff. Can you offer alternatives?
If there is a person who hates farming more in ESO than me, I have not met them. I am probably the only competitive person who has been here at launch and has never done any of the Craglorn grinds back in the day, quits dungeon grinds after getting a decent armor trait (as opposed to the best), and has flat out refused to chase after a Burning Spellweave weapon.
I would highly recommend you make friends with *both* PvE players and PvP players because they chase entirely different gear sets. When my PvP guild advertises to farm Lich, that’s terribly inefficient because they are looking for the same stuff I am. So I run Crypt of Hearts with my PvE friends because any Lich weapon or shield that drops, they’ll be nice enough to give me.
The other thing I would recommend is that even though there is one trait to rule them all (impen/divines or sharpened), if you get serviceable traits and would rather play than farm, then play. I have an infused Lich shield; it’s good enough. I have a precise Lich axe. I’d prefer defending, but precise isn’t bad and will be good enough in 98% of my fights. The only traits I would deem as critical are a sharpened mainbar weapon and to make sure you have enough impen not to explode in PvP (4 pieces will due, especially if you have a sturdy somewhere).
The one thing I have that you might not have a reasonable chance at getting is a sharpened Maelstrom Lightning staff. Lacking one, I would just make a generic sharpened staff and enchant it with a spell/weapon power glyph. Your average spellpower will approximate mine, though you’ll miss the basic attack bonus provided by Elemental Wall. It’s not a huge deal.
As a side note if you really want a sharpened vMA staff, then stop doing the arena on your sorcerer, and hop onto your dragonknight. ON PC NA, all you need to do is finish on your DK to get a weekly gold drop (whereas you need a score in excess of 500,000 on a sorc or nightblade. Even a 425,000 score is not guaranteed on a templar). A DK doubles your chance and still nets you gold tempers even when you get a weapon you don’t want.
Why I like this build:
- When I used to run vMA in light armor, there were times I ran out of magicka because – regardless of what the “infinite resource” complainers say – resource management does not come for free in ESO when chasing max DPS (exceptions being in a Trial raid with multiple healers/support and perhaps the Vicious Ophidian set for stamina users). Unless you are Alcast, Gilliam, etc. who make very few mistakes and have the arena memorized to maximize their small resource pools, you too will run out. I wear heavy and not once had magicka issues.
- Even the trash adds basic attacks do quite a bit of damage. Not to me.
- You know how there are mechanics designed to one-shot or kill a typical DPS (such as the Ash Titian firestorm)? I survive them.
- Sword and shield allows me to block and shrug off dangerous attacks. The ultimate is cheap and thus will most likely be available is you are ever in an “oh ***” moment – which is what you care about since you are going for Flawless rather than score.
- You actually can use your stamina pool for stuff like dodge rolling, sprinting, block without fear of running out.
- Run this after running your light armor DPS build. It is sooooo much more resilient and thus forgiving of mistakes.
- Mostly, this build compensates me for what would be normally be considered crippling vMA weakness (mediocre DPS, nonoptimal CP setups, prone to making mistakes) such that they merely delay completing a round as opposed to killing me.
In short, it strives for efficiency and versatility as opposed to pure power. Instead of relying on luck, it relies on ESO’s mechanics. If you are like me, a somewhat lazy person who hates to respec or switch CPs, who is a good player but makes mistakes, then this is going to be the most efficient path and least frustrating path to getting Flawless.
My Bars:
- Blazing Spear: Yes the stun removal is very painful here. But we have a robust build that can take punishment so the extra DPS maybe a better deal. This is too good of a DPS skill not to bar and use every 8 seconds.
- Channeled Focus: Resistance and Resources. It’s boring, but since our goal is to not die, this skill is very important.
- Extended Ritual: I use this because I PvP and I’m too lazy to change morphs to Ritual of Retribution, which I think would be a perfect skill for vMA. This is potentially a flex spot, although I find it hard to believe there is something out there that better suites your primary goal – survival – than this skill that heals you and increases your healing done while snaring and potentially damaging enemies.
- Honor the Dead: It’s way better than Breath since vMA is solo. As I PvP and rarely group on my EP, I already have this morph selected.
- Total Dark: Yes this skill sucks, but you are going to use it on the absolute only enemy it works on: non elite ranged mobs too dumb to CC break. I would not even bother with this if score is your objective because the skill is that bad. All that being said, what Total Dark does do is give you 6 seconds of safety from dangerous ranged adds, which you need because your DPS is not high enough to simply burn everything. This skill simplifies everything past stage 2.
- Spellwall: This is your “oh ***” button, exactly what you need when survival as opposed to score is the goal. I tried Empowering Sweep; don’t if Flawless is your goal. Yes, will get you a higher score since it’s cheaper, provides strong mitigation, and gives you 10% extra crit … but the whole point of this exercise is to get Flawless, not add 15,000 to your final score.
- Elemental Drain. Use on every enemy that is elite or higher.
- Puncturing Sweeps. My previous guide advocated constant spam of this ability. That not necessary for survival now. Your DoTs are more efficient damage dealers so ensure they are always up before just spamming sweeps.
- Radiant Destruction. I would recommend the Radiant Glory morph if you are the type that doesn’t mind respecing. That morph is more suited for this content. I did not repec since after my first attempt in vMA on this build, I felt confident enough I could get Flawless with RD.
- Reflective Light. I used to poo poo this skill, but I have come to see the light (see what I did there
 ). DoTs are extremely efficient in PvE and this morph hits 3 enemies for the price of one skill and gives you major sorcery. So no need for mage light or expensive potions. I don’t believe the Vampire’s Bane morph is competitive.
Wait, why no Inner Light, which is standard on PvE DPS builds?Because this isn’t a standard PvE DPS build. I’m a Nord so I am already a suboptimal race and don’t forget, we are running heavy armor so our DPS isn’t going to be high in the first place. So chasing some bonus magicka, when I already have a smaller pool than most players to begin with, is not efficient. Besides, slotting Inner Light means I’d have to remove Ritual or Eclipse and rearrange my bars, neither or which I want to do since both would be counterproductive to the only goal I care about: survival. - Wall of Elements. The best magicka DPS skill in the game. Make sure it is always down.
- Eye of the Storm. The placed ultimate is the more effective PVE morph, but as you guessed it, I hate respeccing. I chose this over meteor because most vMA fights are AoE, plus I like the destro passive that returns magicka on a kill.
Note: Purifying Light is a fantastic skill. An argument can be made for its use over Total Dark or Extended Ritual. I used it on my first vMA run and only had 2 deaths. But I noticed I was not using it all that much (mostly because stuff dies so fast) and felt ranged adds were still enough of a threat that neutralizing them with Eclipse made the stages easier.
Joy, I don’t play a magicka templar. What should I do?
The same. I just provided a template. The heavy armor / versatile approach works for every archetype except perhaps magicka sorcerer. In fact, it probably works better on stamina builds. There are stam damage oriented heavy sets like Seventh Legion. The infamous Blackrose-Viper-Velidreth combination would wreak havoc in Maelstrom as it did in Cyrodiil. You could use the standard Bow back bar and consider Sword and Shield. Sure, it’s not a trial DPS build – neither is mine - but it still does good damage (especially with a bash animation cancel), skills like Low Slash are very good, and the extra tankiness is exactly what Flawless aspirants need. Even magicka NBs, you don’t have to play a burst high damage build.
The point is if you are reading this, your trial DPS setup has not gotten Flawless. I ran the standard Burning Spellweave DK build and while I can complete vMA faster using that, it’s sooooooo much squishier and there always seems to be 3 or 4 or 5 places that I die. As we can get good DPS and enjoy legit tanking ability wearing heavy … why wouldn’t we use that if our entire goal, the raison d’etre, is an hour’s worth of difficult content without dying?
- If I had a mDK: I would use Deep Breath because it is an amazing tank and DPS skill that interrupts. I would use Reflective Scales on every round (except possibly the final round – the biggest threats are not reflectable - where I would use Fossilize instead). Dragon Blood makes a restoration staff unnecessary. I’ve seen people not use Burning Embers. That only works with a glass cannon or specific heavy attack build. Burning Embers is amazing because it is the most efficient DPS skill in the game and when spammed can heal you through most of the damage the arena can throw at you.
- If I had a magicka sorcerer: I probably would go the Scamp + necropotance glass cannon route. Your shields + pet make the heavy armor route moot.
- If I had a mNB: I don’t so perhaps I am not the best person to ask for advice. With their HoTs and harness magicka, I’m pretty sure my template would work.
- If I played stamina: I have dabbled in it, but again I am probably not the best person for advice. My instincts tell me that my approach would be very similar, namely I am willingly giving up BiS DPS (dual wield) + 18K health medium, for a more versatile build with higher resistances that uses a weapon setup associated with tanks (sword and shield). These builds are very strong in Cyordiil so that’s why I think these players can bring them to vMA as I did to get Flawless.
Some more specific comments on the Power Sigils.
If you are reading this guide, that means you are going to use these. Period. End of story. They are available every single round. They turn dying into winning. They are that strong. Objectively analyze what is killing you, grab the appropriate power sigal for the situation, and then proceed onto to the next arena. They are not for "noobs" or are "crutches." Pride goeth before a fall.
- The power sigal (the hammer): I think this one is a bit overrated as typically moar DPS is not going to save you from a lethal situation. Obviously always use for main bosses that are DPS races. Otherwise the most effective use for this sigal are to burn mini-bosses, the two-handed Daedra in stages 6 and 9 for example. In general, the other three sigals are better at keeping you alive so I would prioritize them if you find yourself struggling at a particular juncture.
- The Defensive Sigal (the Shield): By far the most useful. It reflects just about just about every ranged attack (key exceptions: the Inferno channels from the spinny mages in Stage 8 and the Final Boss's skull attack). It also increases your overall mitigation so you take less damage. If you have this active you should not die; that's how powerful it is. You get this *every* round of *every* stage. Think about that.
- The Haste Sigal : (the weird looking thingy). Probably the most underrated. It not only increases your speed, but also your regeneration. So if you are running low on resources, just grab this. Any time you are pitted against lumbering dangerous melee adds you or are just tired of dealing with the annoying ever-present snares or just have to get a "safe" zone really quick, this sigal will help more than the others.
- The Healing Sigal : (the Chalice). Not overtly powerful but situationally incredibly useful. Anytime you know there is a lot of unavoidable damage that you just have to eat (e.g. Crematorium Guards on final stage, two troll mini-bosses during the Argonian stage, when the lurcher spawns on spider boss stage, etc.), this sigal can make a decisive difference in a way the power sigal cannot.
General Tips and Advice.
- Power sigils are your friend. As every round and every stage you can use four of them, you should never die. The main reason you haven’t gotten Flawless yet is either your ego or you have prioritized a higher score.
- During those points in the arena in which you sense danger, resist the temptation to take a chance (which invariably means hoping to do enough DPS to kill the immediate threats) and instead adopt a conservative / safe approach. On my templar, this usually meant block-casting Honor the Dead while grabbing the defensive sigil.
- If you are less than 50% of your primary resource and there is one trash mob up stop spamming DPS skills on it. Simply heavy attack it to refill your magicka/stamina pool. Note: Especially effective with elemental drain and a lightning staff.
- I know vMA is a huge DPS race and my build runs counter to that. However, ZoS has provided us with the damage sigil which will allow even a mediocre DPS build the needed damage to more than do the job. Use it liberally against bosses/mini-bosses that are DPS checks (such as the big Dwemer spider boss on stage 4 or elite spawns). That sigil is just another reason heavy armor works fine in vMA.
- I don’t think mitigation works with environmental hazards. These still hurt and are not to be underestimated.
- Don’t be afraid to block. Especially if you have sword & shield. It’s a world of difference from a staff using light armor build
- This goes without saying, but I’ll say it anyway. Keep up your DoTs and buffs. Glass cannon builds will sometimes be under so much pressure they might find doing so difficult at time. A heavy armor user has no excuse. Even under duress, it is easy peasy to switch to my Sword and shield bar, block-cast a blazing spear, then put down a Ritual, an honor the dead, and then go right back to my DPS bar pretty much at full health. Heavy armor allows for much more efficient gameplay. Be sure to take advantage of it!
- I am a big believer in having the right mental / psychological approach in all aspects of life. If you aren’t having fun in vMA, I don’t think you should be doing the content. I thought running a heavy armor build was awesome as it shrugged off enemy mobs that used to frustrate me. Enjoy the power! Do not fret over the final treasure chest (I guarantee upcoming patch will make that sharpened weapon obsolete) or say two deaths. If you died twice and had a similar experience as me, it is only a matter of time before you get Flawless.
- I am also a big believer in honest self-reflection. It’s natural to make excuses to rationalize our failures. Stop. 9 out of 10 times, it wasn’t RNG that killed you, rather it was a poor decision or a flaw in your build.
Specific Stage by Stage advice:
Stage 1: Vale of the Surreal . You don’t need help here! Just be cognizant that the boss is a DPS race and you’re not doing as much on a heavy armor build. Do not be discouraged if you feel he survives uncomfortably long. You could have used the power sigil (and the defensive sigil rendering you invincible to his attacks for good measure) to make the fight a lot shorter but you didn’t.
Stage 2: Seht’s Balcony . The blades are mere nuisances now, but still the only thing that can kill you so just keep up the HoTs/shields/heals. Even with your mediocre DPS, you will spend more time waiting for the bosses to come out of their protective hibernation than actually fighting them. Biggest challenge here is watching your magicka pool because while you are standing around the blades are forcing you to consume resources without actually damaging the bosses. So don’t be afraid to heavy attack once in a while (or grab the speed sigil).
Stage 3: Drome of Toxic Shock . The only real threat is the water and the accompanying high lightning damage that comes from standing in it. Like the previous stage, the extra health and mitigation from heavy is welcome. The only real advice I think is needed here is that it is very convenient to start the final boss at full resources so just heavy attack the hag mini-boss if you aren’t full yet.
As for the Lamina Boss, I don’t think moving from island to island trying to kill the annoying plants is necessary. Even as a light armor templar I typically just stayed put and burned her and with heavy, that’s much easier. The biggest nuisance is the ranged mage. If you feel it threatening, you could simply take the fight to where it spawns or use reflect (eclipse, DK wings, defensive posture, or defensive sigil) to neutralize it.
Stage 4: Seht’s Flywheel This is the first stage that has spawns dangerous enough to kill you. Specially the third round will have two dwemer spheres. If you do not have your ultimate up, use the defensive sigil. They probably won’t kill you because you got more health and more mitigation than you are used to and they usually didn’t kill you before, but you are playing it safe, following my advice of not taking unnecessary risks. Is 750 points worth even a 10% chance of dying? Not when my goal is Flawless!
For the Dwemer Spider boss, if you feel you need the extra DPS, use the power sigil. I didn’t burn the boss during its first explosion phase which you may be accustomed to doing on your glass cannon build. So I made sure to destroy the two dwemer adds that spawned (be careful of the sphere, it likes to stay at range and can be hard to find, which can be an issue as it’s a high damaging opponent). I was able to burn the boss during the second green / safe phase and thus so should you. If you aren’t, then use the power sigil and be more disciplined maintain your DoTs on the boss when it’s exploding.
Stage 5: Rink of Frozen Blood (Ice Flows) This is going to be your first big test. The 2nd wave is no picnic and the 3rd and 4th rounds are legit tough: the 3rd may be the most difficult non-boss spawn in the entire arena because of the large number of high damaging ranged adds.
I think the trolls are more of a nuisance than a priority. They do no damage and the Neried that spawns is easily neutralized with a reflect ability. I know killing them is convenient, but it’s just that, convenient rather than strictly necessary.
What you have to worried about are the ranged adds. If you are a melee oriented build, read everything except a mag sorc and maybe mag NB, you really want a reflect ability, even if that means slotting sword and shield. Dying to them in this stage is your fault, not the developers for making it too hard. Nuking them when they spawn is ideal. Failing that, move toward the edge on an ice flow to entice them to move toward you and out of the water to make targeting them easier. You also have the sword and shield ultimate: I know you want to desto ultimate them, but if you’re in trouble, play conservatively and pop Spellwall, you’ll still kill them and survive. If all else fails you have the Defensive Sigil: fight on the third round on that platform so it’s there just in case.
This is my advice for the 3rd round:
There are three spawns.
- Nereid, frost atro, archer spawn on starter platform (i.e. the one you first spawned on). Mage spawns on Health sigil platform.
- 2 Nereids and ogre spawn on Health sigil platform.
- Nereid, archer, mage, frost atro spawn on double Sigil platform
The easiest way to do this is to build your ultimate on the boss before this wave (it’s the Ice Ogre, a pushover) and begin on the Starter platform. When the Nereid and archer die, make you way to the double Sigil platform. The mage will be in ice water and annoy you; reflect or ranged it down. When the next wave spawn, grab the defensive sigil (it’s on your island). It will not only make short work of this wave, but the next highly dangerous one…which happens to spawn right where you are for convenience
For the 4th round, you just have to avoid giants’ cleaves.
Giant Boss: The only boss in vMA where too much DPS actually makes the fight harder. Spawns and platform breaks are based on health percentage. You control the pace of the fight, not the developers! The safest way to avoid death is to use your ultimate on either the first set of adds or the second and make sure the last platform up is the one with the Defensive Sigil. After the boss breaks the second platform, grab the Defensive sigil and then you can ignore everything and just burn her down.
Stage 6: Spiral Shadow
You first priority is killing the webspinners that cover up the glowing pillars. It’s not a RNG death if the swarm catches you, it’s a failure of prioritization on your part. Hugely important: If there are not at least 2 glowing safe zone when a swarms arrives, you are dead if a webspinner spawns. Always always make sure there are multiple safe zones; nothing else is more important. Sometime light armor builds run into stamina issues here because sprinting and CC breaking are necessary: you will not have that issue.
The three most dangerous parts of this stage are:
- Round 3 when the 2H negate mini-boss spawns. I believe he is threatening enough to use a horvor and super-stun everything and simply kill him.
- Round 3 when the two archers spawn after the negating mini-boss. If the mini-boss is still alive when these spawn, you are in trouble. Hence why I believe stunning the negating boss is optimal. If you are unable to stun him, I would absolutely use the Defensive Sigil if my goal was Flawless and I had zero deaths.
Note: You *must* kill the first horvor that spawns after you stun anything because there is only one safe zone. - Round 4: you once again will have the pattern of a high damaging mini-boss and two archers than spawn afterward. I would rather not risk trying to setup the perfect super-stun to burn the final spider boss if I felt threatened by this wave, but that’s just me. So I uses the super-stun Alternatively an ultimate and the defensive sigil will also neutralize the mini-boss + archer combination.
Spider Boss: I know there is a burn strategy, but my build isn’t a raid DPS so I instead played it safe, which means not counting on that super-stun ultimate combination. Rather, every action I did was governed by how to not die. This meant:
- Ensuring I do not run out of magicka. Since we aren’t burning her, there is a lot of healing involved. Do not hesitate to grab the Speed sigil and heavy attack if these are necessary.
- Killing any horvors and webspinners that spawn regardless of the situation.
- I used the Defensive sigil when the tree spawns and killed it while in comfort of being immune to the boss.
- Never allow healthbar to drop below 50%
There really is only one danger: If she is alive after you super-stun her, and she probably will be, do NOT think you can finish her off rather than destroying the first horvor and webspinner that spawn. Because that webspinner quickly spawns after the super-stun and so does a spider spawn; if there is only the one glowing safe-zone, you’re dead.
Stage 7: Vault of Umbrage (Poison Plants!) This is the real challenge, right? Where Flawless runs go to die because of the infamous poison plant spawns. Have you ever thought of why ZoS never changed the round despite its infamy and overwhelming calls from the community? Because the perspective that well over 90% of all poison plant deaths are preventable is a perfectly valid one. If we are being honest here, and I’m a big fan of honesty instead of self-exculpating excuses, many of us are lazy players who take the easy route because it works the vast majority of the time or we are greedy players who expect to have our cake and eat it. These are the three times that account for just about all my poison deaths:
- The wamsu lightning breath super slows me and I can’t move to green safety pools
- There is a plant nearby and I’m too lazy to move a little bit away while burning adds (they will follow you!)
- When the 2 shield argonians spawn, I kill the first one I see and just hope there isn’t a mushroom by the other. LOL.
These are preventable. And that’s my strategy for this entire stage.. Obviate the RNG death by never allowing the confluence of circumstances that allow for their possibility. This stage is *not* hard. It is much easier than the previous two. The adds are pretty pathetic actually. Nuke the Argonian poison spanner. What really are the only non-poison plant threats?
- Your gear. How often did you forget to take off your Grothdar or other proc set and killed the shield argonian? Put on Valkyn Scoria and be careful where you aim your elemental walls.
- The troll mini-boss ground pound. Dodge out of it. Note: Their rock attacks are considered projectiles and thus reflectable.
- The archer’s conal Acid Spray attack. That’s not like the regular ability, it counts as a poison-plant proc. Move out of it!
- The wamasu mini-boss at the end of round 3. It is a legit threat because it has a 90% snaring attack and that kills you because either a poison plant spawns or you can’t dodge the insta-kill electrical ground AoEs it fires. YOU ARE GOING TO GRAB THE SPEED SIGIL BEFORE IT SPAWNS rather than relying on dodging its first attack. Nothing it does can kill you if you are hasted unless you are a noob.
- The three archers wave that spawns in round 4. Grab the Defensive Sigil. Bonus: it will also reflect the two trolls rock attacks that spawn afterward. It’s an obvious strategy.
When the Shield argonians spawn, look before you attack. Make sure the one you leave alone is not near a poison plant. Their attacks are high damaging: you should have harness magicka slotted for this stage to begin with (I’d replace Extended Ritual) and a reflect so you can take the time to examine the environment.
All these precautions being taken, there still is one danger that is a bug and I’m not sure there is anything you can do about: If the boss stomps after one argonian shielder is dead and before it does its scream attack, it hits you as if it was enraged. This one shots any glass cannon that isn’t a warded sorcerer. I don’t know if it would one-shot me and I wasn’t about to find out. My advice is to take this super cautiously. Cast harness magicka before the final attack that kills a shielded argonian. You could even go as far as to wait until the boss stomps and then coup d’grace the first shielded argonian.
This bug is why you want to get this fight over with as quickly as possible and why I would recommend using the power sigil and not kiting.
Stage 8: Igneous Cistern
This stage isn’t difficult. But you’ve come this close, so caution and power sigils are still the way to go.
In the entire stage, there are only four circumstances that pose a danger:
- In the third round, a fire-spinner will spawn with the tree mini-boss. Melee players are especially vulnerable because the tree hits like a truck and the two fire atros lobbing in homing attacks complicate matters. The fire-spinner needs to die ASAP and would recommend using an ultimate even if the goal was not Flawless. The defensive sigil here is particularly strong.
- At the beginning of the fourth round, 4 mages will spawn, 2 of them that can use the channeled inferno attack. As these 4 spawn literally on top of the defensive sigil, the best strategy for dealing with them is obvious.
- The mini-boss at the end of the fourth round puts out a *lot* of burst damage with her flame breath, fire trail, and whip attack. That needs to be cleansed, shielded, and healed through quickly. If I were a stamina build and I wasn’t using Rally, I absolutely would grab the healing sigil with Flawless on the line.
- You’ve begun to dismiss the end boss at this stage because you have been bursting her down. Even if she isn’t burst down, quite frankly, she should never kill an experienced player because she’s slow and all melee. There is only one way you should ever die and it’s totally preventable: you break the stones and start nuking the boss and then the fire-spinner spawns does his channeled inferno attack.
I think the fire-spinner spawns on a timer, but sometimes I burn the three totems and DPS the boss and never see him. And sometimes he spawns just as I am at the third totem. So I don’t know. And uncertainly is not something you want here. So what I did was burn the two totems, left the third at 10% and then waited for the spawn and killed him. Then (with the power sigil) nuked the boss, grabbed the defensive sigil so the fire atros wouldn’t annoy me, and repeated the process: leave one totem at 10%, kill the spinner, then finish off the boss. I even grabbed the speed sigil at one point because the boss was getting too close to me and my resources were kind running low. This is extremely conservative, but how pissed off would I have been had I burned the three totems, was DPSing the boss, only to see the fire-spinner on the other side of the map channeling Inferno when I have no ranged interrupt? Extremely. I believe the best solution is to simply make such a scenario impossible to unfold.
Stage 9: Theater of Despair
You made it this far, don’t #%$& it up. Get every gold ghost. Use sigils at the slightest inkling of doubt or danger. Do not be cheap with your spectral explosions. Be very cognizant of the archers because they have a taking aim one-shot mechanic. My thoughts round by round:
ONE: This is easy. Don’t complicate it by trying to kill the Crematorium Guard that spawns at the end without using a spectral explosion. You get three ghosts in the round. Use them.
TWO: A pretty steep difficulty spike. The third wave has a Crematorium Guard and two adds (one is an archer). The fourth wave has an Ogrim, a super-snaring DK, and a NB with a very high damaging stun attack. You can’t use an ultimate for both. Whichever one you aren’t using a spectral explosion for, use the defensive sigil.
THREE: Arguably the most difficult round in the entire arena. There are three difficult pulls and you might only have one spectral explosion. GET THE GOLD GHOSTS to ensure you at least get one! The round starts off with a healer and Crematorium Guard. You do not want to use an ultimate if you don’t have to. If these things give you problems, the mage spawns right next to the power sigil. Use the power sigil to help burn them down. The second pull is just three annoying daedra. Not too hard. Consider heavy attacking to build up your ultimate/resources if that’s needed. Then comes the hard part: a two-handed mini-boss spawns, when it’s low on health an Ogrim an super-snaring DK spawns, and then a Crematorium guard + stunning NB + healer. I personally think it’s best to use the spectral explosion against the Ogrim. You do NOT want the Ogrim healing itself and be alive while the Crematorium guard is up – and it will be if you do not use something special; that’s a lot of incoming damage, even against my build. Do *NOT* hesitate to use the healing sigil and the defensive sigil, especially if you don’t have ultimate or missed a Gold Ghost. Even against a glass cannon build, the combination of these two will pretty much carry you through your mistakes.
FOUR: This isn’t hard. Even so, that Bone Colossus gets summoned real quickly so don’t get sloppy. The wave with the Ogrim + two summoners on opposite sides of the arena can be annoying; a spectral explosion there makes it a lot easier (note: this round just by a little stalling you can get a lot of gold ghosts: I typically stun both the Crematorium Guard and the Ogrim).
FIVE: You probably have a strategy to burn the Ash Titan, but remember, if you followed my advice on a build for survival, your DPS might have trouble pulling that off. The Crematorium Guard spawns by the power sigil, which is convenient because that’s what we are going to use against the Ash Titan. Like round three, you got to kill the Crematorium guard + an add (a stunning NB) and you don’t want to use an ultimate or spectral explosion. This is exactly why I really like my build; it’s not even a concern.
When the Ash Titan spawns, grab the power sigil, drop an ultimate, and DPS the crap out of it … while standing next to the defensive sigil. You are going to grab that sigil at some point before it does its fire wave. For whatever reason, an unsettling amount of times I just don’t make it to the safe spot in-between the fire waves; normally an insta-death, not on my build. The defensive sigil allows you to ignore all the archer spawns and finish off the Ash Titan at your leisure.
The most dangerous enemy in this round is not the Ash Titan, but the soul teathering stunning NB that spawns in the wave after. How many times when first doing the arena did you kill the Ash Titan only to get stunned and killed by the NB? Do *not* underestimate it. Once you are left with the Ogrim, use it to build up your ultimate and change you quickslot from trash magicka pots to tri-stat potions that refill all your resources. Do this before the round ends! The final boss fight is stamina intensive and if you run out of it, you’re dead. If you are the safe-type, your chances of survival are higher with purple tri-stat food than with blue dual-stat food. Consider that as well.
FINAL BOSS:
You are going to use all four sigils. I don’t care how easy your strategy has made this fight, you are using all four and taking zero chances.
If you have a ranged interrupt, I highly recommend you slot it. I trade Eclipse for Toppling Charge. This fight is stamina intensive and if you are relying on bash, then you are relying on luck for Flawless because it is no guarantee and you know it. A DK, NB, and Sorcerer who uses their respective disorient ability completely and pretty much permanently neutralizes any healer/summoner, which makes burning the boss easier. Harness Magicka is a strong skill on this stage. Console users are kind of screwed because they can’t just press a key to change their setups. *Do NOT be in your character menu when the boss spawns.* With tri-stat potions you already slotted the round before, my default build is good enough to clear this.
At this point in doing vMA, this fight is not really that much harder than the others; it is first timers that struggle mightily on it. You undoubtedly have a strategy that involves burning it, just keep in mind that if you followed my route, your DPS is not going to be as high and adjustment is probably necessary. Also, everyone’s approach is going to be different because some people bring a spectral explosion into the arena and doing so dramatically changes the course of the fight.
Burning the boss to 70% before it teleports and spawns a Crematorium Guard is *not* a guarantee. Because a Crematorium Guard will spawn anyway (instead of the healer) and if it breathes on you before you kill the clanfear on the correct portal, you are screwed if you go up top with that DOT. I’ve done the burn on my DPS build but do not know if I can on my PvP build. So I offer zero guarantees or assurances and the 70% burn strategy is not something I’d recommend testing if Flawless is on the line. If you pop your destro ultimate and the boss teleports out of it … now you have a Crematorium Guard and the mage add to deal with and you have no ultimate.
What I did (super-safe mode!):
Didn’t try 70% burn. I just played it normally because I’d rather know what I am dealing with…especially since I know the “normal” way won’t kill me. What I recommend to newer players is that they should grab the healing sigil after they block the boss’s first skull attack (and before he teleports) to deal with the Crematorium Guard, and that’s exactly what I did. Overkill for sure since I handle this just fine on my DPS build, but I’m not taking any chances and I’m using all four of these sigils.
Ignore the healer while killing the Crematorium Guard. Between the sigil and the heavy armor 23K health build, you can be sloppy and still survive. An AoE ultimate placed at the boss and the CG brings the boss down to 70% and kills the CG. Simply kill the healer before you go up to the crystals.
Note about the Walls. Do *not* chase them. Instead anticipate where they will explode and DPS that crystal, usually it’s faster to turn around and intercept the wall. The first wall will travel about 1 Crystal. The second one about 2. The Third one will make about a complete circuit. If there is a fourth wall, then you are hemorrhaging health and resources and doing it wrong.
I was able to burn the 3 totems on my build thus so should you, but there was not much margin for error. If you even sense the potential for running out of resources or dying, THEN JUMP DOWN. Yes. jumping down (as opposed to getting throw off) is a more conservative and safer strategy when burning the Crystals become a dicey proposition. OK, so you have a cleanfear and a Creamtorium Guard to kill. Big deal. Yeah, this was tough when first learning the arena, but:
- You aren’t a noob anymore
- You are on a more survivable build
- You are going to use the defensive sigil you haven’t used yet.
- They aren’t going to kill you
When you destroy the Crystals and (ideally jumped) back down to finish off the boss, you have two dangers: running out of stamina and tunnel vision. Stamina is no joke; you were sprinting and dodge/blocking the skull attacks up top and now you need to sprint more & bash if that’s for some reason what you are relying on as an interrupt. If you are using blue food and spell power pots and run out of stamina, that’s your own fault for dying. If you just focus on the boss and ignore a Crematorium Guard or even the dumb summoner, you run a risk: you might miss a skull attack, the Bone Colossus might spawn faster than your DPS, the CG you ignored is breathing on you and you are using Radiant Oppression rather than Glory, etc. Lots of things can go wrong.
Whatever sigils you haven’t used yet, you are going to grab. You are also going to get the three gold ghosts and use your spectral explosion. If there is even a chance of the boss being alive after the spectral explosion stun wears off, you are going to kill the Crematorium Guard rather than ignore it (you have an AOE ultimate, it’s not asking much). Do NOT just ignore the summoner. The Bone Colossus spawns fast. In short, you are removing the potential threats before they arise and DPSing the boss in-between. If you have stamina, if you neutralize/kill the first summer, if you get the three gold ghosts and kill the CG before it can attack, you aren’t going to die.
The only potential RNG issue here is that sometimes a ghost spawns next to the boss and you won’t be able to get it. There is a technique to defend against this. Wait a bit to grab the defensive sigil, perhaps after the second gold ghost spawns (this is why I use the healing sigil against the first CG spawn). Let’s say the third gold ghost spawns next to the boss so you can spectral explosion the CG spawns. Big deal. Another gold ghost spans immediately after the CG, you are going to get it. Normally this is dangerous because of the boss’s channeled attack. Not in this instance because the sigil reflects it. So you will get that gold ghost! If you already used the defensive sigil, that means you have had some rotten luck so far, which is why you are happy to have a heavy armor build with 23K health because it can survive things such as this. You have to be able to kill the CG and interrupt the boss so be sure to follow the boss wherever he teleports to.
Final Remarks
The guide is not how to get the best score or even necessarily the easiest way to clear these stages. Its sole intent is identifying those pulls/circumstances in the area you already are clearing at an 80-90% clip and lessen that possibility of a death. Because the laws of mathematics dictate even when faced with a 10-15% chance of failure, if there are enough of them – and in vMA there are – by accepting them you are more than tempting fate, you are enabling failure if your goal is Flawless. In fact, I would say the only time my guide is valid is if Flawless is your goal: I would most certainly not follow the many conservative strategies I outline if my goal was simply farming for a particular sharpened weapon (and even then, I’m not sure the laws of mathematics make that a worthwhile, let alone enjoyable, goal to pursue). So, understand that while this guide maximizes your odds for Flawless, it also will lengthen your run and lower your score (though I still got like 487,000 on a my templar, which isn’t bad for templars. Actually, it’s good for a templar with mediocre DPS that used power sigils!)
This is just a guide to how I did it. Use and tailor them as you see fit! They are meant for those folks who want Flawless and found it frustrating so far. I think the approach will work! It’s been a year since I have run this arena regularly. I have the “wrong” race. I use disposable potions that many people just vendor. I did not adjust a single champion point from my normal build. Nor did I change any morph. Did not change any gear. And my previous best score was like 370,000 or something. It took me three tries to get something I was quite frankly was not close to before. This arena has a reputation of being an RNGfest. I don’t think it is. I think most of the people who say that are lazy players who willfully accept at 10% chance for failure and comfort themselves by claiming that 10% is somehow not their fault, rather due to circumstances beyond their control. All this guide seeks to accomplish is to lower that 10% such that the laws of mathematics are now in favor of Flawless rather than against it.
My final observation would be this: it was sort of fun again to run vMA on a heavy armor build. There was a reason I stopped doing this content: I didn’t enjoy it. With my PvP build, I felt powerful and strong, felt like I was bullying the NPCs, felt like they couldn’t hurt me. It was … gratifying … in contrast to my previous experiences on a glass cannon build. Maybe variety is the spice of life and changing builds and approaches is the way to go rather than copying some perceived “best-in-slot” build or chasing some weapon you’re only hope to get is via RNG. I’ve done neither and Tamriel calls me “The Flawless Conqueror”
Good luck!
Make Rush of Agony "Monsters only." People should not be consecutively crowd controlled in a PvP setting. Period.
11
-
 timidobserver✭✭✭✭✭
✭✭✭✭I only skimmed, so if I may have missed it, but you'd might as well use all 4 of the buffs for each round if score is of no concern.V16 Uriel Stormblessed EP Magicka Templar(main)
V16 Derelict Vagabond EP Stamina DK
V16 Redacted Ep Stam Sorc
V16 Insolent EP Magicka Sorc(retired)
V16 Jed I Nyte EP Stamina NB(retired)0 -
 cjhhickman39✭✭✭✭Thank you for putting this information out I've been trying to prepare for a run at vma and all the guides seem to require high dps burn but this fits my pvp build and gives me hope that I will be able to complete1
 -
 eso_nya✭✭✭✭✭
✭This is awesome, ty for sharing!
I actually did stage 5 in a heavy spec and found it sooo much easier, didnt know u can do it in the other rounds aswell, i considered them pure dps-races.
What i found superhelpfull esp. on a templar: Swarm Mother, to pull the nasty archers right into your sweeps") 0
0 -
 GrigorijMalahevich✭✭✭✭✭Good build, thanks for sharing
If you run mist, it is better to use warlock - just saying...PC/EU 800 CP.
PvP MagSorc.Pedro Gonzales - Mag Sorc EP vMA Flawless Conqueror clear http://imgur.com/a/CB6j6
Valera Progib - Stam Sorc DC vMA Flawless Conqueror clear https://i.imgur.com/eYgpXG2.png
Valera Pozhar - Mag DK EP vMA Flawless Conqueror clear http://imgur.com/a/jrsuK
Valera Podlechi - Mag Templar AD vMA Flawless Conqueror clear http://imgur.com/a/N0BYq0 -
Joy_Division✭✭✭✭✭
✭✭✭✭✭This is awesome, ty for sharing!
I actually did stage 5 in a heavy spec and found it sooo much easier, didnt know u can do it in the other rounds aswell, i considered them pure dps-races.
What i found superhelpfull esp. on a templar: Swarm Mother, to pull the nasty archers right into your sweeps
Ohh, nice call with Swarm Mother
@Banana : I did vMA twice there... definitely more difficult and a fair amount of heavy attacking is absolutely necessary.Edited by Joy_Division on April 25, 2017 4:03AMMake Rush of Agony "Monsters only." People should not be consecutively crowd controlled in a PvP setting. Period.0 -
DHale✭✭✭✭✭
✭Thanks alot Joy, I am glad you can't drop oil on them as you would have finished VMA in about 20 minutes. I know first hand if there was an achievement for oil based kills you would have it. Whenever I go through a breech and die within an inch of entering the door it will be to your oils. Great work.Sorcerna, proud beta sorc. RIP April 2014 to May 31 2016 DArk Brotherhood. Out of retirement for negates and encases. Sorcerna will be going back into retirement to be my main crafter Fall 2018. Because an 8 k shield is f ing useless. Died because of baddies on the forum. Too much qq too little pew pew. 16 AD 2 DC. 0 EP cause they bad, CP 2300 plus 18 level 50 toons. NA, PC, Grey Host#SORCLIVESMATTER actually they don’t or they wouldn’t keep getting nerfed constantly.0 -
GrigorijMalahevich✭✭✭✭✭Any advice on what to use now that Harness doesn't work with HA anymore?
Play light armor? Go full damage ez pz PC/EU 800 CP.
PvP MagSorc.Pedro Gonzales - Mag Sorc EP vMA Flawless Conqueror clear http://imgur.com/a/CB6j6
Valera Progib - Stam Sorc DC vMA Flawless Conqueror clear https://i.imgur.com/eYgpXG2.png
Valera Pozhar - Mag DK EP vMA Flawless Conqueror clear http://imgur.com/a/jrsuK
Valera Podlechi - Mag Templar AD vMA Flawless Conqueror clear http://imgur.com/a/N0BYq0 -
Joy_Division✭✭✭✭✭
✭✭✭✭✭Any advice on what to use now that Harness doesn't work with HA anymore?
This approach made sense in Homestead patch when Heavy Armor was noticeably stronger than it is now.
While most of the strategies I used make sense for someone wanting to minimize the possibility of dying, I do not think the damage or resource management is there for heavy armor magicka users. So I haven't updated this guide.
I think the best approach for Flawless now for magicka users is to use light armor, allow for extra resource sustain than you'd otherwise would to allow for mistakes, take zero chances, and start grabbing power sigils once you get to Round 5.
Make Rush of Agony "Monsters only." People should not be consecutively crowd controlled in a PvP setting. Period.0

