Maintenance for the week of May 4:
• PC/Mac: No maintenance – May 4
• PC/Mac: No maintenance – May 4
Some tips for vet HM RoM?

Dantaria
✭✭✭✭✭
Ok, let me start with: **** this **** to the **** abyss and **** beyond. Phew. Sorry.
So me and my guildies finally went there for a dat awesome skin. After 4 hours we gave up. Considering that then, without HM, we simply breezed through it (and teabagged that **** for good measure), I think it's fair to assume that we are good with our roles. We just simply don't see something.
The problem are the guys with shields. The ones who cast Stones with huge dmg. Is there any way to prevent this from happening?
After first illusion one guy becomes Ghost (that's how we called the one who must kill the statue). If that alignes with this Stone aoe - the Ghost dies, no way out. The dmg from statue (which you ofc try to avoid by moving, but still) + Stones = certain death. Stones stun you, the statue does the rest. Then most probably wipe. If it's a healer - certain wipe.
You obviously can't kill them until the illusion phase (the illusions of previous bosses). We tried, they just respawn.
Also at some points we even had two of them at once o_O Wtf?
The Ghost thing, those guys and the totem is just too much. Is there any way to remove Stones from the picture? Or only git gut? And if only git gut, any tips about tactic?
English isn't my native, apologies for any mistakes.
0
Best Answer
-
 Magdalina✭✭✭✭✭
✭✭✭
Note that the 'ghost' phase _can_ be dodged. She throws amber plasm which turns on the ghost phase. I have successfully dodged this, but I don't know if she keeps throwing it until she hits someone.
It doesn't work (anymore). Idk if it works on normal but it certainly doesn't work on vet, hm or not.
Generally yes, you should focus stoneshapers. They get utimate priority. Watch out for when they spawn(which is on timer whereas amber shades are on health % so if you push her down fast enough she will not do ads til after the amber shade), have tank taunt and pull them in asap, then burn the hell out of them. If you can cc them, do that when you can, and just burn burn burn. Unlike Velidreth's fight, this one is a dps race. You HAVE to kill stoneshapers asap and you HAVE to kill totem asap.
I've speedran hm so it's entirely possible and even easy when you all know the mechanics and are on the same page about how to tackle them:) What server are you?
A few other tips - always stack. Like I don't mean stand within 1 m away and get caught by same aoe, move around but do stay close. Totem spawns near person furthest away from group. So you stack. Someone got statue? You all, together as one, go to the statue and stack. Totem dropped? You stack on it and burn the hell out of it(as already been mentioned, do try to alternate your groups' ultis - some for stoneshapers, some for totem). Ads spawned? Tank chains them in, you stack on them and burn the hell out of them too. Amber shades is probably the only part of the fight where it's fairly safe to spread out(and even better so with Chudan, never ever be in front of her unless you're the tank), it's also generally more or less "safe time" to recover your resources and build up ulti etc. Execute phase? You DEFINITELY stack.
As a healer it's insanely easier for me to heal when everyone is together because I just spam springs. They're so cheap I can spam them even with totem on me some, and I can outheal crazy damage like this. But if someone runs off, things begin to get messy.
It's a fight where you always gotta pay attention - you need to notice ads spawning, you need to see totem as soon as it spawns, you need to notice the statue as soon as it lights up and all run to it. It's easier on voicechat as you can call things out. I got my no death, along with speedran hm, without one though, but I still wipe there a lot with different teams, even with people whom I know are good.
It blows when your healer gets vision really, blows more that it's just dumb luck pretty much. You can get around it though. One way is to have a dk tank with 70k health and 13k group shields spam Another would be to ask one of the dps to slot off resto and offheal, though it would be a dps loss but Springs spam would likely help healer survive the statue. I generally try to use shield when I know vision is coming to someone but since it's just 6 seconds now it's not as useful. I imagine you could use Barrier but that'd be a dps loss so I'm not sure how viable it is, but perhaps somethiong to try(just for the vision stage if healer gets it).
It's insanely frustrating when it doesn't work but it's actually quite fun once you do find the right people and strat to just breeze through it") Good luck! Edited by Magdalina on April 1, 2017 8:40AM5
Good luck! Edited by Magdalina on April 1, 2017 8:40AM5
-
 pizzaow✭✭✭✭Here is a recent video of a group (not me) doing HM. What this group did was to memorize the spawn locations and prioritize the stone shaper (shield guy). They assign one person to stun the shaper and both DPS and healer concentrate on burning him down before he's able to fire off a stone attack (I can't tell, but they might also have 1 player save an ultimate for him).
Another strategy I've heard is to only have 1 player drop an ultimate on the totem. The healer keeps his as a backup, and the DPS always save ultimates for totems (and stone shapers?).
Note that the 'ghost' phase _can_ be dodged. She throws amber plasm which turns on the ghost phase. I have successfully dodged this, but I don't know if she keeps throwing it until she hits someone.
Also, this group will voluntarily pickup the pools of amber plasm... not sure what this does, but I'm sure there is a reason why they are doing it.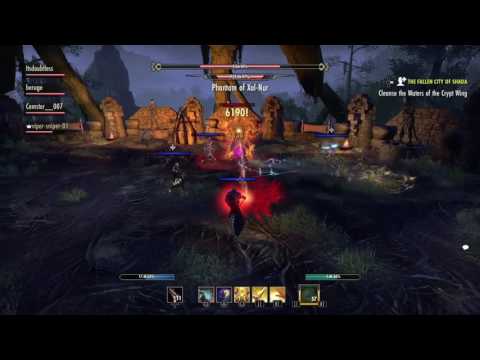 https://www.youtube.com/watch?v=qguSbn27r58
XBox/NA GT: Pizzaow0 -
 WarpigFunk✭✭✭If you can burn her down fast enough you can get the boss phases without adds... This is imho, the hardest dungeon fight in the game because theres some RNG involved with who gets statues - and if you get behind she starts stacking mechanics making it near impossible.
It's an ult. management fight. Make sure to never let the stone shapers get the orange goop - If you have a boss add up and no other adds - feel free to just light attack the boss in the cage to build ultimate before killing the boss add, and starting the next phase of the fight.
You want an ult for the totem and an ult for the stone shapers. If you have the boss tanked next to the totem you can ult both and burn her to the next hp benchmark before she summons adds (iirc it's 75/50/25) . But that gets tougher and tougher as the fight progresses. Can almost always do it for the first set of adds tho.PS4 [NA]
Hingle McKringleberry - Altmer MagSorc DD The Flawless Conquerer
Sek Sual Chocolate - Redguard StamSorc DD Stormproof
Doktor Feelgood - Breton Templar Healz Boethia's Scythe
Tiberius Asskickatron - Imperial DK StamTank Mageslayer
-VERIFIED-
-FFF-
vAAHM 100k+, vSOHM 100k+, vHRCHM 100k+, vMoL 78k, vDSA 36k, vMA 535k0 -
Dantaria✭✭✭✭✭@pizzaow, @WarpigFunk, huuuuuh. So that's how it works.
We kinda assumed that you can't deal with them and tried to s**k it up. And when we tried to kill them, 'cause we got fed up, it was in the middle of the phase. Then we just s**ked it up, managed to make it to illusions and only then focus on them first and furthermost.
We didn't actually try to burn them right in the beginning and focus on burning down the boss (rather then freaking survival). Thanks, guys! We'll try that!Edited by Dantaria on April 1, 2017 12:07AMEnglish isn't my native, apologies for any mistakes.0 -
WarpigFunk✭✭✭you can also lot skills that stun the shapers as well and keep them from getting their stupid rocks off - I slot streak on my sorc for this fight. I've seen people use Negate as well - but not sure if that works on them.
Tank's skill is pretty important for this fight too - you want to keep stuff grouped up so youre dpsing everything with your AoEs - if adds and boss and stuff start getting all spread out it's a much harder fight. Keep it grouped up - more damage on stuff- and easier to keep the shapers stunned etc ...PS4 [NA]
Hingle McKringleberry - Altmer MagSorc DD The Flawless Conquerer
Sek Sual Chocolate - Redguard StamSorc DD Stormproof
Doktor Feelgood - Breton Templar Healz Boethia's Scythe
Tiberius Asskickatron - Imperial DK StamTank Mageslayer
-VERIFIED-
-FFF-
vAAHM 100k+, vSOHM 100k+, vHRCHM 100k+, vMoL 78k, vDSA 36k, vMA 535k0 -
 Asardes✭✭✭✭✭
✭✭✭✭I have a lot of experience with VRoM HM, having completed it just two days after SotH release, and I've done it countless times since then, having farmed the whole book myself. I've noticed plenty of things over multiple runs.
It's important not to chain the Stoneshapers (big ones with shields) too early, before they begin their channel, because they gain CC immunity right after that for a few seconds, so you can't chain interrupt them again right away, when they actually start that channel. Range taunt them or run to them and taunt, then pull them with chains right when they start channeling. They always spawn at the same door, the right when looking from the entrance. It's useful to have all the adds chained together and taloned down so they can be burned together using AoE skills but there's a catch to that. If nobody picks the Amberplasm they will run to it, and they ignore CC doing so - I've seen Stoneshapers running to the puddle with talons on their legs. Once they get that they gain CC immunity which makes them immune to pull and interrupt and also seem to do much more damage. Also their resistance seems to increase because they take far less damage while empowered - you can notice the same effect earlier in the dungeon, if you trigger the Sludge Slingers and they empower one of the mobs. So you either have to kill them before they get to the puddle or one of the players have to take it - it's a DoT and heal debuff for you I think, but something manageable. Not picking up the Amberplasm grants you the achievement [Sticky Situation Savvy].
Also don't rush trough the miniboss phases. It's actually one of the easiest parts of the fights. Drag this on by heavy attacking the miniboss to load your ults, as you will need them when you have adds and totem present. I always advise people to only use the ults when they have a totem spawn or a big add pack ready. Never use an ult on the boss, because if DPS is too fast you will make her spawn all the mechanics at once: adds, totem, miniboss. I've seen instant wipes from having all of them on me. The totem sucked all my stamina so I couldn't even taunt the Xal-Nur ghost, he feared me and the stone shaper then one shotted me with a bash because I had no stamina left even to block; same with the other players. You will also have adds, a statue and probably a totem in the execute phase - when she makes the rotating rays on the ground. Don't rush it even here. It's usually the healer who gets the statue in this phase - dunno if it's scripted, or I just had bad luck - but everyone should have self heals and/or shields equipped. I usually run barrier here on my tank so I can cast it as soon as the healer gets the vision. Keep your ults only for the totem and the big adds, and I can't overemphasize this - I've seen groups wipe with 1% on the boss 20 times in a row because they rushed and ignored the mechanics. If group DPS is very high (I'd say over 80K overall it's the minimum) you can also take the risky road, cast barrier and simply nuke the boss for the last 10% or so even with totem and adds on. But I wouldn't do that especially if you haven't done HM before.
As a further note DK is not the only class which can tank this fight. I've done it on full magicka sorcerer tank - 41.5K magicka, just 22.5K health and 13.6K stamina. I couldn't chain the stone shapers, but crystal fragments hits and knocks them down as well - I was spamming hardened ward so crystal was ready for insta-cast most of the time. Not sure what other classes can use, but probably volcanic rune from Mages Guild skill line will work, and knock down multiple enemies if they are in range. To reflect Chudan's spit you can use the 1H+S ultimate morph Spell Wall, both in the live and the ghost forms. DKs of course can do the same using only the wings.Beta tester since February 2014, played ESO-TU October 2015 - August 2022, currently on an extended break
vMA (The Flawless Conqueror) | vVH (Spirit Slayer & of the Undying Song) | vDSA | vAA HM | vHRC HM | vSO HM | vMoL | vAS+1 | Emperor
PC-EU CP 3000+
41,000+ Achievement Points before High IsleMember of:
Pact Veteran Trade: Exemplary
Traders of the Covenant: God of Sales
Tamriels Emporium: God of Sales
Valinor Overflow: Trader
The Traveling Merchant: Silver
Characters:
Asardes | 50 Nord Dragonknight | EP AR 50 | Master Crafter: all traits & recipes, all styles released before High Isle
Alxaril Nelcarion | 50 High Elf Sorcerer | AD AR 20 |
Dro'Bear Three-paws | 50 Khajiit Nightblade | AD AR 20 |
Veronique Nicole | 50 Breton Templar | DC AR 20 |
Sabina Flavia Cosades | 50 Imperial Warden | EP AR 20 |
Ervesa Neloren | 50 Dark Elf Dragonknight | EP AR 20 |
Fendar Khodwin | 50 Redguard Sorcerer | DC AR 20 |
Surilanwe of Lillandril | 50 High Elf Nightblade | AD AR 20 |
Joleen the Swift | 50 Redguard Templar | DC AR 20 |
Draynor Telvanni | 50 Dark Elf Warden | EP AR 20 |
Claudius Tharn | 50 Necromancer | DC AR 20 |
Nazura-la the Bonedancer | 50 Necromancer | AD AR 20 |
Tharkul gro-Shug | 50 Orc Dragonknight | DC AR 4 |
Ushruka gra-Lhurgash | 50 Orc Sorcerer | AD AR 4 |
Cienwen ferch Llywelyn | 50 Breton Nightblade | DC AR 4 |
Plays-with-Sunray | 50 Argonian Templar | EP AR 4 |
Milariel | 50 Wood Elf Warden | AD AR 4 |
Scheei-Jul | 50 Necromancer | EP AR 4 |
PC-NA CP 1800+
30,000+ Achievement Points before High IsleMember of:
Savage Blade: Majestic Machette
Characters:
Asardes the Exile | 50 Nord Dragonknight | EP AR 30 |0