The Night Market - Oddities/Puzzle Guide Solo - Text & Video

rhythmsuji
✭✭✭✭
 https://www.youtube.com/watch?v=yjg80kEebrk&t=338s
This guide covers how to solve the Elder Scrolls Online (ESO) Night Market puzzles (Oddities), which are solo-able and also reward Favor.
I cleaned up the details in the text guide as well as I could, but ofc if you see the video. For this type of content, there is quite a bit more benefit or the ability to copy the pathing for those who want to do so and if their puzzle matches.
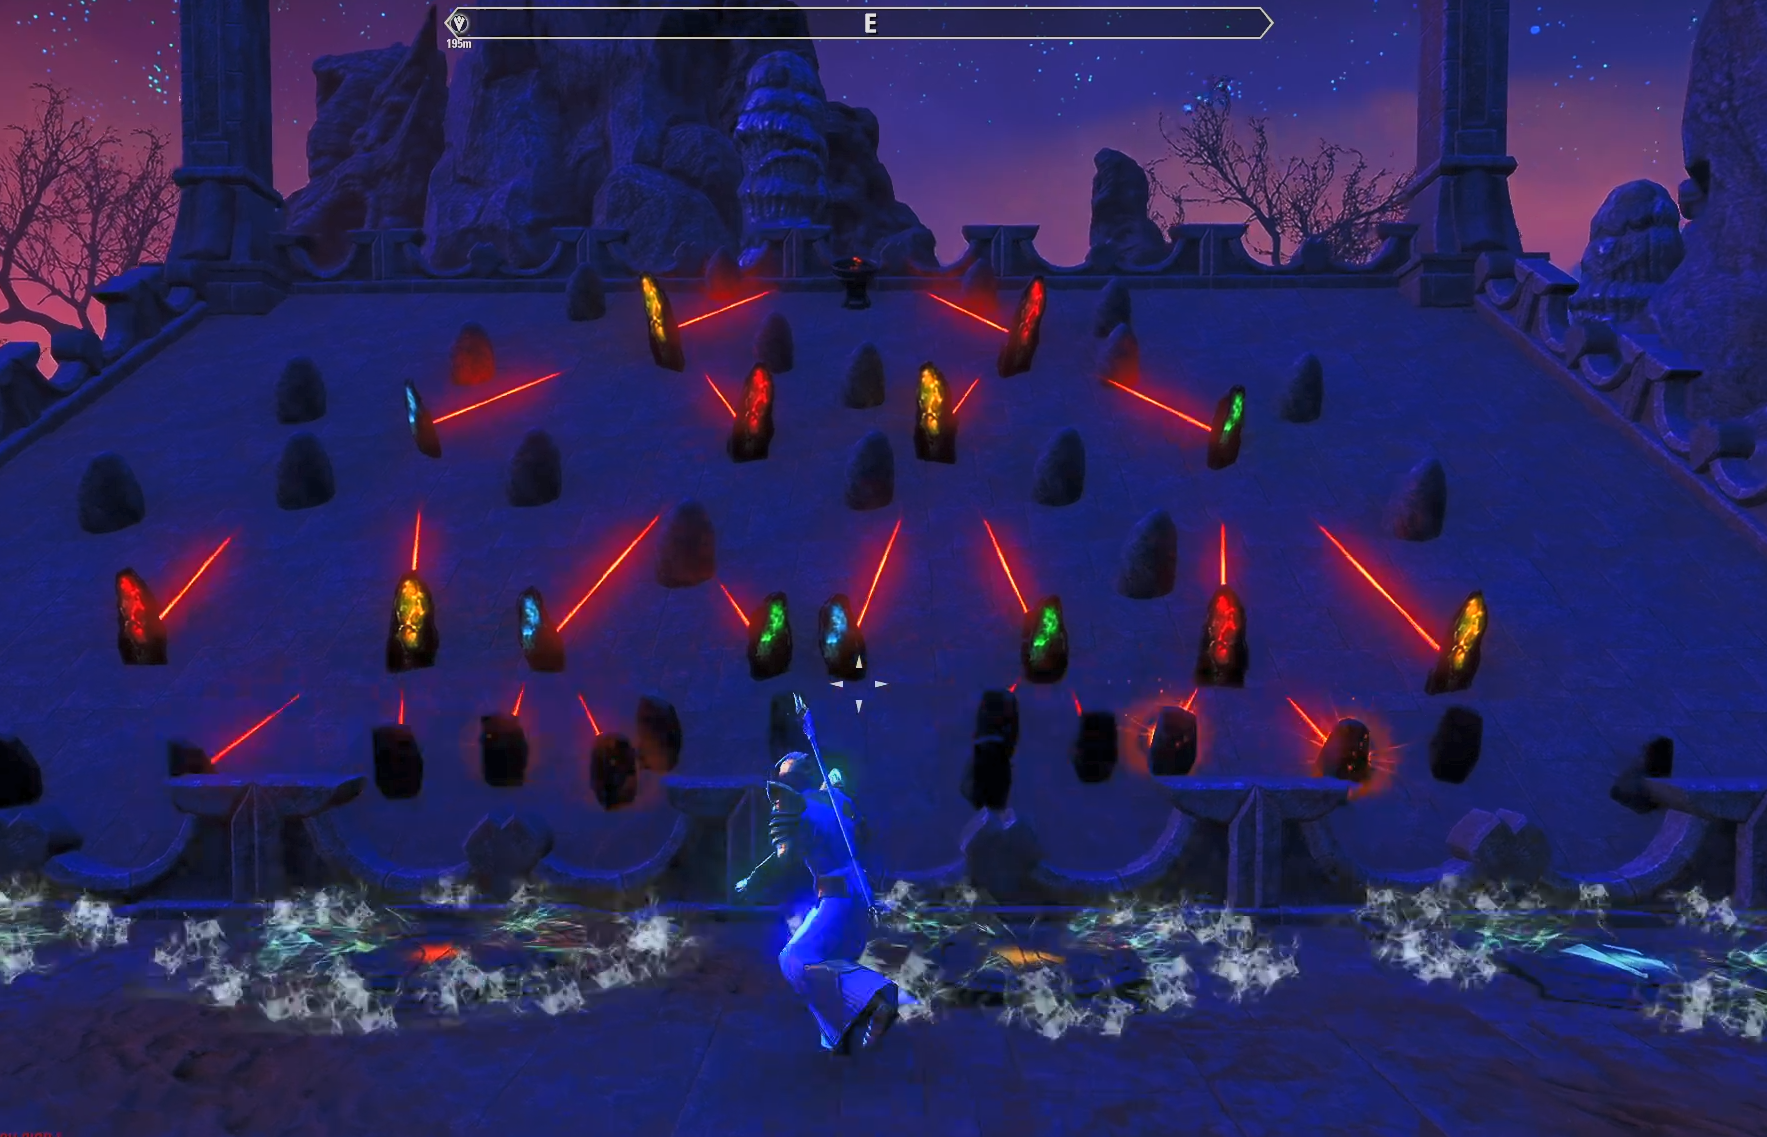
1. Guiding Light Puzzles
Instead of following the laser path from the start, work backwards from the brazier.
The Strategy: The two panels closest to the brazier must be set first. Once they are facing the brazier, they are "locked in."
Simplify: By locking these two, you ignore those colors for the rest of the puzzle. Then, focus on the middle panels and adjust them so they feed into the previously set panels. So when red and yellow
Consistency: This reverse engineering method works for every Guiding Light puzzle location in the zone.
2. Boulder Dash Puzzles
These puzzles require precision with the timing of walls and floor panels, but there is a decent and forgivable timer of a few seconds as you can see in my video.
The Goal: Navigate the boulder into the golden door.
Timing: If you activate a wall too early or late, it will fail to bounce the boulder in the correct direction. Boulders also activate floor plates, not just players. So you need to account for the pathing and timing of boulders hitting said panels. This can be beneficial, but usually it will ruin your planned pathing.
Adaptability: While paths might change, the core logic is to watch the trajectory and manually trigger the required directional panels (typically following a sequence like Red, Green, Yellow) to guide the rock home.
3. Arachnid Invasion
This acts as a "tower defense" mini-game.
Solo vs. Duo: While solo-able, the I highly recommend bringing a partner or multiple to manage the spiders effectively.
Mechanics: Do not spam the attack button, or you will burn out your "pump" defense. If your pump has web on it, overheating the pump can sometimes be beneficial as it will burn off the webbing it accumulated so far.
Strategy: Pace your attacks. Burn spiders when they are about two "blocks" away from your pump. If spiders get within a one "block" radius, they will deal damage to the pump. The goal is to clear the spiders before they destroy your defense wall. (Using "block" as an invisible distance metric. To describe how much distance the spiders travel per singular movement typically.)
General Tips for Accessibility
Navigating Mobs: If you struggle to reach the puzzle locations due to enemy mobs and do not want to use invisibility potions and spells, you can allow yourself to die near the destination, resurrect on a nearby platform, and use the brief invulnerability timer granted after resurrection to dash directly to the puzzle interaction point.
As a additional tip/request, I was asked to add into my text guide (after the video was made)
Please refrain from engaging with the Oddities mechanics if other players are already handling it. Unless absolutely certain help is needed and someone is not controlling the part you engage with, and you are confident.
There have been reports of intentional or accidental sabotaging of Oddity clears. *Stares at Bob* ;D
-ESO Feanor
32
-
 Xenagreen53✭✭✭This is very very needed! So many of these puzzles get failed constantly and god damn I am struggling with them. I will use this to practice!
 5
5 -
 Ilumia✭✭✭✭✭Sweet, I don't have much playtime, and I was looking for an explanation or video to post to people when I group up and they ask how a thing works. Now I can just copy this every time someone asks. Thank you
") 1
1 -
 emilyhyoyeon✭✭✭✭✭
✭✭✭✭Am I missing something? I've tried the guiding lights strategy 4 times now, and it only worked once. The time it worked, I don't know why; I did the same approach every time.
The same issue happens every time it failed: despite the top two colors closest to the brazier being ''set'' as in aimed at the middle brazier, changing the remaining two colors did not work. The lower colors of the first two were not aimed correctly, despite the top two being so.
an example of what it looks like:
Here, I first aimed red to the brazier. Then I aimed yellow to the brazier. Then I aimed the rightmost green to the topmost red. Then I aimed the leftmost blue to the topmost yellow.
EDIT: I ended up completing all of them, with probably a 30-40% success rate with this strategy. I just kept doing it until it worked. I'm still not sure what I was doing wrong on failed attempts.
Edited by emilyhyoyeon on 4 May 2026 18:55IGN @ emilypumpkin
Tullanisse Starborne altmer spellsword battlemage & scholar of the ayleids
Qa'Rirra khajiit assassin & dancer
Seliwequen Narilata altmer necromancer & debaucher3 -
 AScarlato✭✭✭✭✭
✭✭✭Thank you! I can't get anyone to do puzzles dailies and I will be watching this for that sweet 75 Favor!1 -
 ESO_player123✭✭✭✭✭
✭✭✭emilyhyoyeon wrote: »Am I missing something? I've tried the guiding lights strategy 4 times now, and it only worked once. The time it worked, I don't know why; I did the same approach every time.
The same issue happens every time it failed: despite the top two colors closest to the brazier being ''set'' as in aimed at the middle brazier, changing the remaining two colors did not work. The lower colors of the first two were not aimed correctly, despite the top two being so.
an example of what it looks like:
Here, I first aimed red to the brazier. Then I aimed yellow to the brazier. Then I aimed the rightmost green to the topmost red. Then I aimed the leftmost blue to the topmost yellow.
EDIT: I ended up completing all of them, with probably a 30-40% success rate with this strategy. I just kept doing it until it worked. I'm still not sure what I was doing wrong on failed attempts.
I also start at the top as was suggested, but when I aim the topmost red and yellow at the brazier there are other red\yellow ones that point in wrong directions. So, how do I manage those? I tried to use red/yellow pads again, but they affect all the red/yellow once include\ing the ones at the top (messing up the top).Edited by ESO_player123 on 4 May 2026 19:400 -
rhythmsuji✭✭✭✭ESO_player123 wrote: »emilyhyoyeon wrote: »Am I missing something? I've tried the guiding lights strategy 4 times now, and it only worked once. The time it worked, I don't know why; I did the same approach every time.
The same issue happens every time it failed: despite the top two colors closest to the brazier being ''set'' as in aimed at the middle brazier, changing the remaining two colors did not work. The lower colors of the first two were not aimed correctly, despite the top two being so.
an example of what it looks like:
Here, I first aimed red to the brazier. Then I aimed yellow to the brazier. Then I aimed the rightmost green to the topmost red. Then I aimed the leftmost blue to the topmost yellow.
EDIT: I ended up completing all of them, with probably a 30-40% success rate with this strategy. I just kept doing it until it worked. I'm still not sure what I was doing wrong on failed attempts.
I also start at the top as was suggested, but when I aim the topmost red and yellow at the brazier there are other red\yellow ones that point in wrong directions. So, how do I manage those? I tried to use red/yellow pads again, but they affect all the red/yellow once include\ing the ones at the top (messing up the top).
No problem at all! Just to clarify, not all panels will align. As you will see in my video there are many which kinda shoot off into nothingness or into a blank rock.
But for your example image, green needed to be turned to the furthest most left position, or blue needed to be turned one to the right? It's a little hard to tell when the beams are fully lit up. But your red and yellow are 100% in the right spot and can be ignored. Once you get one side working, you can try to set it exactly the same with those colors first. SO for you that would have been Yellow, red, green. And then ONLY mess with a different position on blue, because you already tried 1 way. That means you have a 50/50 chance that one of the other two ways will secure you the win.
The only exception is if the green panel is needed in a different position to secure both left and right beams. But in my experience, ive been able to leave the 3 successful ones be and finagle with the 4th one whether its green or blue depending on the puzzle.0 -
rhythmsuji✭✭✭✭ESO_player123 wrote: »emilyhyoyeon wrote: »Am I missing something? I've tried the guiding lights strategy 4 times now, and it only worked once. The time it worked, I don't know why; I did the same approach every time.
The same issue happens every time it failed: despite the top two colors closest to the brazier being ''set'' as in aimed at the middle brazier, changing the remaining two colors did not work. The lower colors of the first two were not aimed correctly, despite the top two being so.
an example of what it looks like:
Here, I first aimed red to the brazier. Then I aimed yellow to the brazier. Then I aimed the rightmost green to the topmost red. Then I aimed the leftmost blue to the topmost yellow.
EDIT: I ended up completing all of them, with probably a 30-40% success rate with this strategy. I just kept doing it until it worked. I'm still not sure what I was doing wrong on failed attempts.
I also start at the top as was suggested, but when I aim the topmost red and yellow at the brazier there are other red\yellow ones that point in wrong directions. So, how do I manage those? I tried to use red/yellow pads again, but they affect all the red/yellow once include\ing the ones at the top (messing up the top).
Also, if you are able to take a video of an attempt. I can definitely tell you what was wrong and how to plan for it on a future attempt, just slightly harder to perfectly make heads or tails of the situation from that still. 0 -
rhythmsuji✭✭✭✭Thank you! I can't get anyone to do puzzles dailies and I will be watching this for that sweet 75 Favor!
No problem at all! Happy to help, and yeah there are niche groups to find and tag along with.
I have actually grouped a couple times with CosyPeets who is an AUS twitch streamer, and her group will essentially run whatever and help out. 0 -
rhythmsuji✭✭✭✭Sweet, I don't have much playtime, and I was looking for an explanation or video to post to people when I group up and they ask how a thing works. Now I can just copy this every time someone asks. Thank you
Perfect! No problem at all, thanks for reading/watching and the feedback!0 -
rhythmsuji✭✭✭✭emilyhyoyeon wrote: »Am I missing something? I've tried the guiding lights strategy 4 times now, and it only worked once. The time it worked, I don't know why; I did the same approach every time.
The same issue happens every time it failed: despite the top two colors closest to the brazier being ''set'' as in aimed at the middle brazier, changing the remaining two colors did not work. The lower colors of the first two were not aimed correctly, despite the top two being so.
an example of what it looks like:
Here, I first aimed red to the brazier. Then I aimed yellow to the brazier. Then I aimed the rightmost green to the topmost red. Then I aimed the leftmost blue to the topmost yellow.
EDIT: I ended up completing all of them, with probably a 30-40% success rate with this strategy. I just kept doing it until it worked. I'm still not sure what I was doing wrong on failed attempts.
Oh whoops! I realized I was responding to the other commenter but this was your image.
Well a slight addition per your question, is that I think you nearly had it there and you are likely off on those failed runs by just 1-2 button presses. It seems as though the green needed to be far left from what I am seeing? Because the center could be activated by the lower right green, and then the left side would be activated by the middle green? I think that would have worked there.
Keep at it and I swear you will have a near 100% success rate. I know you said you got the achieve, but the puzzles are good for the buffs and bonus favor while passing by. But you will start to get the feel for where you need those pesky green/blue panels. Sometimes the shapes are not intuitive and it does not give you much time per round. So if one setup doesn't work, then just flip 1 of the most "off" colors on the next attempt but put the other 3 exactly as you had them, and it should work out most of the time. 0 -
emilyhyoyeon✭✭✭✭✭
✭✭✭✭rhythmsuji wrote: »ESO_player123 wrote: »emilyhyoyeon wrote: »Am I missing something? I've tried the guiding lights strategy 4 times now, and it only worked once. The time it worked, I don't know why; I did the same approach every time.
The same issue happens every time it failed: despite the top two colors closest to the brazier being ''set'' as in aimed at the middle brazier, changing the remaining two colors did not work. The lower colors of the first two were not aimed correctly, despite the top two being so.
an example of what it looks like:
Here, I first aimed red to the brazier. Then I aimed yellow to the brazier. Then I aimed the rightmost green to the topmost red. Then I aimed the leftmost blue to the topmost yellow.
EDIT: I ended up completing all of them, with probably a 30-40% success rate with this strategy. I just kept doing it until it worked. I'm still not sure what I was doing wrong on failed attempts.
I also start at the top as was suggested, but when I aim the topmost red and yellow at the brazier there are other red\yellow ones that point in wrong directions. So, how do I manage those? I tried to use red/yellow pads again, but they affect all the red/yellow once include\ing the ones at the top (messing up the top).
But for your example image, green needed to be turned to the furthest most left position, or blue needed to be turned one to the right? It's a little hard to tell when the beams are fully lit up. But your red and yellow are 100% in the right spot and can be ignored.
The green was set to the leftmost thoughIGN @ emilypumpkin
Tullanisse Starborne altmer spellsword battlemage & scholar of the ayleids
Qa'Rirra khajiit assassin & dancer
Seliwequen Narilata altmer necromancer & debaucher0 -
rhythmsuji✭✭✭✭Xenagreen53 wrote: »This is very very needed! So many of these puzzles get failed constantly and god damn I am struggling with them. I will use this to practice!
Thanks mom! LOL And yeah this should help when im not on and you are with a group who does no know. ^.^ 0 -
rhythmsuji✭✭✭✭emilyhyoyeon wrote: »rhythmsuji wrote: »ESO_player123 wrote: »emilyhyoyeon wrote: »Am I missing something? I've tried the guiding lights strategy 4 times now, and it only worked once. The time it worked, I don't know why; I did the same approach every time.
The same issue happens every time it failed: despite the top two colors closest to the brazier being ''set'' as in aimed at the middle brazier, changing the remaining two colors did not work. The lower colors of the first two were not aimed correctly, despite the top two being so.
an example of what it looks like:
Here, I first aimed red to the brazier. Then I aimed yellow to the brazier. Then I aimed the rightmost green to the topmost red. Then I aimed the leftmost blue to the topmost yellow.
EDIT: I ended up completing all of them, with probably a 30-40% success rate with this strategy. I just kept doing it until it worked. I'm still not sure what I was doing wrong on failed attempts.
I also start at the top as was suggested, but when I aim the topmost red and yellow at the brazier there are other red\yellow ones that point in wrong directions. So, how do I manage those? I tried to use red/yellow pads again, but they affect all the red/yellow once include\ing the ones at the top (messing up the top).
But for your example image, green needed to be turned to the furthest most left position, or blue needed to be turned one to the right? It's a little hard to tell when the beams are fully lit up. But your red and yellow are 100% in the right spot and can be ignored.
The green was set to the leftmost though
You know what? This is fully on me! I definitely communicated that poorly, and I see why it's confusing.
When you shift a color, they don't all go one direction. So I meant the lower panel being furthest left, but I do see that like the top right one is as far left as it can go.
It's one of those runs where that right side green seems to be the solution, BUT if it gets sacrificed. 2 of the other greens in the center will feed the left and right. Brazier beams
I am pretty sure
Now, these puzzles do randomize each time you go. So it will likely not be exactly the same combination, but this is one more example closer to being ready for any of them combinations.
I should have added that factor in about one button press changing different directions for each panel thats my bad!1 -
rhythmsuji✭✭✭✭@emilyhyoyeon I went and ran another one right now, to grab a couple of images and explain the before & after and hopefully do a better job at helping you.
Okay, so in this image you can see that it was a pretty strong and partially fortunate run. There are many paths to success
On the lower right - the power stones are feeding red, which will hit green, which is aimed at the final red.
Middle right - Green is being activated by the power stones and will hit yellow, which also hits the final red.
2 different ways my right side beam will be activated.
Middle bottom left - Blue is being activated and will hit red which then feeds into the final yellow.
Middle bottom left - Yellow being activated and will hit blue which hits the final yellow.
2 different ways my left side will also be activated.
This combo was kinda crazy, and even made a pretty neat symmetrical shape. But the process still works, even if usually you will end up with only 1 successful beam path per side.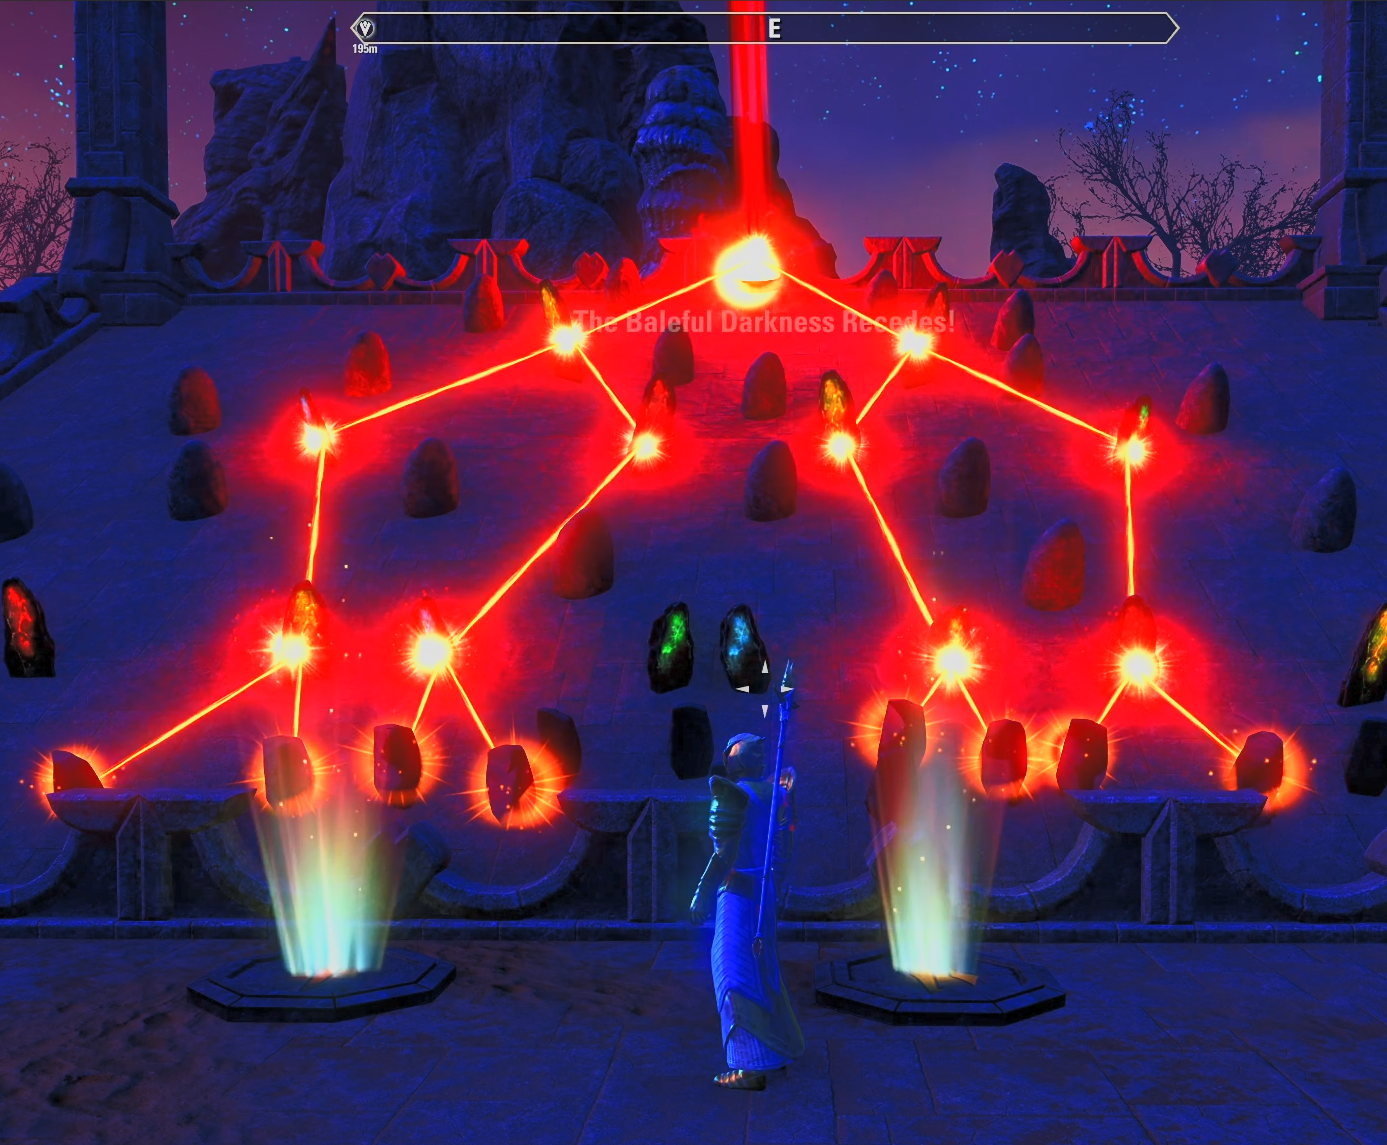
0 -
emilyhyoyeon✭✭✭✭✭
✭✭✭✭rhythmsuji wrote: »@emilyhyoyeon I went and ran another one right now, to grab a couple of images and explain the before & after and hopefully do a better job at helping you.
I'm confused about the strategy of first aiming the top two and then only worrying about the other two colors. That is what you're saying to do in the OP right?IGN @ emilypumpkin
Tullanisse Starborne altmer spellsword battlemage & scholar of the ayleids
Qa'Rirra khajiit assassin & dancer
Seliwequen Narilata altmer necromancer & debaucher0 -
rhythmsuji✭✭✭✭emilyhyoyeon wrote: »rhythmsuji wrote: »@emilyhyoyeon I went and ran another one right now, to grab a couple of images and explain the before & after and hopefully do a better job at helping you.
I'm confused about the strategy of first aiming the top two and then only worrying about the other two colors. That is what you're saying to do in the OP right?
Correct. Once you aim the top two at the Brazier, you can ignore them fully. Every round I start with that first, I aim them at the center immediately and as fast as I can. So I can focus on the two which are not guaranteed.
Sorry had to go back to work after my lunch ended, so it took me a bit to answer.
Edited by rhythmsuji on 5 May 2026 01:291 -
rhythmsuji✭✭✭✭spartaxoxo wrote: »Thank you! Got my puzzle lord now thanks to this
YUS! Another success! No problem & thanks for watching 0 -
emilyhyoyeon✭✭✭✭✭
✭✭✭✭rhythmsuji wrote: »emilyhyoyeon wrote: »rhythmsuji wrote: »@emilyhyoyeon I went and ran another one right now, to grab a couple of images and explain the before & after and hopefully do a better job at helping you.
I'm confused about the strategy of first aiming the top two and then only worrying about the other two colors. That is what you're saying to do in the OP right?
Correct. Once you aim the top two at the Brazier, you can ignore them fully. Every round I start with that first, I aim them at the center immediately and as fast as I can. So I can focus on the two which are not guaranteed.
Right, and what happens with me is that after aiming the first two, aiming the second two colors isn't enough sometimes.
Like with this scenario: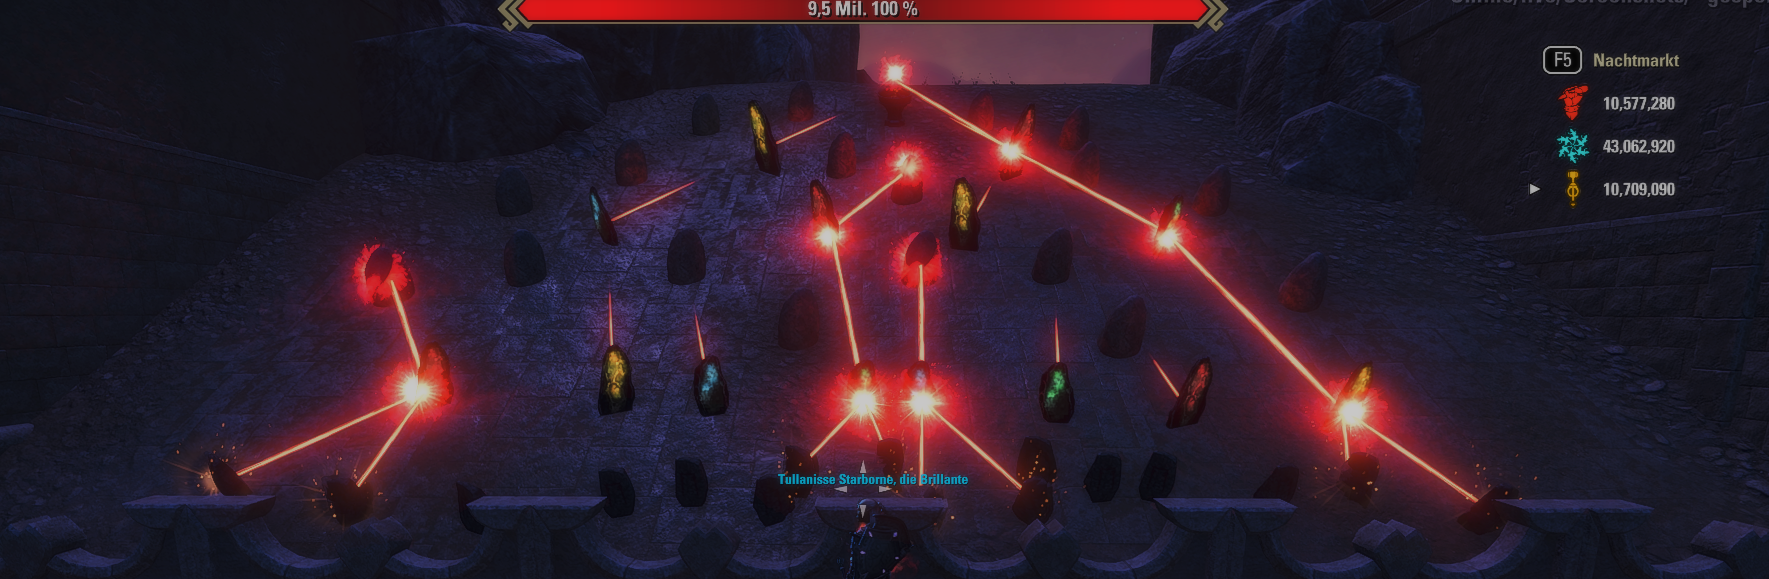
How do I get the top yellow side to light up? Red is set; I couldn't aim it any other way and also keep it aimed at the brazier. Same with the top right green one.
Yellow also must be set, since it's the top on and must be pointed at the brazier too, which it is.
So how does the blue need to be changed here?
The higher left side blue is pointed at the yellow; both other directions pointed it at nothing. The lower left side blue also can't reach anything.
What I did exactly:
I pointed both the top yellow and top red towards the middle brazier; neither were facing it at the start.
So both top yellow and top red are ''locked in.''
Then I aimed the top right green to the red to make the successful connection.
Then I could not find a solution for the left side with the remaining blue.
Edited by emilyhyoyeon on 5 May 2026 11:12IGN @ emilypumpkin
Tullanisse Starborne altmer spellsword battlemage & scholar of the ayleids
Qa'Rirra khajiit assassin & dancer
Seliwequen Narilata altmer necromancer & debaucher0 -
 o_Primate_o✭✭✭✭boulder dash is easy solo. light show you got to be fast, i kept running out of time(?) - if i had to do a fourth pad it would reset.Xbox NA as o Primate o0
 -
rhythmsuji✭✭✭✭emilyhyoyeon wrote: »rhythmsuji wrote: »emilyhyoyeon wrote: »rhythmsuji wrote: »@emilyhyoyeon I went and ran another one right now, to grab a couple of images and explain the before & after and hopefully do a better job at helping you.
I'm confused about the strategy of first aiming the top two and then only worrying about the other two colors. That is what you're saying to do in the OP right?
Correct. Once you aim the top two at the Brazier, you can ignore them fully. Every round I start with that first, I aim them at the center immediately and as fast as I can. So I can focus on the two which are not guaranteed.
Right, and what happens with me is that after aiming the first two, aiming the second two colors isn't enough sometimes.
Like with this scenario:
How do I get the top yellow side to light up? Red is set; I couldn't aim it any other way and also keep it aimed at the brazier. Same with the top right green one.
Yellow also must be set, since it's the top on and must be pointed at the brazier too, which it is.
So how does the blue need to be changed here?
The higher left side blue is pointed at the yellow; both other directions pointed it at nothing. The lower left side blue also can't reach anything.
What I did exactly:
I pointed both the top yellow and top red towards the middle brazier; neither were facing it at the start.
So both top yellow and top red are ''locked in.''
Then I aimed the top right green to the red to make the successful connection.
Then I could not find a solution for the left side with the remaining blue.
Yeah it's interesting. Since the puzzles change each time, it is hard for me to know exactly what I would do if there.
The directions the panels face and how they rotate on a press is different, so I would need to press the green and blue to discern what the options were. But I am guessing the right side would need to be scrapped for a different solution. Would probably end up going up the middle right line instead of far right, and then one of the colors would be repurposed on the left.
I will say, that one does seem more difficult than many of the others at minimum. I was looking at it like "can it be unsolvable sometimes?" haha. Which isn't impossible, maybe it can spawn bad. But I have not had conclusive evidence of that yet, I might test it more to see if that can happen on rare occasion.1 -
rhythmsuji✭✭✭✭o_Primate_o wrote: »boulder dash is easy solo. light show you got to be fast, i kept running out of time(?) - if i had to do a fourth pad it would reset.
Yeah it definitely takes some getting used to on the pace/timing. Especially because those pesky red and yellow panels reset each go of it lol.
I just stand on the red or yellow and get ready to immediately fix whichever one goes wonky (or both if unlucky) and then rush to the sides.0 -
rhythmsuji✭✭✭✭For anyone who arrives here now. I have posted a follow-up guide for the Night Market Daring races, but also 7 MORE tips for these Puzzles as well. Edited by rhythmsuji on 6 May 2026 08:003
-
 Thanks for the guide. I know I can only do guiding light solo, maybe 30% of the time. The others are too difficult to even attempt solo. Thanks for the daring races guide which I'm about to watch now, I can do the Sorrow's Friend one but haven't tried the others yet.
One question, how did you get the dancing nereid on a plinth in your house? I don't think there is a nereid houseguest or target dummy and the only nereid furnishing I can find is just a statue?Edited by ElderDuck on 6 May 2026 13:002 -
 Eporem✭✭✭✭This guide I think should be added to the Community Guides - Night Market Event Zone - though not sure how to do this...
https://forums.elderscrollsonline.com/en/discussion/692476/official-discussion-thread-for-community-guides-night-market-event-zone
maybe through this way..@ZOS-Kevin Edit: never mind this - I saw these added and others when reading through them a bit simply by commenting on the discussion instead of what I thought to have to go through instagram or facebook...
Edited by Eporem on 6 May 2026 19:021 -
 redlink1979✭✭✭✭✭
✭✭✭Thanks for sharing"Sweet Mother, sweet Mother, send your child unto me, for the sins of the unworthy must be baptized in blood and fear"- Sons of the Night Mother | VforVendetta | Grownups Gaming EU | English Elders [PS][EU] 2500 CP
- Daggerfall's Mightiest | Eternal Champions | Legacy | Tamriel Melting Pot [PS][NA] 2300 CP
- SweetTrolls | Spring Rose | Daggerfall Royal Legion | Tinnitus Delux [PC][EU] 2525 CP
- Bacon Rats | Silverlight Brotherhood | Canis Root Tea Party | Vincula Doloris [PC][NA] 2300 CP
1 -
rhythmsuji✭✭✭✭Thanks for the guide. I know I can only do guiding light solo, maybe 30% of the time. The others are too difficult to even attempt solo. Thanks for the daring races guide which I'm about to watch now, I can do the Sorrow's Friend one but haven't tried the others yet.
One question, how did you get the dancing nereid on a plinth in your house? I don't think there is a nereid houseguest or target dummy and the only nereid furnishing I can find is just a statue?
No problem ElderDuck!! Thanks you as well
And I was confused at first but I understood what you meant, in the video behind me. That's actually out in the open if you head up toward the Goad area.
I WISH we could have her in a house, I would 100% be buying her lol.
I used one of my multiple sitting emotes, so it probably looked like placed furniture. 0

